

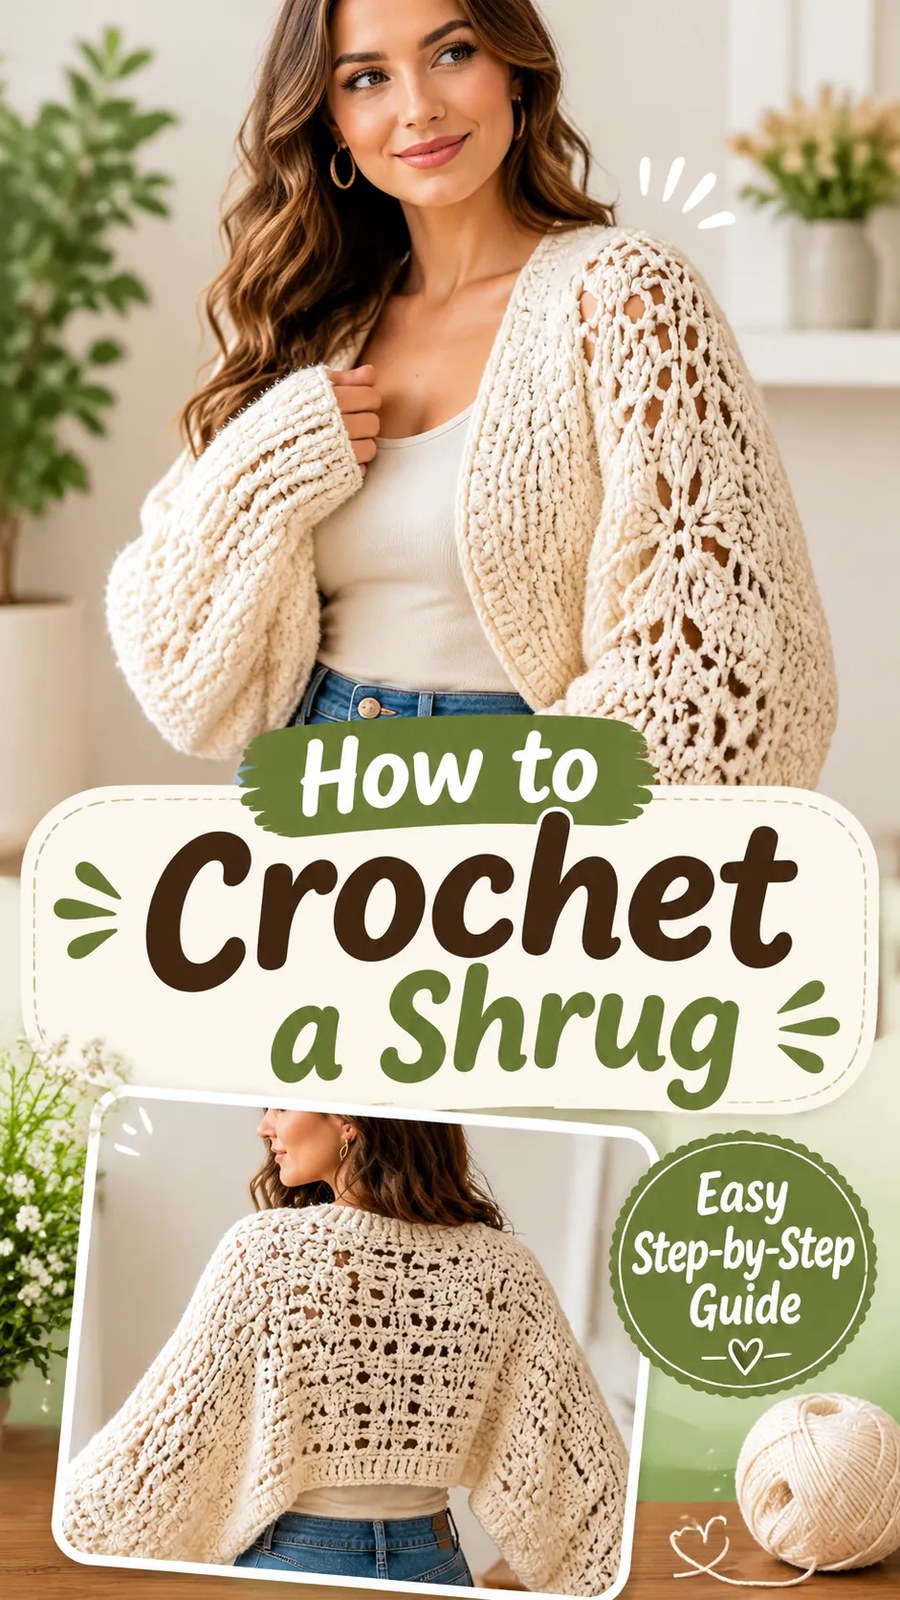
Create a cozy, beautifully textured layer with this crochet shrug pattern, featuring oversized balloon sleeves, an airy openwork design, and a relaxed cropped silhouette. This handmade shrug combines chunky crochet stitches with delicate lace-inspired details, creating a lovely balance between warmth and breathability.
Designed as a versatile layering piece, this crochet shrug looks beautiful over a fitted tank top, simple dress, or everyday outfit. Its soft ivory color gives it a timeless bohemian feel, while the loose sleeves and open front make it comfortable and easy to style throughout the year.
This original pattern uses a combination of half double crochet, back-loop stitches, and simple chain-space mesh to create a similar textured appearance. The construction is approachable for adventurous beginners who understand basic crochet stitches and want to try making their first wearable garment.
Key Takeaways
- Project: An oversized, open-front crochet shrug with balloon sleeves.
- Skill level: Advanced beginner to intermediate.
- Construction: Three body panels and two separately crocheted sleeves.
- Texture: Half double crochet, back-loop crochet, and open mesh stitches.
- Yarn: Soft bulky-weight yarn in cream, ivory, or another neutral shade.
- Customization: Adjustable body width, sleeve length, and overall fit.
A Cozy Crochet Shrug with Beautiful Openwork Texture
This crochet shrug is a relaxed, cropped garment designed to sit comfortably around the shoulders and upper body. It features an open front without buttons or a zipper, making it an easy layering piece that can be worn casually or dressed up.
The most noticeable detail is the contrast between the denser crochet fabric and the open lace-like sections. The back features a grid-inspired arrangement of stitches and spaces, while the sleeves have a soft, voluminous appearance created by their gradual increase in circumference.
The front edges are designed to fall naturally on either side of the body. A simple textured edging gives the garment a clean finish without making it feel too structured.
What Makes This Crochet Shrug Special?
- Oversized sleeves: The roomy sleeves provide a relaxed, comfortable silhouette.
- Openwork details: Chain spaces and double crochet stitches create a lightweight lace effect.
- Textured fabric: Back-loop half double crochet produces raised horizontal ridges.
- Open-front design: No complicated closures are needed.
- Neutral color palette: Ivory and cream yarn highlight the stitch definition and make the garment easy to coordinate.
The finished garment is particularly suitable for transitional weather. It can be worn over lightweight tops during spring and fall or used as a decorative extra layer indoors during cooler months.
Crochet Construction and Stitch Details
For this original crochet shrug pattern, the construction uses three rectangular body panels and two shaped sleeve tubes. The back panel forms the central section, while two smaller front panels create the open-front silhouette.
The body panels are crocheted flat in rows. They alternate between textured half double crochet rows and simple mesh rows. The panels are then joined at the shoulders and sides, leaving openings for the sleeves.
Each sleeve is worked separately in joined rounds, beginning at the cuff and gradually increasing toward the upper arm. This creates a loose balloon shape while maintaining a more fitted wrist opening.
The Main Crochet Stitches
Half Double Crochet
Half double crochet creates a compact but flexible fabric. It is used throughout the body to provide enough structure for a wearable garment.
Back-Loop Half Double Crochet
Working half double crochet through the back loop only leaves the front loop visible on the fabric surface. This creates attractive horizontal ridges that add dimension and texture.
Open Mesh Stitch
The mesh section is created by alternating chain stitches, skipped stitches, and double crochet. The resulting spaces form a simple openwork pattern that gives the garment a delicate appearance without requiring complicated lace techniques.
Balloon Sleeve Shaping
The sleeves begin with a smaller circumference at the wrist. Gradual increases add width as the sleeve approaches the upper arm. The combination of bulky yarn and openwork rounds creates a soft, draped sleeve.
Construction Tip:
Measure the body panels and sleeve openings before joining. Matching the armhole perimeter to the sleeve circumference is essential for avoiding puckering or excessive fabric around the shoulder.
Free Crochet Shrug Pattern
Cozy Ivory Openwork Crochet Shrug
Pattern description: This oversized crochet shrug features a textured back, open front, relaxed balloon sleeves, and a simple ribbed-style finish. The pattern uses basic stitches and straightforward shaping to create a comfortable handmade garment.
Pattern note: This original interpretation uses three flat body panels and two sleeves worked in joined rounds. The yarn weight, hook, gauge, and measurements below are recommended specifications for achieving a similar look.
Pattern Overview
| Skill Level | Advanced beginner to intermediate |
| Finished Size | Approximately 40 inches (102 cm) across the flat body and 16 inches (41 cm) long |
| Size Range | One oversized base size, approximately S/M with relaxed fit |
| Yarn | Bulky weight category 5, approximately 950 to 1,150 yards (869 to 1,052 meters) |
| Recommended Hook | 8 mm (US L-11) |
| Gauge | 10 hdc stitches and 8 rows = 4 inches (10 cm) |
| Terminology | US crochet terminology |
| Construction | Three body panels and two sleeves |
| Finished Sleeve Length | Approximately 18 inches (46 cm), excluding cuff edging |
| Estimated Time | Approximately 12 to 18 hours, depending on experience |
Finished Measurements
- Back panel: 22 inches (56 cm) wide by 16 inches (41 cm) long.
- Each front panel: approximately 8.8 inches (22 cm) wide by 16 inches (41 cm) long.
- Body width before assembly: approximately 40 inches (102 cm).
- Sleeve length: 18 inches (46 cm).
- Sleeve cuff circumference: approximately 12 inches (30 cm).
- Upper sleeve circumference: approximately 20 inches (51 cm).
- Side seam length: 6 inches (15 cm).
- Unseamed armhole depth: approximately 10 inches (25 cm).
These are approximate finished garment measurements, not body measurements. The shrug is designed to have a loose fit with substantial room through the sleeves.
Materials and Supplies
- 950 to 1,150 yards (869 to 1,052 meters) of bulky category 5 yarn.
- 8 mm (US L-11) crochet hook.
- Stitch markers.
- Yarn needle for sewing and weaving in ends.
- Measuring tape.
- Scissors.
- Blocking mats and rust-resistant pins, if needed.
Suggested yarn: Choose a soft bulky yarn with good drape. Acrylic, wool blends, cotton-acrylic blends, and soft merino blends are suitable options. A yarn that is too stiff may make the sleeves stand away from the body instead of falling naturally.
For a similar appearance, choose an ivory, warm cream, oatmeal, or natural off-white shade. Using one consistent color throughout the garment highlights the stitch texture and openwork details.
Gauge and Tension
Using an 8 mm hook and bulky yarn, work 10 half double crochet stitches and 8 rows to measure approximately 4 inches (10 cm) square.
Make a gauge swatch before beginning. If you have more than 10 stitches across 4 inches, try a larger hook. If you have fewer than 10 stitches, try a smaller hook.
Gauge is especially important for garments because a small difference in stitch size can change the width of the body panels and the circumference of the sleeves.
Abbreviations
- ch: Chain
- st: Stitch
- sts: Stitches
- sl st: Slip stitch
- sc: Single crochet
- hdc: Half double crochet
- dc: Double crochet
- hdc blo: Half double crochet in back loop only
- inc: Increase, working two stitches in one stitch
- RS: Right side
- WS: Wrong side
- rep: Repeat
- sk: Skip
- sp: Space
- rem: Remaining
US terminology is used throughout. In UK terminology, US single crochet is double crochet, US half double crochet is half treble crochet, and US double crochet is treble crochet.
Special Stitch Instructions
- HDC BLO: Yarn over, insert the hook into the back loop only of the indicated stitch, yarn over and pull up a loop, yarn over and pull through all three loops.
- Mesh repeat: Ch 1, skip the next stitch, and dc in the following stitch. Repeat across the row or round as instructed.
- 2 hdc in one stitch: Work two half double crochet stitches into the same stitch. This creates one increase.
- Beginning chain: Ch 1 at the beginning of a row or round does not count as a stitch.
Slip stitches used for joining rounds do not count as stitches. Always work the first stitch of the next round into the first actual stitch after the join.
Construction Notes Before Starting
- The back and front panels are worked flat in turned rows.
- The sleeves are worked in joined rounds from the cuff upward.
- The body uses alternating textured and mesh rows.
- The turning chain does not count as a stitch.
- Do not count joining slip stitches as stitches.
- Use stitch markers to identify shoulder and sleeve placement.
- Keep the same yarn tension throughout the garment.
Part 1: Crochet the Back Panel
The back panel is the largest body section. It provides the main structure and creates the textured center of the shrug.
Starting chain: Ch 56.
Row 1 (RS): Hdc in the second ch from the hook and in each ch across. You will have 55 hdc. Ch 1 and turn.
Row 2 (WS): Hdc blo in each stitch across. You will have 55 sts. Ch 1 and turn.
Row 3 (RS, mesh): Ch 1, sk the first st, dc in the next st, *ch 1, sk the next st, dc in the next st; rep from * across the row. Work the final dc in the last stitch. You will have 55 stitch positions, including chain spaces. Ch 1 and turn.
Row 4 (WS): Hdc in each dc and each ch-1 space across. You will have 55 hdc. Ch 1 and turn.
Row 5: Hdc blo in each stitch across. You will have 55 sts. Ch 1 and turn.
Row 6: Repeat Row 3. You will have 55 stitch positions. Ch 1 and turn.
Row 7: Repeat Row 4. You will have 55 hdc. Ch 1 and turn.
Rows 8 to 32: Continue the same six-row sequence:
- Rows 8, 14, 20, and 26: Hdc blo across.
- Rows 9, 15, 21, and 27: Mesh row as described in Row 3.
- Rows 10, 16, 22, and 28: Hdc across, working into each dc and chain space.
- Rows 11, 17, 23, and 29: Hdc blo across.
- Rows 12, 18, 24, and 30: Mesh row.
- Rows 13, 19, 25, and 31: Hdc across.
- Row 32: Hdc blo across.
Fasten off after Row 32, leaving a long tail if you prefer to use it for seaming.
Finished back panel: Approximately 22 inches (56 cm) wide by 16 inches (41 cm) long.
Part 2: Make Two Front Panels
The front panels are narrower than the back panel. Together, they create the relaxed open-front shape.
Make two identical panels using the following instructions.
Starting chain: Ch 23.
Row 1 (RS): Hdc in the second ch from the hook and each ch across. You will have 22 hdc. Ch 1 and turn.
Row 2 (WS): Hdc blo across. You will have 22 sts. Ch 1 and turn.
Row 3 (RS, mesh): Ch 1, sk the first st, dc in the next st, *ch 1, sk the next st, dc in the next st; rep from * across. You will have 22 stitch positions, including chain spaces. Ch 1 and turn.
Row 4: Hdc in each dc and each ch-1 space across. You will have 22 hdc. Ch 1 and turn.
Row 5: Hdc blo across. You will have 22 sts. Ch 1 and turn.
Row 6: Repeat Row 3.
Row 7: Repeat Row 4.
Rows 8 to 32: Continue repeating Rows 2 to 7 in sequence until you have completed 32 rows in total.
Fasten off. Repeat the same instructions for the second front panel.
Finished size of each panel: Approximately 8.8 inches (22 cm) wide by 16 inches (41 cm) long.
Part 3: Crochet the Two Balloon Sleeves
The sleeves are worked from the wrist upward. They begin with a narrower cuff and gradually widen to create a loose, rounded shape.
Make two identical sleeves.
Starting round: Ch 30. Join with a sl st to the first chain, making sure the chain is not twisted.
Round 1: Ch 1, hdc in each chain around. Join with a sl st to the first hdc. You will have 30 hdc.
Round 2: Ch 1, *hdc in the next 14 sts, 2 hdc in the next st; rep from * once more. Join. You will have 32 sts.
Round 3: Ch 1, hdc blo in each stitch around. Join. You will have 32 sts.
Round 4: Ch 1, *hdc in the next 15 sts, 2 hdc in the next st; rep from * once more. Join. You will have 34 sts.
Round 5: Ch 1, hdc blo around. Join. You will have 34 sts.
Round 6: Ch 1, *hdc in the next 16 sts, 2 hdc in the next st; rep from * once more. Join. You will have 36 sts.
Round 7: Ch 1, hdc blo around. Join. You will have 36 sts.
Round 8: Ch 1, *hdc in the next 17 sts, 2 hdc in the next st; rep from * once more. Join. You will have 38 sts.
Round 9: Ch 1, hdc blo around. Join. You will have 38 sts.
Round 10: Ch 1, *hdc in the next 18 sts, 2 hdc in the next st; rep from * once more. Join. You will have 40 sts.
Round 11: Ch 1, hdc blo around. Join. You will have 40 sts.
Round 12: Ch 1, *hdc in the next 19 sts, 2 hdc in the next st; rep from * once more. Join. You will have 42 sts.
Round 13: Ch 1, hdc blo around. Join. You will have 42 sts.
Round 14: Ch 1, *hdc in the next 20 sts, 2 hdc in the next st; rep from * once more. Join. You will have 44 sts.
Round 15: Ch 1, hdc blo around. Join. You will have 44 sts.
Round 16: Ch 1, *hdc in the next 21 sts, 2 hdc in the next st; rep from * once more. Join. You will have 46 sts.
Round 17: Ch 1, hdc blo around. Join. You will have 46 sts.
Round 18: Ch 1, *hdc in the next 22 sts, 2 hdc in the next st; rep from * once more. Join. You will have 48 sts.
Round 19: Ch 1, hdc blo around. Join. You will have 48 sts.
Round 20: Ch 1, *hdc in the next 23 sts, 2 hdc in the next st; rep from * once more. Join. You will have 50 sts.
The sleeve has now reached its upper circumference. Continue working without further increases.
Round 21: Ch 1, hdc blo around. Join. You will have 50 sts.
Round 22: Ch 1, hdc blo around. Join. You will have 50 sts.
Round 23 (mesh): Ch 1, *ch 1, sk the next st, dc in the next st; rep from * 25 times. Join with a sl st to the first dc. You will have 50 stitch positions, including chain spaces.
Round 24: Ch 1, hdc in each dc and each chain space around. Join. You will have 50 hdc.
