

comp
for
it

/it
it
Introduction
/it
it
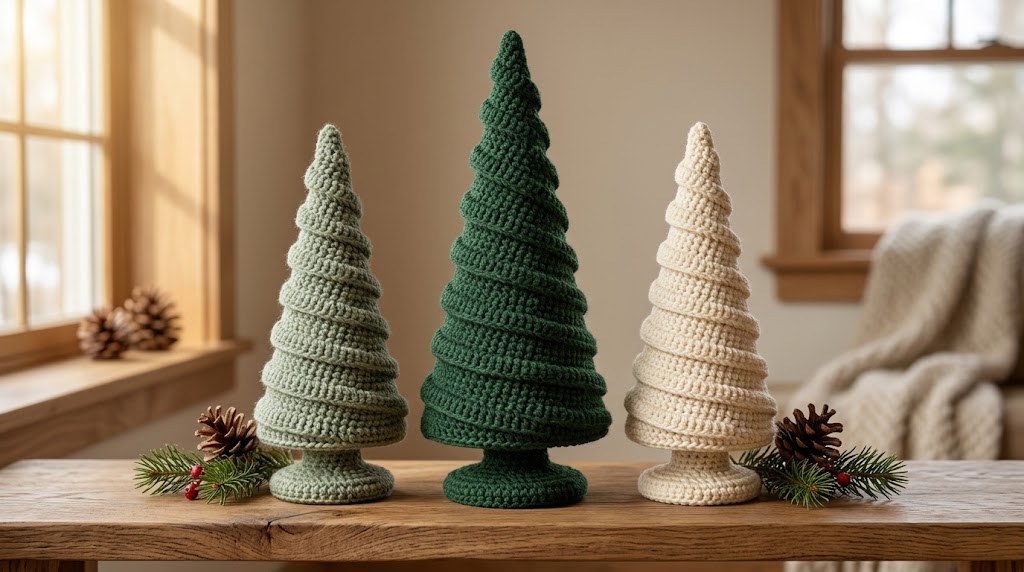
Looking for a handmade holiday decoration that feels cozy, elegant, and a little different from traditional Christmas ornaments? Spiral crochet trees are a lovely way to bring a rustic Alpine touch into your home.
/it
it
These small cone-shaped decorations feature raised spiral ridges that wrap around the tree from the top to the base. Display three trees together on a wooden shelf, place one on a mantel, or use a miniature version as part of a holiday table arrangement.
/it
it
The design looks especially beautiful in natural colors such as sage green, deep forest green, and warm ivory. These shades work well with wood, linen, pinecones, and other neutral holiday decorations.
/it
it
You do not need complicated colorwork to create an attractive result. The main techniques are working in the round, increasing stitches to create a cone, and adding texture to produce the spiral effect.
/it
it
This tutorial explains a practical construction approach for a decorative spiral tree. Because different spiral tree patterns use different stitch counts and shaping methods, treat the measurements and stitch suggestions below as a customizable guide rather than a tested commercial pattern.
/it
it
Why Make Crochet Spiral Trees?
/it
it
Crochet trees are useful projects for anyone who enjoys seasonal crafts.
/it
it
They are small enough to finish without committing to a large blanket or garment. You can experiment with yarn scraps, make matching sets, and adjust the height to suit your display space.
/it
it
They also make thoughtful handmade gifts. A coordinated set of three trees can look beautiful wrapped in kraft paper and tied with natural twine.
/it
it
Another advantage is their versatility. Use green yarn for a traditional evergreen appearance, cream for a snowy winter look, or muted colors for a modern Scandinavian interior.
/it
it
Materials and Tools
/it
it
Gather the following supplies before starting.
/it
it
- Medium-weight yarn in sage green, forest green, and ivory.
- A crochet hook suitable for the yarn, often around 4 mm to 5 mm.
- Scissors.
- A yarn needle.
- Stitch markers.
- Polyester fiberfill if making a stuffed tree.
- A small wooden base or firmly secured decorative support, if desired.
- Optional wooden beads or a small amount of contrasting yarn.
/it
it
Choose yarn that produces clear stitch definition. Smooth acrylic, cotton blends, and many wool blends can work well.
/it
it
For a firm tree, a slightly smaller hook than you would normally use for a loose fabric may help reduce gaps. Do not make the stitches so tight that they become difficult to work.
/it
it
If you are making decorations for a household with young children or pets, avoid loose beads, detachable pieces, and small unsecured accessories.
/it
it
Understanding the Spiral Shape
/it
it
A spiral crochet tree generally has two visual features: a tapered cone and a raised spiral texture.
/it
it
The cone becomes wider toward the bottom. This can be created by starting at the tip and gradually increasing stitches, or by crocheting a larger shape and working upward through a different construction method.
/it
it
The spiral ridge can be produced through a textured stitch pattern, a separately crocheted strip, or decorative rounds attached to the surface.
/it
it
For this tutorial, we will focus on a tapered cone with a raised spiral effect. You can make the tree as a stuffed three-dimensional ornament or adapt the concept into a hollow cone that fits over a lightweight support.
/it
it
The stuffed version is a useful starting point because it can stand independently when the base is finished properly.
/it
it
Step 1: Choose Your Tree Size
/it
it
Decide how tall your tree should be before beginning.
/it
it
For example, you might make a small tree approximately 5 inches tall, a medium tree around 7 inches, and a larger tree around 9 inches. These are project targets, not guaranteed finished dimensions.
/it
it
The final size depends on your yarn, hook, tension, and shaping.
/it
it
Write down your planned height and the approximate width of the base. If you are making a set, keep the same proportions across all three trees so they look coordinated.
/it
it
A tall, narrow tree has an elegant minimalist appearance. A shorter, wider tree looks more playful and can be easier to keep stable on a shelf.
/it
it
Step 2: Crochet the Tip
/it
it
Start with a magic ring or a small adjustable starting loop.
/it
it
Work a few stitches into the center and close the ring securely. Mark the beginning of your round so you can keep track of your progress.
/it
it
The first few rounds should form a narrow tip.
/it
it
Depending on the stitch pattern you choose, you may work single crochet for a dense fabric or half-double crochet for a slightly softer texture.
/it
it
The key is to increase gradually. If you add too many stitches at once, the tip may flare outward. If you add too few, the cone may become unusually narrow and tall.
/it
it
Try the first several rounds and examine the shape before continuing.
/it
it
Step 3: Build the Tapered Cone
/it
it
Continue working in the round while adding increases at regular intervals.
/it
it
An increase means working more than one stitch into a stitch or designated location, allowing the fabric circumference to grow.
/it
it
Distribute increases evenly around the cone rather than placing them all in the same area. This helps create a symmetrical shape.
/it
it
After every few rounds, set the piece on a flat surface and check its profile. The cone should widen gradually toward the base.
/it
it
If it begins to curl or develop obvious corners, review your stitch count and increase placement.
/it
it
For a firm decorative tree, keep the fabric reasonably dense. Visible stuffing holes can detract from the finished look.
/it
it
Step 4: Create the Spiral Texture
/it
it
There are several ways to create spiral ridges.
/it
it
One beginner-friendly method is to crochet a narrow textured strip separately and attach it around the cone in a spiral. This allows you to control the spacing and thickness of each ridge.
/it
it
Another method is to incorporate raised stitches directly into the cone as you work. This can create a seamless finish but may require more experimentation to achieve an even spiral.
/it
it
For a separate strip, make a foundation chain and work rows of single crochet or half-double crochet. The strip should be long enough to wrap around the cone from near the tip toward the base.
/it
it
Pin or temporarily position the strip before attaching it. Check that the spiral spacing looks consistent and that the strip does not pull the cone out of shape.
/it
it
Use matching yarn to sew the strip securely in place. Avoid long, loose loops that can catch on fingers or decorations.
/it
it
If you prefer a subtle texture, use the same color for both the cone and the spiral. For a more decorative design, choose a slightly lighter or darker shade from the same color family.
/it
it
Step 5: Add More Definition to the Ridges
/it
it
Once the spiral is attached, examine the tree from several angles.
/it
it
The raised ridge should be visible without covering too much of the underlying cone.
/it
it
If the spiral looks too thin, make a wider strip. If it looks bulky, reduce the strip width or use a lighter yarn.
/it
