

it
Keep the ridge close enough to the cone that it follows the shape naturally. Loose sections may create an uneven silhouette.
/it
it
For a rustic Alpine appearance, a slightly chunky spiral can look beautiful. For a delicate miniature tree, use finer yarn and narrower ridges.
/it
it
Step 6: Make the Remaining Trees
/it
it
Repeat the process in two additional colors.
/it
it
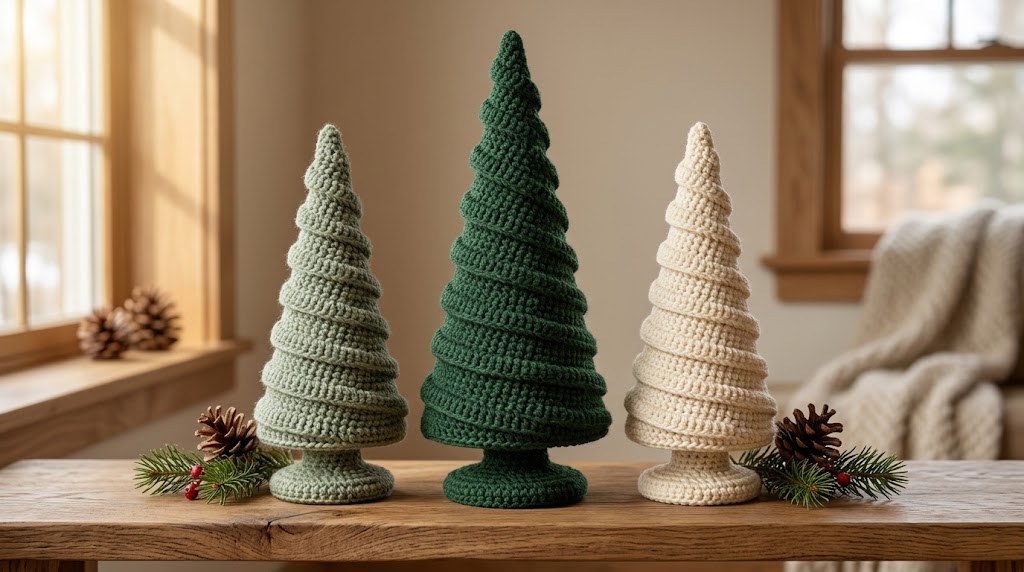
A classic three-tree display might include sage green, deep forest green, and ivory cream.
/it
it
The sage tree adds a soft natural tone, the forest green provides depth, and the ivory tree creates a snowy contrast.
/it
it
You can also make a monochromatic set using several shades of green. Alternatively, choose muted pink and cream for a contemporary winter display.
/it
it
Keep the spiral construction consistent across the set. Small differences are natural in handmade work, but similar proportions help the collection feel intentional.
/it
it
Step 7: Stuff the Tree Carefully
/it
it
If you are making a three-dimensional tree, add polyester fiberfill gradually as the cone grows.
/it
it
Use small amounts of stuffing rather than forcing a large clump into the narrow tip. A blunt tool can help distribute the stuffing, but avoid sharp objects that may damage the stitches.
/it
it
The tree should feel firm enough to maintain its shape without becoming stretched or lumpy.
/it
it
Check the silhouette frequently. If the base bulges unevenly, redistribute the stuffing before closing the opening.
/it
it
For a hollow version, fit the crocheted cone over a suitable support instead. Ensure that any support is stable and cannot easily tip over.
/it
it
Step 8: Finish the Base
/it
it
The base is important because it determines whether the tree stands upright.
/it
it
A simple method is to continue crocheting around the bottom until the opening is small enough to close securely.
/it
it
If you are making a stuffed tree, finish the base with a flat circular section or a suitable closing method. Add the final stuffing before securing the last stitches.
/it
it
For a more polished display, attach a small wooden base or use a firmly fitted support. The attachment should be stable and proportionate to the tree.
/it
it
If the tree leans, inspect the base before adding extra weight. Uneven shaping or uneven stuffing may be the actual cause.
/it
it
Do not leave a heavy or sharp support exposed where it could cause injury.
/it
it
Step 9: Add Optional Decorative Details
/it
it
Your tree can remain simple, or you can add a few carefully chosen accents.
/it
it
A small wooden bead at the tip can create a natural finishing touch. A tiny embroidered star or a narrow contrasting edge can also work well.
/it
it
For a modern rustic style, less is often more. The spiral texture already provides plenty of visual interest.
/it
it
Avoid adding too many different decorations. A restrained palette makes the handmade stitches and shape easier to appreciate.
/it
it
Step 10: Arrange Your Holiday Display
/it
it
Place the finished trees on a wooden shelf, mantel, or side table.
/it
it
Arrange them in a group of three, varying the heights to create a balanced composition. Add a few pinecones or a small evergreen branch to reinforce the natural theme.
/it
it
Leave some empty space around the display so the spiral details remain visible.
/it
it
If photographing your work for a blog, position the trees near a window and use soft daylight. A neutral background can help the green and cream yarn stand out.
/it
it
Take one close-up photograph to show the texture and another wider image to demonstrate how the trees look in a home setting.
/it
it
Troubleshooting Common Problems
/it
it
The cone flares too quickly: Reduce the frequency of increases or check whether your stitch count is growing too rapidly.
/it
it
The tree looks uneven: Use stitch markers and distribute increases consistently.
/it
it
The stuffing shows through: Try a smaller hook or a denser stitch pattern.
/it
it
The spiral strip twists: Reposition it before sewing, and make sure its tension is consistent.
/it
it
The tree will not stand: Check the base shape, redistribute stuffing, or use a stable support.
/it
it
The ridges look crowded: Increase the spacing between spiral wraps or use a narrower strip.
/it
it
Frequently Asked Questions
/it
it
Are spiral crochet trees beginner-friendly?
/it
it
Yes, especially if you already know how to work in the round and make increases. The spiral attachment may require some practice, but the design is adaptable.
/it
it
Can I use leftover yarn?
/it
it
Yes. Small trees are excellent scrap-yarn projects, provided the yarn weights are compatible.
/it
it
Do the trees need to be stuffed?
/it
it
No. A hollow tree can fit over a support, while a stuffed version can be finished as a freestanding decoration.
/it
it
Can I make the trees larger?
/it
it
Yes. Use a larger hook or yarn and increase the number of rounds, adjusting the spiral length to match.
/it
it
How do I store the trees after the holidays?
/it
it
Keep them in a clean, dry container and avoid crushing the raised spiral. Follow the yarn manufacturer’s care instructions if cleaning is needed.
/it
it
Final Thoughts
/it
it
Spiral crochet trees are a charming way to bring handmade texture into your seasonal decorating. Their simple shapes, raised ridges, and natural color palette make them suitable for rustic, Scandinavian, and minimalist interiors.
/it
it
Start with one small tree to practice the cone shape and spiral attachment. Once you are happy with the result, create a coordinated collection in different heights and shades.
/it
it
A few carefully made crochet trees can become decorations you look forward to displaying year after year.
/it
it
Suggested image alt text: Three handmade spiral crochet Christmas trees in sage green, forest green, and ivory displayed on a rustic wooden shelf with pinecones.
/it
it
Suggested URL slug: spiral-crochet-christmas-tree-tutorial
/it
/for
/comp
