

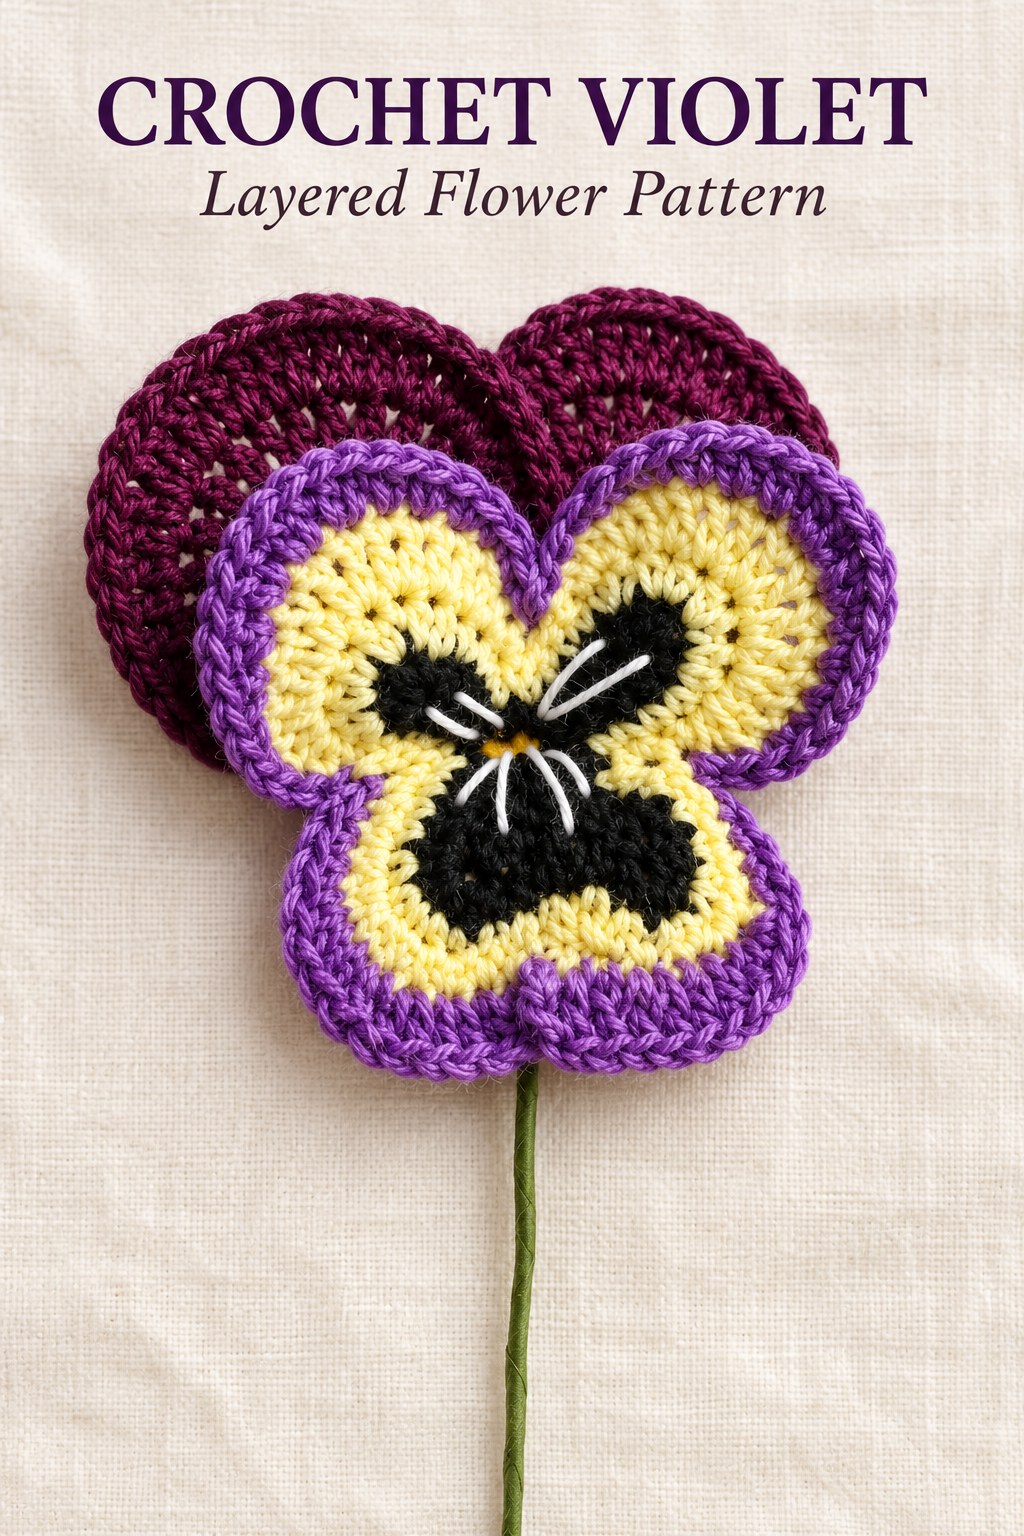
This crochet Violet pattern combines a shaped three-lobed front with rounded dark backing petals, white center embroidery and a taped wire stem. It follows PDF pages eighty-three and eighty-four of the supplied collection. The front is worked through a detailed sequence of chain extensions, short turned sections, increases and skipped positions. Separate rounded petals are crocheted around support wire and joined behind it. This guide preserves every source round and includes both original charts plus the actual wire, joining, embroidery and stem-finishing photographs.

Key Takeaways
- Use the listed cotton colors and 1.90 mm hook, with 0.6 mm wire, a needle and green floral tape.
- Work the shaped flower front separately from the dark rounded backing petals.
- In this chapter, two stitches together means two complete stitches in the same original, not a decrease.
- The main flower’s short-row and chain-extension paths must follow the chart in their written order.
- Work the backing petal’s third round around wire before twisting its support.
- Embroider white lines in the center, join the layers and cover the combined stem with floral tape.
CROCHET VIOLET FLOWER PATTERN
Project: A layered pansy-like Violet with shaped front, rounded backing petals, white center rays and a wire-supported taped stem.
| Skill level | No individual rating is supplied. Uses partial paths, graduated stitch heights, increases, wire incorporation and embroidery. |
|---|---|
| Materials | Cotton in white, yellow, light orange, violet, dark violet and black; 1.90 mm hook; 0.6 mm wire; green floral tape; needle. Yarn weight, quantity, gauge and finished dimensions are unspecified. |
| US abbreviations | ch chain; sc single crochet; hdc half double crochet; dc double crochet; ss slip stitch. ST means ss. inc-sc/inc-hdc/inc-dc below mean 2 complete named stitches in ONE original, matching the source together symbols. |
| Main flower rounds 1–2 | Magic ring. R1: ch3, 6 dc, ss join and tighten. R2: 6 sc, ss join. |
| Main round 3, initial extension | Ch6+1; sc, 4 hdc, sc. Turn; ch1, 4 sc. Ch2+1 and work sc, 4 hdc, sc along the new extension and existing path shown by the chart. Skip1, ss. |
| Main round 3, next projections | Ch6+1; sc, 4 dc, sc; skip1, ss. Repeat that projection once more. |
| Main round 3, completing path | 4 sc, inc-sc, inc-sc, 2 sc, ss, 2 sc, inc-sc, inc-sc, 4 sc. |
| Main round 4, first sections | Skip1, 4 sc, inc-hdc 4 times, 4 sc. Repeat that entire section once more. |
| Main round 4, last section | Skip1, 6 sc, inc-sc twice, 2 sc, skip1, 2 sc, inc-sc twice, 6 sc. |
| Main round 5, first sections | 3 ss, sc, inc-dc 8 times, sc, 3 ss. Repeat that entire section once more. |
| Main round 5, last section | 3 ss, 3 sc, inc-sc 3 times, 2 sc, 2 ss, 2 sc, inc-sc 3 times, 3 sc, 3 ss. |
| Main round 6, first section | Skip3, ss, 6 sc, inc-hdc 4 times, 6 sc, ss. |
| Main round 6, second section | Skip6, ss, 6 sc, inc-hdc 4 times, 6 sc, ss. |
| Main round 6, last section | Skip6, ss, 4 sc, inc-hdc 4 times, 2 dc, skip2, 2 dc, inc-hdc 4 times, 4 sc, ss; skip6, ss. |
| Backing petal round 1 | Magic ring: ch3, 10 dc, tighten and ss join. |
| Backing petal round 2 | Inc-sc, inc-dc 8 times, inc-sc. 20 complete stitches. |
| Backing petal round 3 | Incorporate wire: inc-sc, inc-dc 18 times, inc-sc. 40 complete stitches. Ss join, lock ch2, cut yarn. |
| Layer quantity and colors | The process photograph shows two backing petals behind the main flower. Follow that arrangement for the pictured version. The written rows list the palette but do not state every color-change location; use the source chart and finished photo as guides. |
| Assembly | Twist each backing petal support. Insert wire at the main flower bottom. Join the backing petals behind it and twist the wires. With needle and white yarn embroider short lines at the flower center. Cover the stem with green floral tape. |
Understand the Layered Construction
The main flower is a connected shaped piece, not three separately sewn circles. Its lobes develop through the long third-round path and subsequent outlining rounds. The darker rounded petals are separate components placed behind it. The source process photograph shows two backing petals in that upper layer, producing the pictured five-lobed overall silhouette.
Keep the two construction types separate while working. A main front made as an ordinary increased circle would not reproduce its three-lobed shape. Conversely, the backing petal is a compact round motif that doubles ten to twenty and then forty, with support wire incorporated during its final round.
Prepare the Listed Colors and Notions
The source lists cotton in white, yellow, light orange, violet, dark violet and black. It specifies a 1.90 mm hook, 0.6 mm wire, green floral tape and a needle. It does not supply a formal yarn weight, brand, quantity, gauge or finished flower dimensions.
The completed photograph shows black front markings surrounded by yellow and violet, dark upper backing petals and white embroidered center lines. The prose does not independently state every color join. Use the actual source diagram and photograph for the pictured arrangement, while keeping any specific chosen joining technique distinct from an additional printed instruction.
Reserve white yarn for the embroidery as well as any other use guided by the source palette. The needle has an explicit job in the finishing photographs. The floral tape covers the joined wire stem after the layers are assembled, rather than substituting for crochet around the backing-petal wire.
Increase checkpoint: The source’s together symbols mean two full stitches sharing one original. Keep each increase separate from the skips that shape the main front.
Read the Main Chart as a Shaped Path
The front chart shows connected projections and partial return paths, with different stitch heights and skipped positions around them. Its written rounds should be followed in that order. A single total circumference is less useful here than checking the next path, increase group and skip against the actual diagram.
The first short extension starts with six working chains plus one starting chain. Its return, a short turn and another small chain extension create the initial shaped area. Two later six-plus-one projections use taller double crochets. The third round then continues around the existing outline rather than starting another independent flower piece.

Main Rounds 1–2: Build the Shared Center
Make a magic ring, chain three and work six double crochets into it. Join with a slip stitch and tighten the circle. The second round works six single crochets and joins. Keep the six working positions identifiable for the following projection and anchoring path.
Do not add an extra counted double crochet because the starting chain is mentioned separately. The source’s next round is built from the six-single-crochet center. The lobes and surrounding markings are formed later, so no separate bead or embroidered spot is added at this stage.
Main Round 3: Work the First Extension and Turn
Chain six plus one and work single crochet, four half doubles and single crochet across its six working positions. Turn, chain one and work four singles. Begin two plus one chains and continue with single, four half doubles and single along the connected path shown in the chart, then skip one and slip stitch.
The short two-plus-one extension is not a free-standing six-stitch foundation. It extends the existing turned path, which supplies the remaining working locations. Keep the previous short section attached and follow the diagram, instead of adding four unprinted chains to make a separate new petal.
Main Round 3: Add the Taller Projections
Begin six plus one chains and work single crochet, four double crochets and single crochet. Skip one stitch and slip stitch. Work that same taller projection once more. The source gives doubles here, distinct from the half doubles in the first extension.
Complete the remaining third-round path with four singles, two separate single-crochet increases, two singles, a slip stitch, two singles, two more single-crochet increases and four singles. Keep these outlining stitches connected to the existing projections, following the chart around their sides.
Construction Note
The main front uses a connected chain-and-short-row path. The backing petals use ordinary circular rounds. Their different methods produce the front markings and the separate dark upper layer.
Main Round 4: Outline the First Two Sections
Skip one, work four singles, four half-double increases and four singles. Repeat that whole section once more. Each increase places two full half doubles in its original, while each skip leaves one original unworked. Those are different shaping operations and should not be interchanged.
For the last section, skip one, work six singles, two single-crochet increases, two singles, skip one, two singles, two single-crochet increases and six singles. The mirrored groups shape the outline on either side of the inner skipped position.
Main Round 5: Add the Taller Edge Groups
Work three slip stitches, one single, eight double-crochet increases, one single and three slip stitches. Repeat the entire section once more. The slip stitches form low transitions, while the double increases build the fuller rim on the first two lobes.
For the last section work three slips, three singles, three single-crochet increases, two singles, two slips, two singles, three single-crochet increases, three singles and three slips. Retain the two slips in the middle rather than adding another tall fan there.
Path checkpoint: Count the complete increase groups and low slip-stitch transitions for each section. Do not replace the partial outlines with one repeated circular increase formula.
Main Round 6: Finish the Shaped Front
Skip three, slip stitch, work six singles, four half-double increases, six singles and a slip stitch. Next skip six and work that same slip, six singles, four increases, six singles and slip sequence. Keep the first skip-three distinct from the following skip-six.
