

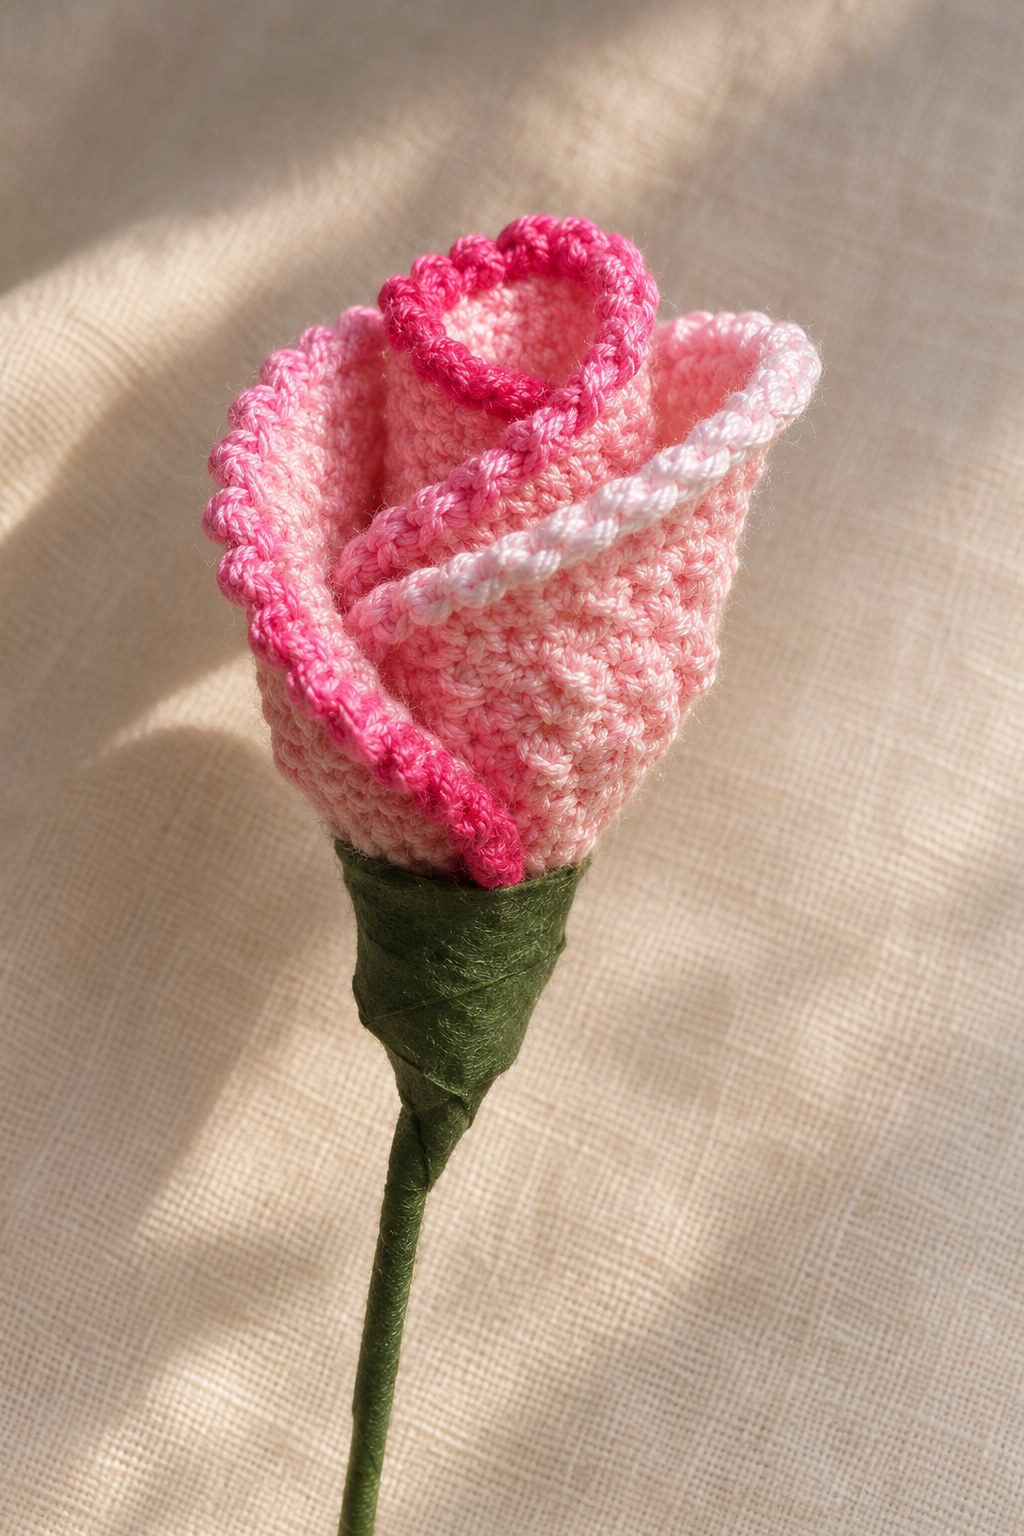
This crochet rose bud pattern uses three round petals to create a compact flower: one rolled petal forms the center, and the other two wrap around it. A raised crab-stitch edge defines the pink petal rims, while wire and green floral tape support the base and stem. The guide follows PDF pages 162–163 of the supplied collection, with the full petal sequence, original stitch chart and all three assembly drawings placed beside the related explanations.

Key Takeaways
- Use Cotton 8 in soft pink and pink, with the listed 1.90 mm hook.
- Make three petals using the same central foundation and two increase rounds.
- In the source legend, two doubles together means two complete doubles in one anchor.
- Finish each petal with crab stitch before assembling the bud.
- Roll one petal, add the other two around it and attach them with 0.8 mm wire.
- Twist the support ends and cover the stem with green floral tape.
CROCHET ROSE BUD FLOWER PATTERN
Project: A compact three-petal rose with a rolled center, two overlapping outer petals, raised edging and a taped wire stem.
| Skill level | No individual rating is supplied. Uses chains, joined double-crochet rounds, same-anchor increases, crab stitch and supported assembly. |
|---|---|
| Materials | Cotton 8: soft pink and pink; hook size B (1.90 mm), as printed; wire 0.8 mm; green floral tape. No yarn quantity, gauge, finished dimensions or wire cut length is supplied. |
| US abbreviations | ch chain; dc double crochet; ss slip stitch (source ST); inc-dc 2 complete dc in the same original anchor. Crab stitch is reverse single crochet. |
| Petal round 1 | Begin ch4 and work9dc in the first chain. Join with1ss. The remaining ch3 is shown as the starting double-crochet-height unit in the source chart. |
| Petal round 2 | Ch3+1dc together in the starting anchor, then2dc together in each stitch. Join with1ss. The chart shows both members of every increase sharing one anchor, without closing their tops together. |
| Petal round 3 | Ch3+1dc together in the starting anchor, then2dc together in each stitch. Join with1ss. Break off yarn. |
| Petal round 4 | Work all around the petal in Crab Stitch. Break off yarn. Make3petals in total. |
| Color reference | The listed palette is soft pink and pink; the finished example shows contrasting raised edges. The prose does not allocate a fixed color to every round, so use its finished photograph as the palette reference rather than claiming an unprinted color schedule. |
| Assembly step 1 | Roll up1petal, following Figure1. |
| Assembly step 2 | Join the remaining2petals around that center and attach them with wire, following Figure2. |
| Assembly step 3 | Twist the wire ends together, following Figure3. Cover the stem with green floral tape. |
Plan the Three-Petal Construction
All three pieces follow the same crochet pattern. Their different roles arise during assembly: the first is rolled into the center, while the other two become the outer wrapping petals. Keep that component count visible from the start so that a three-piece bud does not gradually become an unrelated many-petal rose.
The original chart shows the petal as a round component before shaping. The assembly drawings then show that component rolled and wrapped. Crochet the pieces completely, including their raised edging, before trying to create the final flower shape. The narrow bud silhouette comes from the later placement of those finished pieces rather than from adding an extra cone-shaped crochet component.
Gather the Listed Cotton and Support Materials
The source names Cotton 8 in soft pink and pink, a hook labeled size B with a stated diameter of 1.90 mm, wire 0.8 mm and green floral tape. Preserve the metric diameter when selecting the hook because letter labels can be interpreted differently across hook systems. These are the specifications printed for this particular rose bud.
No yardage, ball weight, brand or formal finished gauge accompanies the entry. The source also gives no measured stem length or numerical wire-cut length. Work with the listed materials while treating exact final size as dependent on the actual cotton and tension. The photograph is a reference for construction and proportion, rather than a measured size chart.
Component checkpoint: Make three complete round petals. Keep one for the rolled center and two for the outer wrap; all three receive their crab-stitch edging before assembly.
Understand the Source Increase Wording
The chapter legend defines two double crochets together as two complete doubles in the same stitch. The petal chart confirms that meaning with paired symbols sharing an anchor and keeping separate tops. It is an increase, unlike the shared-top decrease often called dc2tog in other patterns. Retaining that distinction is essential to expanding these round petals.
At the beginning of the next two rounds, three chains and one double form the starting pair. Their common anchor is shown at the chart’s joining line. Treat the starting chain as the double-crochet-height member of that pair rather than adding a second complete increase into the same starting position after it.
Begin the First Petal
Chain four. Work nine double crochets into the first chain, the chain closest to the starting yarn end. Join with a slip stitch as printed. The chain foundation creates the center from which the doubles radiate; the remaining three-chain length rises to their height at the beginning of the round.
The source chart is useful here because its initial chain is visible alongside the radiating double-crochet symbols. Keep the nine actual doubles distinct from the starting chain-height unit when counting. A separate magic ring or an additional ring of chains is not part of this petal’s written foundation.

Work the First Increase Round
Begin round two with three chains and one double together in the starting anchor. Continue with two complete doubles in each stitch and join with one slip stitch. Each ordinary original position receives a pair, widening the component while keeping it circular. Complete the doubles individually so the paired stitches have separate tops.
Use the source chart to recognize the starting chain-height position and the subsequent pairs. The first chain-and-double pair belongs to the increase pattern; it is not an extra decorative group added outside it. If a petal begins to cup sharply at this early stage, first check whether the increase wording has accidentally been read as a decrease.
Repeat the Increases in Round Three
Round three repeats the same written start and expansion: three chains and one double together, then two doubles together in each stitch. Join with one slip stitch and break off the yarn. The chart shows the second set of increases around the larger perimeter, continuing the same paired-anchor construction.
The two expanding rounds provide the fabric that will later curve around the center. Keep their stitch sequence consistent across all three petals. The source does not supply a separate small, medium and large petal size for this bud, so do not change the increase rate merely to assign a different assembly role to one piece.
Prepare for the Raised Edge
The source breaks the yarn after round three and supplies round four as a separate all-around crab-stitch finish. Its palette includes two pink shades, and the finished example has contrasting raised rims. The written instructions do not state a fixed color assignment for each individual round or component.
Use the photograph as the color reference while keeping the distinction clear: the required construction is the three-round petal followed by crab stitch, while a precise round-by-round color schedule is not printed. Keep any choice of which pink to use for a particular edge in your own project notes so the three components can be coordinated intentionally.
Work the Crab-Stitch Round
Crab stitch is reverse single crochet. Work single-crochet motions in the reverse direction around the petal edge, creating the characteristic twisted, cord-like rim. For a right-handed worker the progression is generally toward the right; use the corresponding reverse progression for the way you normally crochet. The source specifies this named standard stitch as the complete final round.
Keep the perimeter stitches accessible while working the reverse motion. The raised rim should follow the rounded petal rather than gathering it into a tight pouch. Break off the yarn after completing the all-around finish, as instructed. The chart’s outer orange dots distinguish this edging from the earlier double-crochet increase rounds.
Petal Construction Note
The petal grows through its central foundation and two same-anchor increase rounds. Crab stitch is then worked around the completed edge. The rolled center and outer wraps are assembly roles, not three different crochet formulas.
