

Row 12 (Inc): (14 dc, 13 sps)
Checkpoint: 3.25 in (8.3 cm) wide x 3 in (7.6 cm) tall.
Tier 3
Row 13 (Step-In): Work as for Row 7. (10 dc, 9 sps)
Row 14 (Cluster): Ch 5, turn, dc in the next dc, (ch 2, dc in the next dc) twice, ch 3, CL over the next 3 sps, ch 3, dc in the next dc, (ch 2, dc in the next dc) 3 times, working the last dc in the 3rd ch of the tch. (8 dc, 1 CL, 8 sps)
Row 15 (Fan): Ch 5, turn, dc in the first dc, (ch 2, dc in the next dc) 3 times, ch 3, Fan in the CL, ch 3, dc in the next dc, (ch 2, dc in the next dc) 3 times, working the last dc in the 3rd ch of the tch, ch 2, dc in the same ch. (10 dc + Fan, 10 sps)
Row 16 (Settle): Ch 5, turn, dc in the first dc, (ch 2, dc in the next dc) 4 times, ch 3, dc in the 2nd dc of the Fan, ch 2, dc in the 6th dc of the Fan, ch 3, dc in the next dc, (ch 2, dc in the next dc) 4 times, working the last dc in the 3rd ch of the tch, ch 2, dc in the same ch. (14 dc, 13 sps)
Row 17 (Inc): (16 dc, 15 sps). Fasten off.
Checkpoint: 3.75 in (9.5 cm) wide x 4.25 in (10.8 cm) tall.
Trunk
Row 17 has 6 sps, then 3 center sps, then 6 sps. Join the thread with a sl st in the 7th dc from either end.
Trunk Row 1: Ch 1, sc in the same dc, (2 sc in the next sp, sc in the next dc) 3 times. This gives 4 sc worked 1 per dc + 6 sc added (2 per ch-2 sp) = 10 sc.
Trunk Rows 2–6: Ch 1, turn, sc in each sc across. (10 sc)
Fasten off.
Checkpoint: the trunk is 3/4 in (1.9 cm) wide x 1/2 in (1.3 cm) long, and the total height is 4.75 in (12.1 cm).
Border
Border gauge: 12 sc = 1 in (2.5 cm).
Join the thread with a sl st at the base of the hanging loop, then ch 1. Work one round as follows.
Loop: 30 sc into the hanging loop.
Side A, going down:
- Tier 1 side: 3 sc in each row end of Rows 1–6 (18 sc), then a picot at the corner
- Tier 1 ledge: a Scallop in each of the 2 outer sps of Row 6, working over the sl sts (10 sts)
- Tier 2 side: 3 sc in each row end of Rows 7–12 (18 sc), then a picot
- Tier 2 ledge: a Scallop in each of the 2 outer sps of Row 12 (10 sts)
- Tier 3 side: 3 sc in each row end of Rows 13–17 (15 sc), then a picot
- Tier 3 ledge: a Scallop in each of the 6 outer sps of Row 17 (30 sts)
Trunk:
- 1 sc in each row end (6 sc)
- Along the bottom: 3 sc in the first sc, sc in the next 8 sc, 3 sc in the last sc (14 sc)
- 1 sc in each row end up the other side (6 sc)
Side B, going up: a Scallop in each of the 6 outer sps of Row 17 (30 sts), picot, 15 sc up Tier 3, Scallops in the 2 Row 12 sps (10 sts), picot, 18 sc up Tier 2, Scallops in the 2 Row 6 sps (10 sts), picot, 18 sc up Tier 1. Sl st to the first sc and fasten off.
Per-side count: 18 + 10 + 18 + 10 + 15 + 30 = 101 sts and 3 picots.
Total: 30 (loop) + 101 (Side A) + 26 (trunk) + 101 (Side B) = 258 sts plus 6 picots.
Why the math works:
- Each dc row end is 1/4 in (0.6 cm) tall. At 12 sc per inch, 3 sc fill it exactly.
- Each sc row in the trunk is 1/12 in, so 1 sc per row end matches the same gauge.
- The tier corners get a picot instead of extra sc, so no corner stitches are counted twice.
- The trunk’s 10 sc already include both corner stitches. Each corner just gets 2 extra sc to turn it.
- The Scallop’s mix of stitch heights makes it curve out without ruffling.
The border adds 1/8 in (0.3 cm) to each edge. The width becomes 4 in (10.2 cm) and the height becomes 4 7/8 in (12.4 cm).
Final Blocking
- Weave in all ends along the dc posts and trim them close.
- Wet the ornament, then roll it in a towel to remove extra water.
- Pin it to the mat at 4 in (10.2 cm) wide x 4 7/8 in (12.4 cm) tall.
- Pin each picot tip outward so the corners come to a point. Place one pin in the center of each scallop.
- Ease each starburst round and keep the trunk square at 3/4 in (1.9 cm).
- Spray it well with starch and let it dry completely before you unpin it.
Final Quality-Control Checklist
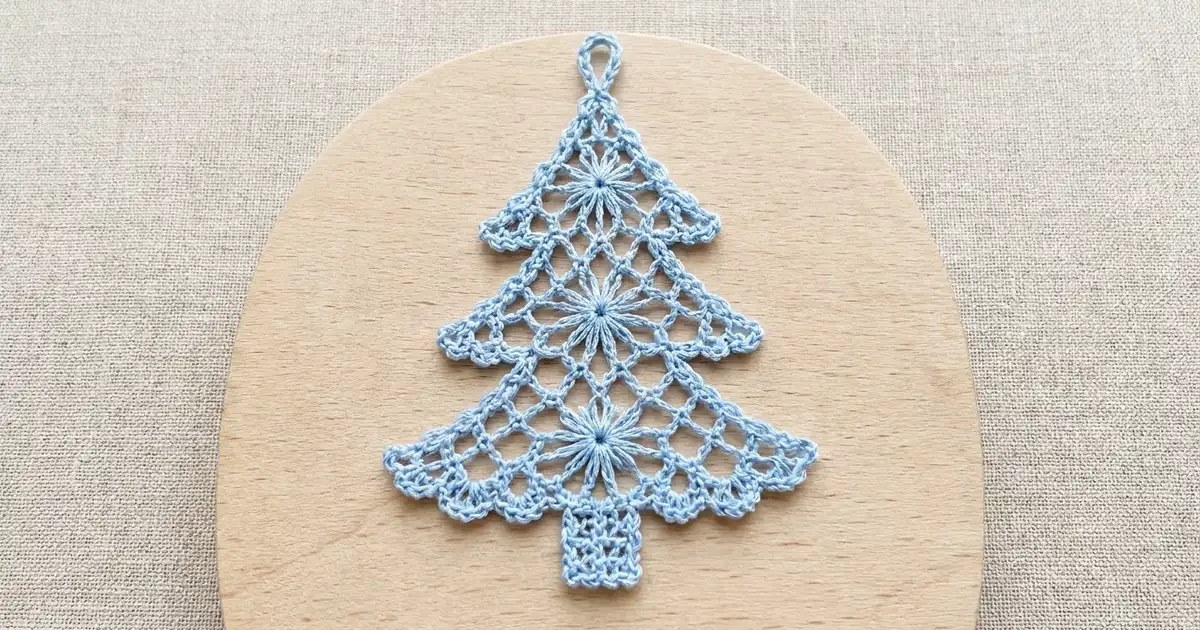
- The width is 4 in (10.2 cm) and the height is 4 7/8 in (12.4 cm), not counting the loop.
- All three starbursts sit on the center line, with 14 spokes each.
- Each side has 3 picot tips, and the tiers are mirror images of each other.
- The ledges have 2, 2 and 6 scallops on each side.
- The trunk is centered, with 6 open sps on either side of it.
- The loop is fully covered and measures 3/4 in (1.9 cm).
Troubleshooting
- Starburst is off-center: Recount the sps on each side of the CL. The two sides must match.
- CL gaps or puckers: Pull up each partial dc to the full height before you close the cluster.
- Sides ripple: Your sc are too loose. Work 2 sc in some row ends, or use a smaller hook for the border.
- Sides pull in: Check that every row end has 3 sc.
- Tiers lean: You probably missed an increase at one end. Check the stitch counts for each row.
- Trunk flares: Work Trunk Rows 2–6 more tightly.
Care
Hand wash in cool water and lay flat to dry. Re-starch it each season and store it flat between tissue sheets.
Final Notes
Here is the measurement chain:
- The test tier is 2.25 in (5.7 cm) wide.
- Tier 2 reaches 3.25 in (8.3 cm).
- Tier 3 reaches 3.75 in (9.5 cm) at 4.25 in (10.8 cm) tall.
- The trunk brings the height to 4.75 in (12.1 cm).
- The 1/8 in (0.3 cm) border finishes the tree at 4 in x 4 7/8 in (10.2 cm x 12.4 cm).
If you hit each checkpoint, the border math will work out exactly.
Happy crocheting!
