

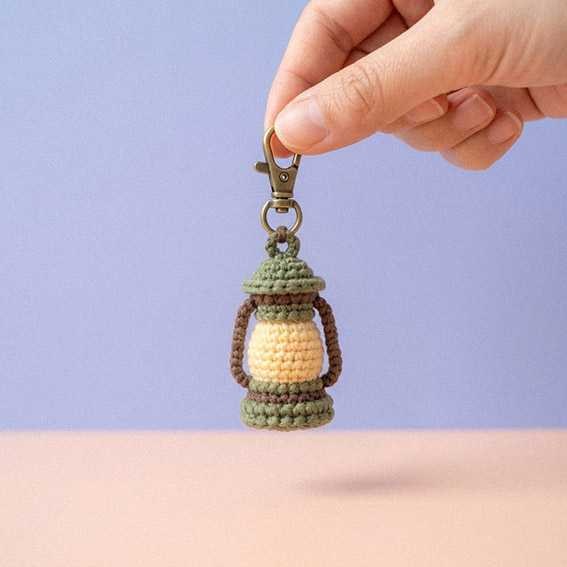
Rounds 12–18: 24 sc (7 rounds). (24) Round 19: (2 sc, dec) × 6. (18) Lightly stuff the body, keeping the cream section rounded and the green bottom flat. Change to sage green. Round 20: 18 sc. (18) Round 21: 18 sc. (18) Change to brown. Round 22: (2 sc, inc) × 6. (24) Round 23: (3 sc, inc) × 6. (30)
Fasten off, leaving a 12 in (30 cm) tail for sewing. Leave the upper opening unclosed.
Ami_kare 300×250
Domed Lantern Lid
Make 1 with sage green.
Round 1: 6 sc in MR. (6) Round 2: 6 sc. (6) Round 3: 6 inc. (12) Round 4: (sc, inc) × 6. (18) Round 5: (2 sc, inc) × 6. (24) Round 6: (3 sc, inc) × 6. (30) Round 7: 30 sc. (30) Round 8: FLO, (4 sc, inc) × 6. (36) Round 9: 36 sc. (36)
Fasten off and weave in the end.
Round 8 creates the projecting brim. Keep all 30 unused back loops of Round 7 accessible beneath it for sewing the lid to the body. Do not close or fold the 36-stitch outer brim inward.
Brown Side Supports – Make 2
Use brown yarn. Leave a 6 in (15 cm) starting tail.
Ch 15.
Row 1: Starting in the second ch from the hook, 14 sc. (14)
Fasten off, leaving another 6 in (15 cm) tail.
Both supports are narrow, flat strips worked back and forth, not stuffed tubes. They will be sewn at both ends to form the curved side frame.
Ami_kare 300×250
Reinforced Top Loop
Use sage green yarn and the closed lower ring of the swivel clasp. Work before attaching the lid to the body.
Ami_esnek (yatay)
- Join the yarn with a sl st through both loops of stitch 1 of Lid Round 2, leaving a 6 in (15 cm) starting tail.
- Ch 2.
- Remove the hook, keeping the active loop open. Pass that loop through the closed lower metal ring and reinsert the hook.
- Ch 2, then sl st through both loops of stitch 4 of Lid Round 2, opposite the starting point.
- Fasten off, leaving a 6 in (15 cm) finishing tail.
- Thread the starting tail onto a needle. From beneath the lid, pass it through neighboring stitches of Rounds 2–3, through the metal ring, and back through different neighboring roof stitches. Repeat twice, securing the attachment across several stitches.
- Use the finishing tail to reinforce the opposite anchor through adjacent stitches in Rounds 2–3 and the metal ring. Secure both tails inside the lid.
With a short brown yarn strand, make two small decorative wraps around the upper green loop immediately below the metal ring. Secure the ends inside the roof.
The metal clasp must be held by the reinforced green loop, not by the decorative brown wraps.

Assembly
- Place the lid over the body with the green brim extending beyond the upper brown band.
- Using the brown body tail, sew the 30 stitches of Body Round 23 to the 30 unused back loops of Lid Round 7, matching one stitch to one loop around the opening. Keep the 36-stitch brim free. Secure the seam.
- Position the two brown side supports on opposite sides of the cream globe. Keep the body joining seam at the back.
- Sew the upper end of the first support across stitches 7–8 of brown Body Round 22. Curve the strip outward and sew its lower end across stitches 7–8 of brown Body Round 9.
- Sew the second support in the same way at stitches 19–20 of Rounds 22 and 9. Reinforce each end with additional sewing passes through the brown stitches. The supports should frame the globe without covering its front.
- Weave in the remaining ends. Confirm that the roof seam is secure, the green loop stays centered, and the clasp swivels freely. Gently check the sewn connections before use.
Copyright & Credits
This crochet pattern and all accompanying photos belong to Blog.AmigurumiAllFreePatterns.com. The written instructions and photos may not be copied, redistributed, translated, republished, or used for commercial purposes without permission. Finished items made from this pattern may be sold in small quantities with credit to Blog.AmigurumiAllFreePatterns.com.
Ami_esnek (yatay)
Pick Your Favorite & Pin It
CONTENT END 1
