

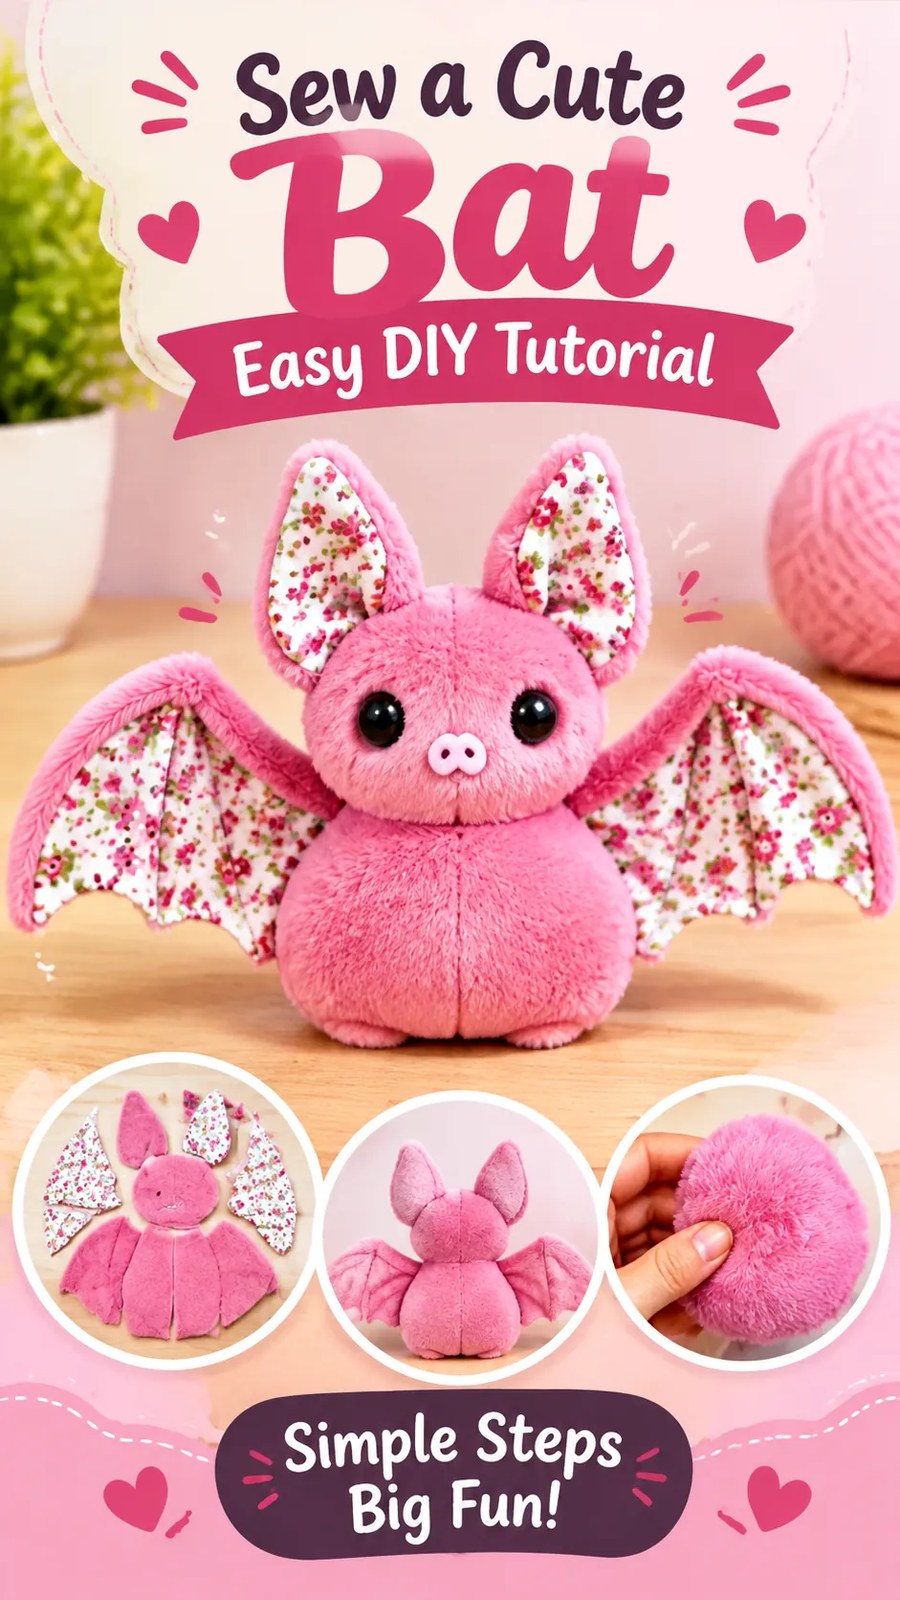
Create an adorable handmade plush bat with this free bat sewing pattern! This sweet stuffed animal features a soft pink fuzzy body, a round face, oversized upright ears, and beautiful floral fabric wings. The combination of fluffy pink fabric and delicate printed cotton gives the little bat a charming, whimsical appearance that makes it a lovely handmade gift, Halloween decoration, or addition to a collection of handmade plush toys.
This original sewing tutorial explains how to create a similar character using simple shaped fabric pieces, a lightly stuffed body, a rounded padded head, and separately constructed wings. The pattern is designed to be approachable for confident beginners who are comfortable sewing curved seams and working with plush fabric. You will also find practical cutting measurements, fabric recommendations, construction instructions, and customization ideas.
Key Takeaways
- Create a cute stuffed bat with a rounded head, tapered body, pointed ears, and decorative wings.
- Use soft pink plush fabric for the main body and contrasting floral cotton for the wing details.
- Learn how to sew curved seams, attach separate components, stuff a soft toy, and finish small openings neatly.
- The original pattern is designed for an approximately 11-inch (28 cm) finished hanging plush bat.
- Customize the design with different colors, printed fabrics, embroidered facial features, and decorative stitching.
- A manageable sewing project for confident beginners and intermediate sewing enthusiasts.
Meet This Adorable Plush Bat Sewing Project
The featured design is a small stuffed fabric bat with a particularly sweet and playful appearance. Its most recognizable features are the round pink head, large upright ears, dark round eyes, tiny embroidered nose, and broad bat wings decorated with a floral print.
The body has a soft, elongated silhouette that narrows toward the bottom. This shape gives the finished toy a hanging or resting appearance rather than the proportions of a conventional upright teddy bear.
The wings are especially important to the design. Their curved outer edges and pointed lower sections create a recognizable bat silhouette, while the floral fabric adds a delicate decorative contrast to the fuzzy pink body.
The face is kept simple, with two dark eyes and a small nose. These details make the character expressive without requiring complicated embroidery or sculptural techniques.
How the Bat Is Constructed
For this original interpretation, the toy is constructed from several separate sewn components rather than one complicated continuous pattern piece.
- Head: Two circular fabric panels joined with a narrow side gusset to create a softly rounded shape.
- Body: Two matching tapered panels sewn together around the outer edges and lightly stuffed.
- Ears: Two small pointed fabric ears made with contrasting floral cotton on the front and pink plush on the back.
- Wings: Two mirrored fabric wings, each made from floral cotton and a pink backing layer.
- Face: Embroidered or securely attached facial details positioned on the front of the head.
This approach makes the project easier to construct, stuff, and customize. It also allows the wings and ears to be made independently before they are attached to the main body.
Fabric Choices and Sewing Techniques for a Plush Bat
The visual appeal of this project comes largely from the contrast between the fuzzy main fabric and the smooth floral wing fabric. Recreating that contrast is more important than choosing an exact fiber or fabric composition.
Recommended Main Fabric
For the head and body, choose a soft, medium-weight plush fabric such as short-pile minky, velboa, fleece, or another suitable synthetic plush textile.
A fabric with a short, even pile is particularly helpful because it makes small facial details easier to position and reduces bulk around the curved seams.
Choose a fabric that is soft but stable enough to handle without excessive stretching. Very stretchy plush can distort the head and body shapes, making the finished toy difficult to assemble evenly.
Recommended Contrasting Fabric
For the ears and wings, use lightweight to medium-weight woven cotton. A small floral print in pink, cream, green, or other soft colors creates a delicate contrast against the main plush fabric.
Quilting cotton is a practical choice because it is easy to cut accurately, holds its shape, and is suitable for small decorative components.
For a coordinated appearance, select a floral print that includes at least one shade similar to the main body fabric.
Needles, Thread, and Stitching
A universal sewing machine needle in size 80/12 is a useful starting point for the cotton components. For thicker plush fabrics, a size 90/14 universal or ballpoint needle may work better depending on the textile structure.
Use quality all-purpose polyester thread. It provides useful strength and flexibility for stuffed toys.
Recommended machine settings include:
- Stitch length: approximately 2.5 mm for ordinary seams.
- Stitch length: approximately 2.0 mm around tight curves and small components.
- Seam allowance: 1/4 inch (6 mm) throughout the original pattern.
- Stitch type: straight stitch for joining fabric components.
- Finishing: hand-sewn ladder stitch for closing stuffing openings.
Important sewing tip: Plush fabric can hide the stitching line and make seam allowances bulky. Gently brush the pile away from the stitching path before sewing, and use clips rather than pins when possible. Always test your needle and stitch settings on fabric scraps first.
Free Plush Bat Sewing Pattern
Free Sewing Pattern: Pink Floral-Wing Bat
Project name: Sweet Pink Plush Bat
This original interpretation uses a separately stuffed rounded head, a tapered stuffed body, two decorative ears, and two lined wings. The construction is designed to create a soft hanging plush character inspired by the visible design.
Pattern Overview
| Specification | Details |
|---|---|
| Skill level | Confident beginner |
| Estimated sewing time | 3 to 4 hours |
| Finished height | Approximately 11 inches (28 cm) |
| Head diameter | Approximately 3.5 inches (9 cm) |
| Body length | Approximately 7 inches (18 cm) |
| Wingspan | Approximately 10.5 inches (27 cm) |
| Main fabric | Short-pile pink plush |
| Contrasting fabric | Floral woven cotton |
| Seam allowance | 1/4 inch (6 mm), included in all cutting dimensions |
| Closure | Hand-stitched stuffing openings |
| Lining | Not required for the head or body; wings and ears are self-lined |
Materials and Fabric Quantities
- Pink plush fabric: 1/3 yard (0.30 meter), assuming 44-inch (112 cm) usable width.
- Floral cotton fabric: 1/4 yard (0.23 meter), assuming 44-inch (112 cm) usable width.
- Polyester fiberfill: approximately 2 to 3 ounces (57 to 85 grams).
- All-purpose polyester thread in pink and a coordinating floral color.
- Dark embroidery floss for the eyes.
- White or pale pink embroidery floss for the nose and mouth.
- Hand-sewing needle and sewing machine.
- Fabric scissors or rotary cutter.
- Measuring tape and clear ruler.
- Fabric marker or chalk.
- Wonder clips or sewing pins.
- Blunt turning tool or chopstick.
- Small amount of temporary fabric adhesive, optional, for positioning embroidery backing if needed.
The fabric quantities are approximate and include a little allowance for cutting mistakes and fabric direction. The layout assumes the plush pile runs in one direction and the floral cotton does not require extensive pattern matching.
Pattern Terminology and Abbreviations
- RS: Right side of the fabric, or the side intended to be visible.
- WS: Wrong side of the fabric.
- SA: Seam allowance.
- Clip: Make small cuts into the seam allowance without cutting through the stitching.
- Notch: Remove a small amount of seam allowance from a curved edge to reduce bulk.
- Ladder stitch: A nearly invisible hand stitch used to close a turning opening.
- Mirrored pieces: Two pieces cut in opposite orientations so they form matching left and right components.
Preparing the Fabric
Prewash the cotton fabric according to its care instructions, then dry and press it before cutting. This helps prevent later shrinkage.
Check the plush manufacturer’s care recommendations. If washing is permitted, wash a small sample first and allow it to dry completely before using the fabric for the project.
Brush the plush pile in one direction and mark the grain or pile direction on the wrong side. Keep the pile running downward from the head toward the bottom of the body for a consistent finish.
All cutting dimensions below include a 1/4-inch (6 mm) seam allowance. Use inches as the primary drafting system, and treat the centimeter equivalents as practical rounded conversions.
Complete Cutting List
| Pattern piece | Material | Quantity | Cut dimensions | Notes |
|---|---|---|---|---|
| Head circles | Pink plush | 2 | 4.25-inch (10.8 cm) diameter | Mark quarter points |
| Head gusset | Pink plush | 1 | 1.25 × 13.75 inches (3.2 × 34.9 cm) | Join into a ring |
| Body panels | Pink plush | 2 mirrored | 7.5 × 5 inches (19.1 × 12.7 cm) maximum | Tapered silhouette |
| Ear fronts | Floral cotton | 2 mirrored | 2.5 × 3.5 inches (6.4 × 8.9 cm) | Pointed leaf shapes |
| Ear backs | Pink plush | 2 mirrored | 2.5 × 3.5 inches (6.4 × 8.9 cm) | Match ear fronts |
| Wing fronts | Floral cotton | 2 mirrored | 6.25 × 5 inches (15.9 × 12.7 cm) maximum | Bat-wing outline |
| Wing backs | Pink plush | 2 mirrored | 6.25 × 5 inches (15.9 × 12.7 cm) maximum | Match wing fronts |
Drafting the Head and Gusset
Draw two circles measuring 4.25 inches (10.8 cm) in diameter. A compass, round plate, or circular template can help you achieve an even shape.
Divide each circle into four equal sections by marking the top, bottom, left, and right points. These marks will help you distribute the gusset evenly.
Cut one gusset strip measuring 1.25 inches (3.2 cm) wide and 13.75 inches (34.9 cm) long. The extra length provides a small fitting allowance when joining the ends. The finished joined gusset should measure approximately 13.5 inches (34.3 cm) around its centerline.
Join the short ends of the strip with a 1/4-inch (6 mm) seam to create a ring. Press the seam open gently using a low heat setting if the plush fabric permits, or finger-press it instead.
Drafting the Tapered Body
Draw a vertical centerline measuring 7.5 inches (19.1 cm). This is the center of the body pattern.
At the upper end, draw a horizontal line measuring 4.5 inches (11.4 cm), centered on the vertical line. At the lower end, draw a horizontal line measuring 1.5 inches (3.8 cm), also centered.
Join the ends of these lines with smooth curves. The sides should gradually narrow from the upper body toward the bottom, creating a soft tapered silhouette.
Round the upper corners slightly rather than leaving them sharply squared. The finished top edge should fit comfortably beneath the head.
Trace the finished outline onto the plush fabric twice, reversing the pattern for the second panel. Cut the two panels as mirrored pieces.
Drafting the Pointed Ears
Draw a vertical centerline measuring 3 inches (7.6 cm). At the base, draw a horizontal line measuring 2 inches (5.1 cm), centered on the vertical line.
Mark a point at the top of the centerline. Create a gently curved outer shape by connecting the top point to the two base corners. Round the lower corners slightly to avoid bulky seams.
The resulting ear should resemble an elongated leaf with a rounded bottom and a softly pointed tip. Add the 1/4-inch (6 mm) seam allowance around the shape, then use the same outline for the two floral fronts and two plush backs.
Drafting the Bat Wings
Each wing is a separate, approximately triangular shape with a curved upper edge and three rounded scallops along the lower edge.
For each wing, draw a horizontal base line measuring 6 inches (15.2 cm). Mark its inner attachment point at one end. Measure upward 4.75 inches (12.1 cm) at the outer end and draw a gently rising upper edge between the points.
Shape the outer tip into a rounded point. Along the lower edge, mark three shallow valleys and four rounded projections. The scallops should become progressively narrower toward the outer tip.
Use smooth curves rather than sharp corners. The finished silhouette should look like a stylized bat wing rather than a rigid geometric triangle.
Repeat the drafting process in reverse for the opposite wing. Cut two mirrored floral fronts and two mirrored plush backs. The inner edge of each wing will remain relatively straight so it can be attached neatly to the body.
Pro Tip: Before cutting the final plush fabric, make a quick paper version of the body and wings. Place the pieces together to check the overall proportions. This simple step makes it easier to correct a wing that is too narrow or an ear that looks oversized.
Complete Step-by-Step Sewing Instructions
Step 1: Prepare the Facial Features
Begin with one head circle. Identify the side that will become the front of the bat’s face.
Mark two eye positions approximately 1 inch (2.5 cm) below the upper center point and about 1.1 inches (2.8 cm) apart. Adjust the spacing slightly if you prefer a wider or narrower expression.
Use dark embroidery floss to create two small oval eyes. Satin stitch or tightly worked French knots can produce a rounded appearance.
Add a tiny nose using white or pale pink embroidery floss. Work a small inverted triangular shape, then add a short vertical stitch below it if you want a simple mouth.
Secure all thread ends on the wrong side. If the project is intended for a young child, embroidered features are preferable to plastic safety eyes or other detachable components.
Step 2: Sew the Rounded Head
Fold the gusset ring in half and mark the two opposite points. Mark the two remaining quarter points by folding again.
Match the four gusset marks to the corresponding quarter marks on the front head circle. Place the right sides together and clip around the circumference.
Stitch with a 1/4-inch (6 mm) seam allowance, removing clips as you approach them. Sew slowly around the curve, keeping the fabric edges aligned.
Repeat with the second head circle on the opposite side of the gusset, leaving an opening approximately 1.5 inches (3.8 cm) long along the lower section for turning and stuffing.
Clip the curved seam allowances at regular intervals, taking care not to cut the stitches. Turn the head right side out through the opening.
Insert small amounts of polyester fiberfill, distributing it evenly around the head. Work the filling gently into the sides and top of the gusset to create a rounded shape.
Continue stuffing until the head feels soft but holds its shape. Avoid packing it so tightly that the seams stretch.
Close the opening with a ladder stitch, making small, even stitches along the folded seam allowances.
Step 3: Construct the Ears
Place one floral ear front and one pink plush ear back with their right sides facing each other.
Clip around the curved edges and sew using a 1/4-inch (6 mm) seam allowance. Leave an opening approximately 1 inch (2.5 cm) wide along the lower edge.
Trim small amounts from the seam allowance near the pointed tip, being careful not to cut through the stitching. Clip the curves where needed.
Turn the ear right side out. Use a blunt turning tool to shape the point gently.
Finger-press the edges and lightly fill the ear with a very small amount of fiberfill if you prefer a slightly dimensional appearance. Alternatively, leave it unstuffed for a softer, flatter ear.
Fold the opening edges inward by 1/4 inch (6 mm) and close them with small hand stitches.
Repeat for the second ear, ensuring that the floral fronts face outward when the ears are positioned on the head.
Step 4: Sew the Wings
Place one floral wing front and one pink plush wing back with their right sides together.
