

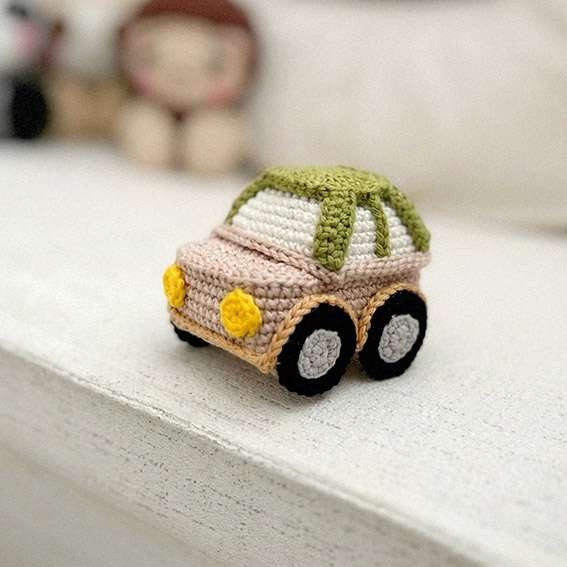
Crochet a compact little vehicle with this free amigurumi car pattern, featuring a soft beige body, white cabin, pistachio green roof, bright yellow headlights, and bold black wheels with gray centers. The layered trim around the body and wheel arches gives the car a finished, structured look, while the rounded hood and raised cabin create an instantly recognizable shape. It is a fun choice for vehicle-themed crochet collections, playful shelf decor, or a small handmade project with plenty of detail.
Ami_kare 300×250

Ami_kare 300×250
Crochet a Detailed Toy Car With a Shaped Hood and Roof
The construction combines a crocheted base and shaped sides with separate pieces for the roof, hood, window outlines, wheels, body trim, and headlights. An internal acetate support helps the body hold its form, while stuffing adds volume through the main car section. This free crochet pattern also uses contrasting colors and layered outlines to highlight the windows, wheel arches, and body edges for a distinctive miniature car finish.
FREE CAR AMIGURUMI CROCHET PATTERN
Designer: Pontinha da Agulha
Instagram: @pontinhadaagulha
Materials
• Amigurumi yarn — Black, Almond Beige, Pistachio, Canary Yellow, White, Caramelito, and Gray; quantities not specified by source
• 2 mm crochet hook
• Fiberfill
• Acetate sheet
• Glue
Ami_esnek (yatay)
Abbreviations
MR — magic ring
ch — chain
sl st — slip stitch
sc — single crochet
inc — increase
dec — invisible decrease
triple inc — 3 sc in the same stitch
Ami_esnek (yatay)
Notes
• The Main Part begins with back-and-forth Rows, then continues in circular Rounds.
• Turning ch does not count as a stitch.
• Gray is required in the Wheel section although it is omitted from the source materials list.
• White is listed by the source and visible on the finished car, but the supplied instructions do not specify where the White color change occurs.
• The source uses glue for the Top, Window Outlines, Car Outline, Wheel Outline, Wheels, and Headlights.
• Stuff the Main Part as you work and finish stuffing while attaching the Car Hood.
Ami_esnek (yatay)
Main Part
Using Almond Beige.
Ch 13. Starting in the 2nd ch from the hook:
Rows 1-17: 12 sc. (12)
At the end of each Row, ch 1 and turn. Do not count the turning ch as a stitch.
Without cutting the yarn, work around the entire rectangle. Work 3 sc in each corner.
Rnd 1: In the same base st as the final sc of Row 17, work 2 more sc; 15 sc, triple inc, 10 sc, triple inc, 15 sc, triple inc, 11 sc. (62)
Attach a piece of acetate to the back of this piece.
Rnds 2-7: 62 sc. (62)
Rnd 8: 13 sc, ch 14, 23 sc on the opposite side of the car. Leave 26 sts unworked at the front.
See Photo 1.

Rnd 9: 12 sc, inc, 14 sc across the chains, inc, 22 sc. (52)
Rnd 10: 52 sc. (52)
Rnd 11: Triple inc, 9 sc, 2 dec, 11 sc, 2 dec, 9 sc, triple inc, 9 sc. (44)
Rnd 12: 14 sc, dec, 4 sc, dec, 22 sc. (42)
Rnd 13: Dec, 7 sc, 2 dec, 7 sc, 2 dec, 7 sc, 2 dec, 7 sc. (37)
Rnd 14: 37 sc. (37)
Rnd 15: Dec, (5 sc, 2 dec) x3, 5 sc. (27)
Source note: 1 sc will remain.
Rnd 16: (Triple inc, 4 sc) x4. (20)
Rnd 17: Dec, sc, (2 dec, sc) x3, dec. (12)
Fasten off and close the opening with an inverted MR. Stuff the Main Part. Lightly stuff the uncovered front section as well.
Top Of The Car
Using Pistachio.
Rnd 1: 8 sc in MR. (8)
Rnd 2: 8 inc. (16)
Rnd 3: Sc, (triple inc, 3 sc) x3, triple inc, 2 sc. (24)
Rnd 4: 2 sc, (triple inc, 5 sc) x3, triple inc, 3 sc. (32)
Fasten off. Glue to the top of the car.
Ami_kare 300×250
