

Total: 6 sts.
Round 2: Ch 1. Work 2 sc in every stitch around. Join with a sl st.
Total: 12 sts.
Round 3: Ch 1. Work (sc in the next st, 2 sc in the next st) 6 times. Join with a sl st.
Total: 18 sts.
FO, leaving a long yarn tail for sewing. Gently flatten each ear into a rounded half-circle shape. The lower portion will be attached to the top edge of the oval.
Repeat the complete instructions to make the second ear.
Part 4: Attach the Bear Ears
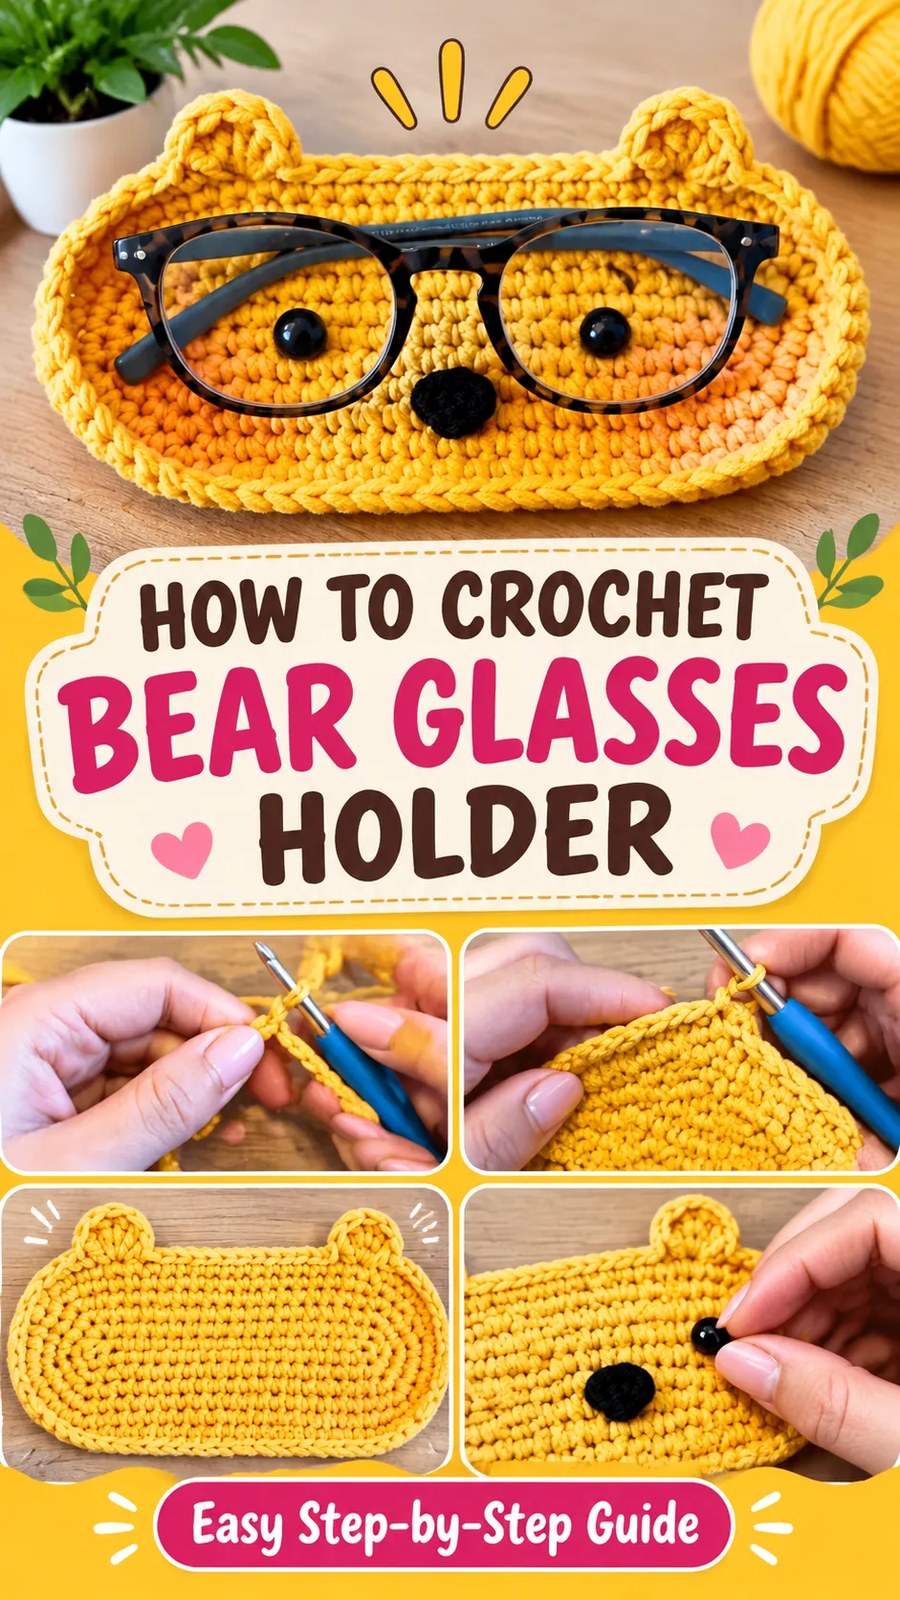
Place the main oval on a flat surface with the right side facing upward. Identify the upper rounded end that will become the top of the bear’s face.
- Position the first ear near the upper-left side of the oval.
- Position the second ear near the upper-right side.
- Leave approximately 1.5 to 2 inches (3.8 to 5 cm) between the inner edges of the ears, adjusting the spacing to suit your base.
- Use locking stitch markers to hold both pieces in position.
- Thread the yarn tails onto a yarn needle.
- Sew the lower curved edge of each ear securely to the upper edge of the oval.
- Pass the needle through several stitches on both pieces, keeping the seam neat and flat.
- Weave in the remaining yarn ends on the wrong side.
Check that both ears are positioned symmetrically. If one ear sits higher than the other, remove the temporary markers and adjust the placement before sewing permanently.
Part 5: Add the Bear’s Cheeks
Use peach or light orange yarn to create two soft cheek accents. These details give the bear a warm, friendly expression.
For each cheek, use surface embroidery rather than making a separate appliqué. This keeps the face smooth and avoids adding unnecessary bulk beneath the glasses.
- Thread a yarn needle with peach yarn.
- Choose a position on the lower-left side of the face, below where the eye will be placed.
- Work several short horizontal satin stitches close together to create a small oval patch.
- Build the patch gradually, adding stitches until the desired shape is achieved.
- Repeat on the opposite side, matching the approximate size and placement.
- Secure both yarn ends on the wrong side of the base.
Keep the cheek patches relatively small so they do not interfere with the space needed for the glasses.
Part 6: Embroider the Eyes and Nose
Use black yarn for the facial details. Embroidery gives the bear a cute expression while keeping the surface comfortable for placing glasses.
The Eyes
- Mark two eye positions on the upper-middle area of the face.
- Keep the eyes approximately 1.5 to 2 inches (3.8 to 5 cm) apart, adjusting the spacing to suit the finished base.
- Use black yarn to embroider a small circular shape at each marked position.
- Make several small stitches through the same area to create a rounded, filled appearance.
- Keep the two eyes similar in size.
- Secure the yarn ends on the wrong side.
The Nose
Place the nose between the eyes and slightly below them. Use black yarn to embroider a small oval or rounded triangular shape.
Work several closely packed satin stitches to fill the shape. Add a short vertical stitch beneath the nose if you want a more traditional bear expression.
Do not pull the embroidery too tightly. The base should remain flat rather than puckering around the facial features.
Part 7: Final Assembly and Finishing
- Lay the completed holder on a flat surface with the bear face facing upward.
- Check both ears and confirm that their seams are secure.
- Inspect the cheek embroidery and facial details.
- Weave in all remaining yarn tails.
- Trim excess yarn carefully without cutting into the crochet stitches.
- Gently shape the oval base with your hands.
- Check that the raised border is even and that the holder rests flat.
Your crochet bear glasses holder is now complete. Place a pair of glasses across the face to check the fit. The holder should provide enough room for the lenses and temples without forcing them against the raised border.
Important use note: This design is an open decorative glasses rest, not a protective travel case. It does not fully enclose the glasses or prevent dust, pressure, or scratches. For best results, use it on a stable surface and avoid placing heavy objects on top of the glasses.
Customizing Your Crochet Bear Glasses Holder
One of the nicest things about this crochet project is how easily you can personalize the finished bear. The basic oval construction stays the same, while small changes to the yarn colors and facial details create completely different personalities.
Choose Different Bear Colors
Golden yellow creates a cheerful, honey-colored bear, but many other shades work beautifully.
- Classic teddy bear: Use medium brown yarn with cream-colored cheeks.
- Polar bear: Choose white or ivory yarn with a black nose.
- Soft pastel bear: Try pale pink, lavender, or baby blue.
- Natural bear: Combine caramel, beige, and chocolate brown.
- Honey bear: Use mustard yellow with warm peach accents.
For a coordinated look, choose a cheek color that contrasts gently with the main yarn rather than using a shade that is too similar.
Adjust the Size for Different Glasses
The suggested base measures approximately 8.75 x 4.5 inches (22 x 11.5 cm). This provides a useful starting point for many ordinary eyeglasses, but larger sunglasses may need a wider or longer resting surface.
To make the holder longer, increase the foundation chain length. Each additional chain adds approximately the width of one single crochet stitch to the straight portion of the oval.
To make the holder wider, add another oval increase round before creating the raised border. Continue distributing increases evenly around both rounded ends, keeping the long sides straight.
For example, after Round 6, another increase round can be added as follows:
Optional Round 7: Ch 1. Work (sc in each of the next 5 sts, 2 sc in the next st) 3 times, sc in each of the next 28 sts, (sc in each of the next 5 sts, 2 sc in the next st) 3 times, then sc in each of the final 28 sts. Join with a sl st.
Total: 98 sts.
When using this optional round, move the back-loop border and both following regular single crochet rounds one round later. The finished base will be slightly wider, and the yarn requirement will increase.
Size reminder: Measure the glasses before changing the pattern. Allow enough space for the lenses and temples to rest comfortably inside the oval. A holder that is too small may cause the glasses to extend beyond the base or press against the ears.
Experiment with Facial Expressions
The face can be customized with just a few embroidery changes.
- Make larger eyes for a more playful cartoon appearance.
- Use dark brown instead of black for a softer expression.
- Add small eyebrows using short embroidered lines.
- Change the nose from oval to triangular.
- Use smaller cheek patches for a subtle expression.
For a different animal-inspired design, the same oval base can also become the starting point for a cat, puppy, or panda glasses holder. Simply modify the ears, facial colors, and embroidered features.
Common Crochet Mistakes and How to Fix Them
Although the pattern uses basic stitches, oval shaping and decorative assembly require a little attention. Checking your work as you go will help produce a neat, balanced result.
The Oval Base Is Curling
If the base curls upward, your stitches may be too tight or the oval may not have enough width. Check that you have completed all the increases in the rounded sections. Also make sure the hook size is suitable for your yarn and tension.
A small amount of gentle shaping can help flatten the base, but severe curling usually indicates a tension or stitch-count problem that should be corrected before adding the border.
The Edges Look Wavy
Wavy edges generally indicate too many increases or accidental extra stitches. Count your stitches at the end of every round and check that the increases are placed only in the designated rounded sections.
For this pattern, the oval should have 92 stitches after Round 6. Do not add increases during the border rounds.
The Ears Look Uneven
Before sewing the ears permanently, position them with locking stitch markers and compare their distance from the center. Make sure the lower edges follow the curve of the oval and that both ears sit at approximately the same height.
If one ear appears larger, check your stitch count and tension. Both pieces should contain 18 stitches after their third round.
The Facial Features Look Uneven
Uneven embroidery can change the entire expression of the bear. Use removable stitch markers to indicate the positions of the eyes, nose, and cheeks before sewing.
Step back and look at the face from a short distance. This makes it easier to spot differences in spacing that may not be obvious when working close to the fabric.
The Holder Does Not Sit Flat
If the base rocks or twists, check the foundation chain and the first few rounds. Uneven tension can cause the oval to distort. A gentle blocking session may help minor irregularities, but correcting uneven stitch placement is preferable when the problem is significant.
Finishing, Shaping, and Caring for Your Crochet Holder
Good finishing techniques make a noticeable difference to small crochet accessories. Once all the components have been attached, take a few minutes to inspect the seams, smooth the edges, and remove loose yarn ends.
Weaving in the Yarn Ends
Use a yarn needle to weave each loose end through several stitches on the wrong side. Change direction once or twice to help secure the yarn. Avoid leaving long tails near the glasses-contact surface because they can catch on frames or lenses.
Blocking and Shaping
Cotton crochet usually benefits from gentle shaping rather than aggressive blocking. Lightly dampen the finished holder if the yarn care instructions permit it, then lay it flat on a clean towel.
Use your hands to smooth the oval outline and position the ears evenly. Allow the piece to dry completely before using it.
Avoid stretching the base excessively, as this may distort the rounded ends and make the raised border uneven.
Cleaning and Storage
Follow the care instructions for the yarn you choose. If the holder is made from washable cotton, gentle hand washing with mild detergent is a suitable option. Avoid harsh scrubbing around the embroidered facial details.
After washing, reshape the holder and dry it flat. Make sure it is completely dry before placing it back on a wooden desk or bedside table.
To protect your glasses, keep the resting surface free from dust, loose fibers, and decorative objects that could scratch the lenses. You can also place a clean, soft lens cloth over the base when the holder is not in use.
Creative Ways to Use Your Handmade Bear Glasses Holder
Although this project is designed primarily for eyeglasses, its cute appearance makes it suitable for several decorative uses around the home.
- Bedside organization: Keep reading glasses within easy reach next to your bed.
- Desk accessory: Add a cheerful handmade detail to a home office or study area.
- Reading corner: Place the bear near your favorite books and reading accessories.
- Gift idea: Pair the holder with a handmade bookmark or a small crochet accessory.
- Craft-room decoration: Use different bear colors to create a coordinated collection.
You can also make several holders in different colors for family members. Personalizing each one with a different expression makes it easier to distinguish between them while adding a playful touch to everyday organization.
At a Glance: Crochet Bear Glasses Holder
- Best yarn: Medium-weight cotton or cotton-blend yarn for a firm, defined fabric.
- Skill level: Advanced beginner, with single crochet, increases, and simple embroidery.
- Key technique: Oval shaping in joined rounds, followed by a back-loop border and regular single crochet rounds.
- Size adjustment: Change the foundation chain for length or add an oval increase round for extra width.
- Finishing: Attach two rounded ears, embroider the facial details, weave in the ends, and gently shape the base.
Make Your Own Cute Crochet Bear Glasses Holder
This crochet bear glasses holder is a charming way to combine simple crochet techniques with a useful everyday accessory. Its elongated oval base, rounded ears, and embroidered bear face create a recognizable design without requiring complicated stitches or advanced shaping.
The original free crochet pattern provides a practical starting point for making your own version. With medium-weight cotton yarn, a suitable crochet hook, and a little patience, you can create a neat handmade glasses rest that looks lovely on a desk, bedside table, or reading shelf.
Before beginning, choose your favorite bear-inspired colors, check your gauge, and read through the complete instructions. Pay particular attention to the oval increases and the placement of the ears, as these details help create a balanced finished shape.
Most importantly, have fun personalizing the face. Experiment with different cheek colors, embroidered eyes, and small expression details to give your bear its own personality. Whether you make one for yourself or create several as thoughtful handmade gifts, this cute crochet glasses holder is a delightful project to add to your collection of crochet accessories.
Tags
Crochet Glasses Holder
Crochet Bear Pattern
Free Crochet Pattern
Crochet Eyeglasses Holder
Cute Crochet Accessories
Easy Crochet Projects
Handmade Crochet Gifts
Crochet Home Accessories
