

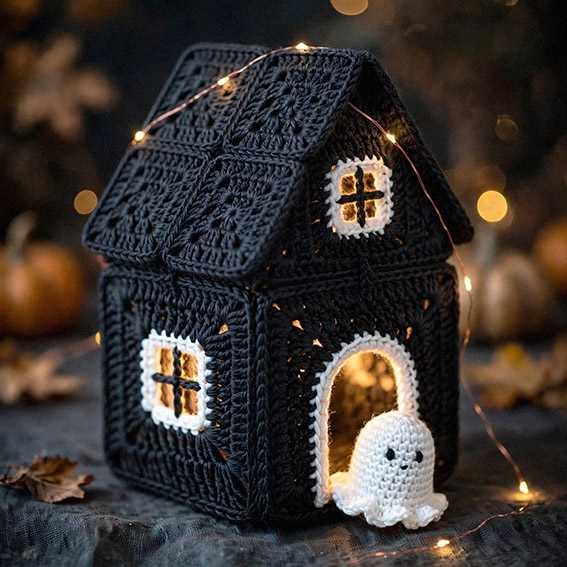
Charcoal granny squares shape the steep roof and walls of this little haunted house, while white-trimmed windows and an open arched doorway give it a storybook silhouette. A tiny white ghost with a scalloped hem sits beside the entrance. This free crochet pattern brings both pieces into one Halloween display, combining solid square motifs, open window frames, and a pitched roof that reveals a warm glow when optional battery-powered lights are added.
Ami_kare 300×250

Ami_kare 300×250
A Little Haunted House with Open Crochet Details
Smaller granny squares are joined into two roof slopes, with larger motifs forming the walls and open-centered squares framing the side windows. A triangular front gable holds another window, outlined in white with black crossbars. The doorway is shaped from separate panels so the opening stays clear, and the ghost is crocheted in spiral rounds with a gently flared ruffle and a flat base. A little stuffing gives it shape.
FREE GRANNY SQUARE HAUNTED HOUSE AND GHOST CROCHET PATTERN
Difficulty Level: Advanced
Materials and Tools
• DK-weight cotton yarn: charcoal black and white
• 2.5–3.0 mm crochet hook
• Polyester fiberfill
• Black sewable plastic canvas for structural support
• Yarn needle, scissors, stitch markers, measuring tape
• Battery-operated, low-heat warm-white LED lights (optional)
Ami_esnek (yatay)
Abbreviations
MR – magic ring
ch – chain
sc – single crochet
hdc – half double crochet
dc – double crochet
sl st – slip stitch
inc – increase (2 sc in the same stitch)
hdc2tog – half double crochet decrease
FLO – front loop only
st(s) – stitch(es)
RS/WS – right side/wrong side
Ami_esnek (yatay)
Finished Size
House: approximately 14 × 14 × 21 cm (5.5 × 5.5 × 8.25 in).
Ghost: approximately 6 cm (2.4 in) tall.
Ami_esnek (yatay)
Notes
• Work granny squares in joined rounds, flat panels in turned rows, and the ghost in continuous spiral rounds.
• Beginning ch 3 counts as the first dc in granny squares. Other turning chains do not count as stitches.
• Each granny-square corner is (2 dc, ch 2, 2 dc).
• Block wall squares to 7 × 7 cm and roof squares to 5 × 5 cm.
• For the front doorway panels, aim for 30 hdc across the combined top and 33 hdc rows in height to measure approximately 14 × 14 cm. Match the gable width to the front wall.
• Keep all windows, the doorway, and the underside open.
Solid Granny Squares – Walls (Make 10)
Use charcoal black.
Round 1: MR, ch 3, 2 dc, ch 2, (3 dc, ch 2) × 3. Join. (12 dc, 4 corners)
Round 2: Sl st to the next corner. Work (2 dc, ch 2, 2 dc) in each corner and dc in each of the 3 sts between corners. Join. (28 dc)
Round 3: Repeat corner groups, with 7 dc between corners. Join. (44 dc)
Round 4: Repeat corner groups, with 11 dc between corners. Join. (60 dc)
For each round after Round 1, use ch 3 as the first dc of the starting corner group. Fasten off. Block to 7 × 7 cm.
Open-Window Granny Squares (Make 2)
Foundation: With white yarn, ch 28 and join into a ring without twisting.
Round 1: (Sc in next 7 chains, ch 2) × 4. Join. (28 sc, 4 corners)
Round 2: Sl st to the next corner. Work (2 dc, ch 2, 2 dc) in each corner and dc in each of the 7 sts between corners. Join. (44 dc)
Round 3: Change to charcoal black. Repeat the corner groups, with 11 dc between corners. Join. (60 dc)
Use ch 3 as the first dc in Rounds 2–3. Fasten off and block to 7 × 7 cm.
With black yarn, embroider reinforced vertical and horizontal crossbars between opposite midpoints of the inner white frame. Leave all four window sections open.
Ami_kare 300×250
Roof Granny Squares (Make 12)
Use charcoal black.
Repeat Rounds 1–3 of the Solid Granny Square pattern. (44 dc)
Block to 5 × 5 cm.
Arrange six squares per roof slope in a 2 × 3 rectangle, with two squares down the slope and three along the ridge. Join with mattress stitch, matching corresponding stitches and corner spaces.
Make two roof slopes, approximately 10 × 15 cm each. Leave the ridge unjoined until assembly.
