

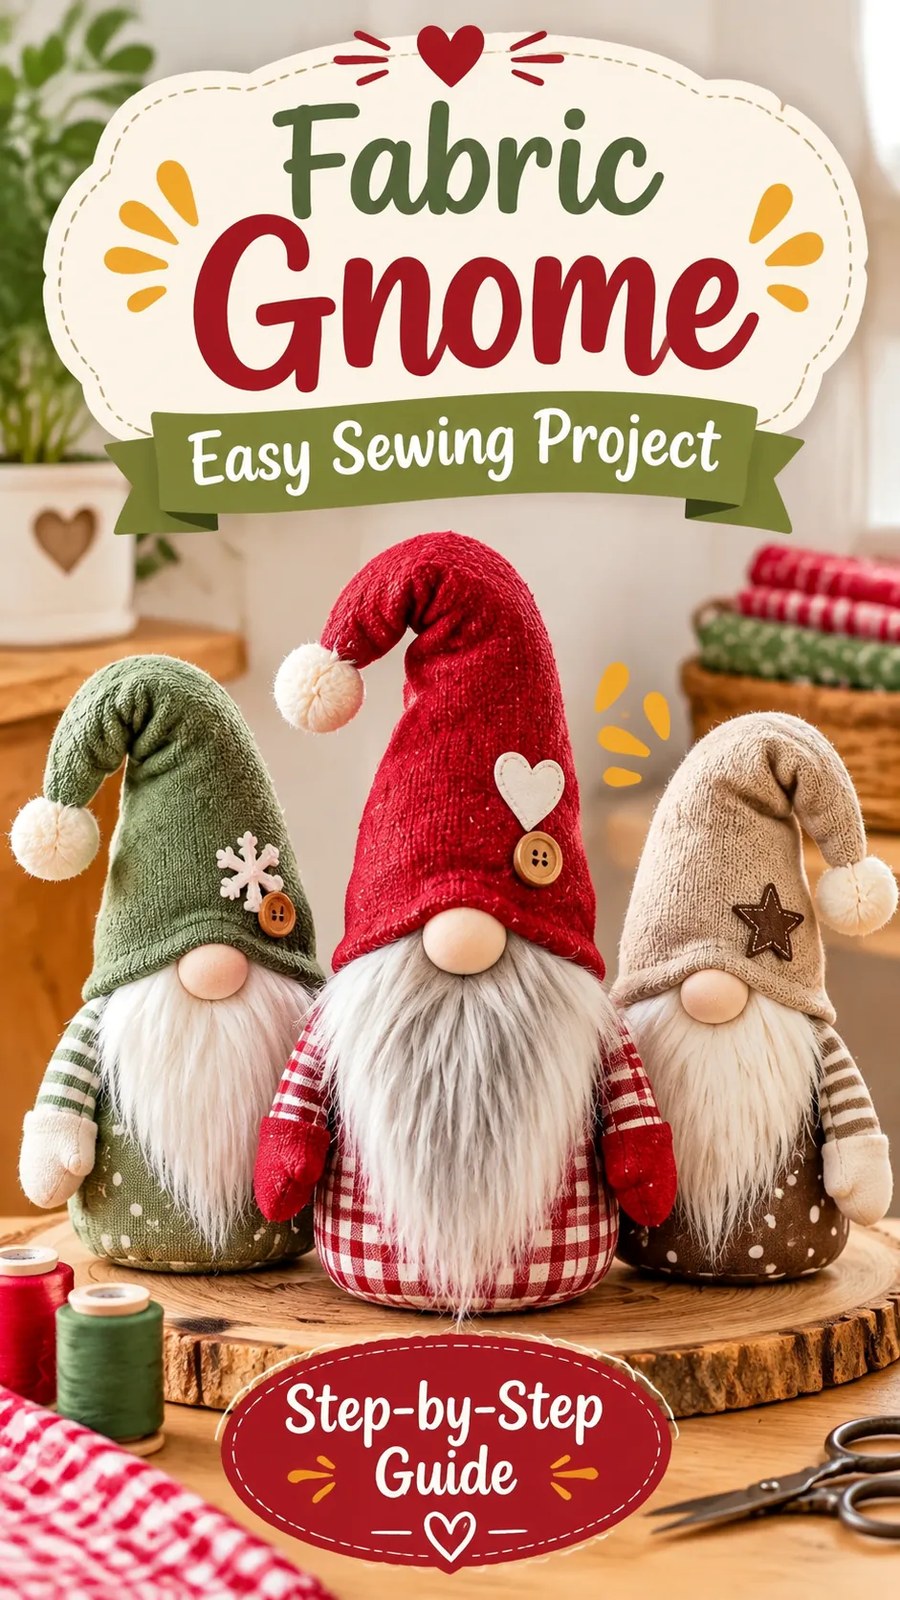
Bring a little handmade Christmas charm into your home with these adorable DIY fabric gnomes! These soft Scandinavian-inspired decorations feature rounded fabric bodies, oversized floppy hats, fluffy beards, and tiny round noses. Their cozy combination of plaid, neutral linen-style fabrics, burgundy red, and muted sage green makes them especially lovely for Christmas decorating, handmade gifts, and holiday craft fairs.
This fabric gnome sewing project is a wonderful way to use small pieces of woven fabric, faux fur, and leftover holiday textiles. The original interpretation in this tutorial uses a simple stuffed body, a two-piece pointed hat, a gathered fabric nose, a soft beard, and small fabric arms. You can make one gnome or create an entire coordinating family by changing the fabrics, hat colors, and beard lengths.
The pattern below provides complete measurements, cutting instructions, and step-by-step construction guidance for a freestanding Christmas fabric gnome. It is designed to be manageable for confident beginners who have basic sewing machine experience.
Key Takeaways
- Project type: Soft stuffed Christmas fabric gnome with a floppy pointed hat and decorative beard.
- Skill level: Confident beginner to intermediate.
- Main techniques: Straight stitching, curved seams, gathering, turning, stuffing, and hand sewing.
- Recommended fabric: Medium-weight woven cotton, linen blends, flannel, or lightweight upholstery fabric.
- Special details: Faux-fur beard, gathered fabric nose, optional embroidered decorations, and weighted base.
- Customization: Change the body fabric, hat shape, beard length, and decorative details to create a coordinated Christmas collection.
Meet the Handmade Christmas Fabric Gnome
A Christmas fabric gnome is a decorative stuffed figure inspired by traditional Scandinavian-style holiday characters. Its recognizable silhouette combines a rounded body, a long pointed hat that bends or droops to one side, a prominent round nose, and a generous beard.
The pictured design features three coordinated gnomes arranged together. Each has a slightly different color combination, giving the group a collected, handmade appearance.
The central gnome wears a deep burgundy hat and coordinating sleeves, with a striped neutral body fabric. The figure on the left has a soft sage-green hat and plaid body, while the right-hand gnome combines a warm beige hat with a darker checked body. Their long white, gray, and cream-colored beards provide contrast against the woven fabrics.
The noses are simple rounded fabric shapes positioned just below the front edge of each hat. Small metallic bells at the hat tips add a festive finishing touch. The overall construction appears to rely on separate sewn fabric components rather than complicated garment-style tailoring.
Shape, Texture, and Decorative Details
- Body: A compact, rounded stuffed form covered in woven plaid, striped, or neutral fabric.
- Hat: A tall, tapered fabric cap with a soft, flexible point that bends naturally.
- Beard: Long, shaggy faux fur in white, silver-gray, or cream.
- Nose: A small gathered fabric ball that sits below the hat.
- Arms: Small fabric-covered shapes extending from either side of the body.
- Hat decoration: Small jingle bells and optional embroidery or appliqué.
The original pattern below uses a gathered cylindrical body with a separate circular base. This is a practical construction choice that creates a rounded, freestanding figure without requiring complicated sculpted seams. A lightly weighted bottom helps the finished gnome sit securely on a shelf, mantel, or tabletop.
Fabric and Construction Analysis
Choosing the right fabric is important because the gnome combines several different textures. The body needs enough structure to hold its shape, the hat should remain flexible, and the beard should look soft and full.
Best Fabrics for the Gnome Body
Suggested fabrics include medium-weight quilting cotton, cotton-linen blends, lightweight canvas, cotton flannel, and soft woven upholstery fabric.
Small-scale plaid, ticking stripes, traditional checks, and subtle winter prints are particularly suitable. They provide visual interest without overwhelming the small proportions of the finished decoration.
Choose a fabric with minimal stretch and enough body to withstand stuffing. Very lightweight cotton may wrinkle or distort, while extremely heavy upholstery material can make gathering the top difficult.
Hat Fabric and Beard Material
For the hat, use soft flannel, cotton twill, brushed cotton, or a lightweight wool-look woven fabric. These materials allow the pointed section to bend naturally while maintaining enough shape to cover the upper body.
For the beard, use long-pile faux fur, shaggy fleece, or another suitable plush fabric. Faux fur provides the most recognizable fluffy appearance. When cutting it, work from the wrong side and cut only through the backing to avoid unnecessarily chopping the pile.
A cotton fabric nose filled with polyester stuffing creates a soft, rounded shape. You can use a small amount of the same body fabric or choose a coordinating flesh-toned textile.
Recommended Sewing Machine Setup
For the suggested woven fabrics, use a universal sewing machine needle in size 80/12. A size 90/14 needle may be preferable for heavier body fabrics or multiple layers. Use a polyester all-purpose sewing thread for durable construction.
A regular straight stitch with a length of approximately 2.5 mm works well for most seams. Shorten the stitch to approximately 2.0 mm when reinforcing the small gathered nose or securing stress points.
Fabric Selection Tip:
Before cutting the final pieces, test your needle, stitch length, and thread tension on a scrap of each fabric. Faux fur can be bulky at seams, so test the thickness before sewing the actual beard or hat details.
Free Sewing Pattern: DIY Christmas Fabric Gnome
Free Sewing Pattern: Cozy Holiday Fabric Gnome
Project description: A freestanding stuffed Christmas gnome with a rounded woven body, floppy two-piece hat, gathered fabric nose, faux-fur beard, and small fabric arms.
| Pattern detail | Recommendation |
|---|---|
| Skill level | Confident beginner to intermediate |
| Estimated sewing time | 2 to 3 hours per gnome, including hand finishing |
| Finished body size | Approximately 5.5 inches tall (14 cm) and 4.5 inches (11.4 cm) across |
| Finished overall height | Approximately 11 to 12 inches (28 to 30.5 cm), depending on the hat fold |
| Main fabric | Medium-weight nonstretch woven fabric |
| Main fabric quantity | 1/2 yard (0.46 m), 44 to 45 inches (112 to 114 cm) usable width |
| Hat fabric | 1/3 yard (0.31 m), 44 to 45 inches (112 to 114 cm) usable width |
| Beard fabric | One piece approximately 5 x 6.5 inches (12.7 x 16.5 cm) |
| Stuffing | Polyester fiberfill and a secured weighted pouch |
| Needle | Universal 80/12; 90/14 for heavier fabrics |
| Seam allowance | 3/8 inch (1 cm), included in all stated cut dimensions |
| Closure | Hand-stitched body opening and optional decorative bell |
| Fit | Decorative freestanding soft sculpture, not a wearable item |
Materials and Supplies
- 1/2 yard (0.46 m) medium-weight woven body fabric.
- 1/3 yard (0.31 m) coordinating hat fabric.
- Scrap of woven fabric for the nose, approximately 4 x 4 inches (10 x 10 cm).
- Faux fur or shaggy fleece, approximately 5 x 6.5 inches (12.7 x 16.5 cm).
- Small scrap of coordinating fabric for the arms.
- Lightweight woven interfacing, approximately 1/8 yard (0.11 m), optional for very soft hat fabric.
- Polyester fiberfill, approximately 2 to 3 ounces (57 to 85 g), depending on firmness.
- Approximately 1/3 cup (80 ml) dry rice or suitable craft-weighting material.
- One small tightly secured fabric pouch for the weighting material.
- One small decorative jingle bell, optional.
- All-purpose polyester sewing thread.
- Hand-sewing needle and pins or fabric clips.
- Fabric scissors, measuring tape, ruler, marking pencil, and turning tool.
- Optional embroidery floss for decorative details.
Sewing Terminology and Abbreviations
- RS: Right side of the fabric, the intended visible surface.
- WS: Wrong side of the fabric.
- SA: Seam allowance, the distance between the stitching line and cut edge.
- Gathering: Drawing fabric together using long temporary stitches.
- Backstitching: Sewing a few stitches backward and forward to secure a seam.
- Slipstitch: A discreet hand stitch used to close an opening.
- Grainline: The direction parallel to the fabric selvage.
- Topstitching: Visible stitching sewn close to an edge for decoration or reinforcement.
Complete Cutting Guide
All measurements below are cut dimensions in inches, with approximate metric conversions in parentheses. The 3/8-inch (1 cm) seam allowance is included unless a piece is specifically identified as a raw-edge decorative component.
The body uses a rectangular tube gathered at the top and attached to a circular bottom. This construction creates a rounded, slightly relaxed body with a stable base.
| Piece | Material | Quantity | Cut dimensions | Grainline and notes |
|---|---|---|---|---|
| Body tube | Body fabric | 1 | 14.5 x 6.25 in (36.8 x 15.9 cm) | Long edge parallel to selvage |
| Body base | Body fabric | 1 | 5.25 in (13.3 cm) diameter circle | Cut on straight grain or bias |
| Hat panels | Hat fabric | 2 mirrored | See drafting instructions | Base parallel to selvage |
| Nose | Soft woven fabric | 1 | 2.5 in (6.4 cm) diameter circle | Any direction |
| Beard | Faux fur | 1 | 5 x 6.5 in (12.7 x 16.5 cm) | Pile directed downward |
| Arms | Coordinating fabric | 2 | 3 x 4 in (7.6 x 10.2 cm) | Long edge parallel to grain |
| Hand shapes | Skin-tone woven fabric | 4 | 1.5 x 1.5 in (3.8 x 3.8 cm) squares | Optional simplified mitten ends |
Drafting the Hat Pattern
The hat is made from two matching tapered panels. Each panel has a curved lower edge, gently sloping sides, and a long pointed tip. The finished hat is intentionally roomy so it can sit over the gathered upper body and fall naturally to one side.
- Draw a vertical center reference line measuring 8.5 inches (21.6 cm) long. This is the approximate height of one hat panel.
- At the bottom, draw a horizontal base line measuring 8.5 inches (21.6 cm) wide. Mark its center at 4.25 inches (10.8 cm).
- Mark the tip at the top of the center line. To create a slightly bent tip, place this point 1/2 inch (1.3 cm) to the left of the center line.
- At a point 5 inches (12.7 cm) above the base, mark a point 1 inch (2.5 cm) to the right of the center line.
- Draw a smooth curved line from the left base corner through the intermediate point to the tip. Repeat from the right base corner, creating a gently asymmetric tapered shape.
- Round the uppermost point slightly rather than leaving a sharp corner. This helps the fabric turn without a bulky point.
- Measure 3/8 inch (1 cm) outward from the drafted seamline around both sides and the tip to establish the cutting line. Keep the lower edge straight and add the same seam allowance.
- Cut two mirrored panels from the hat fabric. If the fabric has a directional print, place both panels with the print running upward toward the tip.
The finished hat opening is approximately 15 to 16 inches (38 to 41 cm) around, depending on the curve. This generous opening allows the cap to sit over the upper body and be adjusted by folding or positioning it during assembly.
Preparing the Body Base Circle
Draw a circle 5.25 inches (13.3 cm) in diameter. The easiest method is to mark a center point, measure 2.625 inches (6.7 cm) in every direction, and connect the marks with a smooth curve.
This circle is the cut dimension, including the 3/8-inch (1 cm) seam allowance. The resulting seamline diameter is approximately 4.5 inches (11.4 cm), which provides the intended finished body width.
Preparing the Weighted Base
Cut a piece of tightly woven scrap fabric approximately 6 x 4 inches (15.2 x 10.2 cm). Fold it in half with right sides together and stitch the two side edges using a 1/4-inch (6 mm) seam allowance. Turn it right side out and fill it with approximately 1/3 cup (80 ml) of dry rice or suitable craft weighting material.
Fold the raw opening inward and stitch it closed securely with several rows of machine stitching. This pouch will sit inside the bottom of the gnome. Keep all loose weighting material completely enclosed.
Step-by-Step Sewing Instructions
Step 1: Prepare and Cut the Fabric
Prewash the cotton or linen fabrics according to their care instructions if the finished gnome may need occasional washing. Dry and press the fabric before cutting. Do not prewash faux fur unless its manufacturer specifically recommends it.
Lay the body fabric flat with the right side facing up. Cut the rectangular body tube and circular base. Cut the two hat panels, nose circle, beard, and arm pieces using the measurements above.
Mark the center of the body tube’s lower edge and divide the circle into four equal reference points. These marks will help you distribute the circular base evenly when sewing.
For the hat, mark the center of the bottom opening and the midpoint of the curved tip. These references help keep the panels aligned during construction.
Step 2: Sew the Main Body Tube
- Place the body rectangle on your work surface with the right side facing up.
- Bring the two short ends together, folding the rectangle in half with right sides facing each other.
- Align the short edges and pin or clip them together.
- Sew the short edges using a 3/8-inch (1 cm) seam allowance, backstitching at the beginning and end.
- Press the seam allowances open if the fabric allows. For bulky fabric, press them to one side.
- You now have a fabric tube approximately 13.75 inches (34.9 cm) around at the raw seamline and 5.5 inches (14 cm) tall between the finished bottom seam and gathered top.
Keep the tube wrong side out for the next construction step.
Step 3: Attach the Circular Body Base
- Match the quarter marks on the body tube’s lower raw edge to the quarter marks on the circular base.
- Place the base against the bottom of the tube with right sides together.
- Distribute the fabric evenly around the circle. The tube’s lower circumference should be close to the base seamline circumference.
- Pin or clip around the complete circle, placing extra pins at the side seam and reference marks.
- Sew around the circle with a 3/8-inch (1 cm) seam allowance, keeping the fabric edges aligned.
- Stitch slowly around the curved seam. Stop with the needle down to reposition the fabric whenever necessary.
- Check the stitching for small folds or skipped sections before proceeding.
Clip the curved seam allowance at intervals of approximately 3/4 inch (2 cm), taking care not to cut through the stitching. This allows the seam to spread smoothly when the body is turned.
Step 4: Gather the Upper Body
At the upper raw edge of the body tube, sew two parallel rows of long gathering stitches. Use a stitch length of approximately 4 mm and leave long thread tails at both ends. Keep the two rows about 1/8 inch (3 mm) apart.
Pull the bobbin threads gently to reduce the opening to approximately 4 to 4.5 inches (10 to 11.4 cm) across. Distribute the gathers evenly around the opening.
Do not secure the gathers permanently yet. You will adjust this opening when inserting the stuffing and positioning the hat.
Step 5: Turn and Stuff the Body
- Turn the body right side out through the gathered top opening.
- Push the circular base into its intended position and smooth the outer seams.
- Insert the sealed weighting pouch into the bottom, centering it over the circular base.
- Add small amounts of polyester fiberfill around the pouch and along the lower sides.
- Continue adding stuffing evenly until the body feels firm enough to stand without becoming overly hard.
- Keep the top opening accessible and avoid filling the uppermost section too tightly.
Important construction tip: The base should remain flat and the weighting pouch should stay centered. Test the body on a level surface before closing the top. If it leans, redistribute the stuffing and adjust the weighted pouch before continuing.
Step 6: Sew the Fabric Arms
Each arm is made from a small folded fabric tube with a soft closed end. The finished arms should look like short sleeves extending from the sides of the body.
