

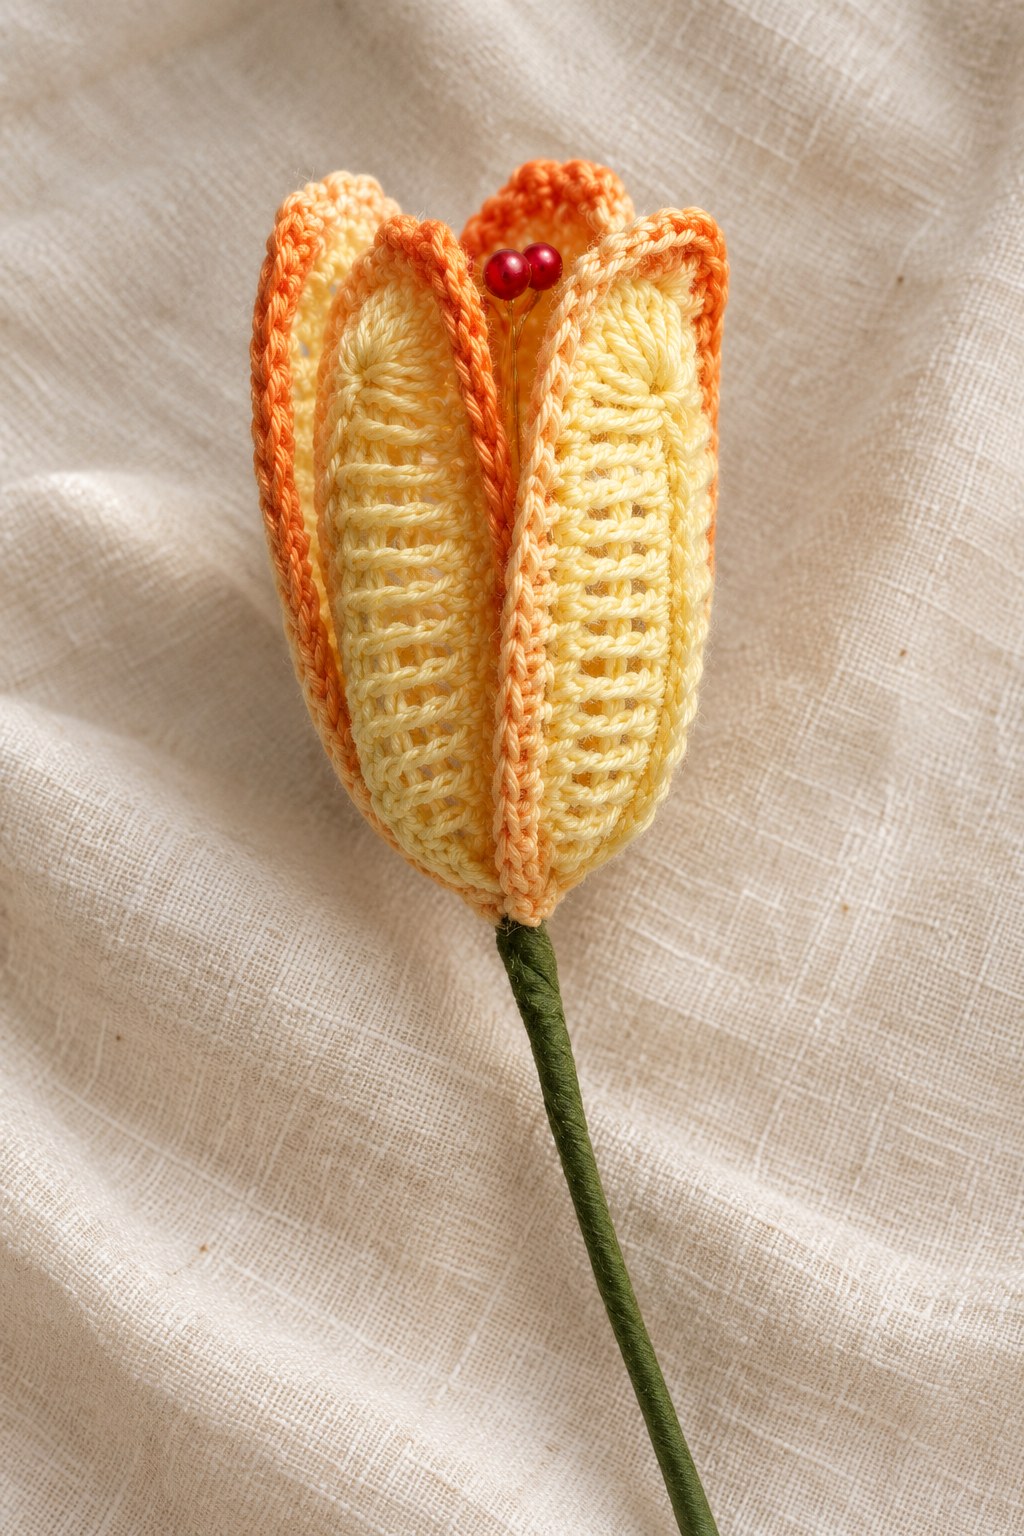
This crochet tulip pattern builds a slender flower from four long petals surrounding three red pearl pistils. The petals use graduated single, double and treble stitches around a chain foundation, followed by a shaped outer round that incorporates wire. The supported pieces are then gathered into an upright cup and finished with a green taped stem. This guide follows PDF pages 160–161, preserving both petal rounds, the original chart and all four source assembly drawings.

Key Takeaways
- Use Cotton 8 in soft yellow and soft orange with the listed 1.90 mm hook.
- Make four petals from the same fifteen-chain foundation and two-round sequence.
- The nine doubles together and three doubles together are complete stitches sharing one anchor, as confirmed by the chapter legend and chart.
- Use 0.6 mm wire in the petal border and 0.3 mm wire for the pearl pistils.
- Prepare three pistils using the three red pearls, then combine their support wires.
- Attach all four petals around the center, twist their wires together and cover the stem with green floral tape.
CROCHET TULIP FLOWER PATTERN
Project: Four long wired petals form an upright cup around three red pearl pistils, with a green floral-tape stem.
| Skill level | No individual rating is supplied. Uses single, double and treble crochet, multiple complete stitches in one anchor, wire-enclosing crochet and illustrated assembly. |
|---|---|
| Materials | Cotton 8 in soft yellow and soft orange; hook size B (1.90 mm), as printed; wire0.6mm and wire0.3mm;3red pearls;green floral tape. Yardage, gauge, finished size and wire cut lengths are unspecified. |
| US abbreviations | ch chain;sc single crochet;dc double crochet;tr treble crochet (source TC);ss slip stitch (source ST). A stated group together means complete stitches in the same anchor, not a shared-top cluster. |
| Petal foundation | Begin with15ch. Work the first round around both sides of this chain as shown in the source chart. |
| Petal round1 | 1sc,1dc,10tr,1dc,9dc together,1dc,10tr,1dc,1sc. The9dc fan shares the end anchor. Break off yarn. |
| Petal round2 | Prepare0.6mm wire. Work15sc,1dc,3dc together,1sc,3dc together,1dc,15sc,1ss, incorporating wire. The two3dc groups each share their own anchor. Break off yarn. Make4petals. |
| Palette reference | The listed colors are soft yellow and soft orange. The photograph shows pale petal bodies with orange-toned rims; the prose gives no fixed color allocation for each round. |
| Pistils | Insert0.3mm wire through a red pearl and twist the wire ends, following Figure1. Make3pistils and twist their support ends together, following Figure2. |
| Flower assembly | Attach the4petals around the pistils, following Figure3. Twist corresponding wires together, following Figure4. Cover the stem with green floral tape. |
Plan the Flower and Component Count
Prepare four petals and three pearl pistils. All four petals use the same crochet sequence, and all three pistils use the same pearl-and-wire method. The finished cup comes from arranging these separately supported components around their common center, rather than from crocheting a single tubular flower head.
The assembly page supplies a drawing for each main transition: making one pearl pistil, combining three, placing four petals and twisting the support beneath the completed cup. Keep these illustrations with the petal chart while working. The chart explains the flat component, and the drawings explain how those components become the upright tulip.
Gather the Specified Cotton and Wire
The material list names Cotton 8 in soft yellow and soft orange, a hook labeled size B with the stated diameter of 1.90 mm, two wire diameters, three red pearls and green floral tape. Use the metric hook diameter as the clear measurement when selecting a hook from your own collection.
The two wire sizes have different jobs. The 0.6 mm wire is enclosed in the petal border, while the 0.3 mm wire passes through each pearl to form the pistils. No wire-cut length, pearl diameter, yarn quantity, finished dimension or measured gauge is provided. Keep these unspecified quantities separate from the diameters and component counts the source actually supplies.
Materials checkpoint: Keep the0.6mm petal wire and0.3mm pearl wire separate. Prepare four crocheted petals and three red pearl pistils before combining their supports into the stem.
Read the Stitch Names in US Terms
The source uses TC for triple crochet. This guide calls that US treble crochet and abbreviates it tr. Its taller posts form the long sides of each petal, between shorter stitches near the lower base and the broad double-crochet fan at the far end. The chart’s two-bar tall symbols confirm the treble stitch.
The chapter legend also clarifies groups described as together: they are complete stitches worked in the same original anchor. The tulip’s nine-double fan and each three-double border group keep separate stitch tops. Closing those doubles into a shared-top cluster would remove the broad fan that the chart uses to shape the petal tip.
Begin the Fifteen-Chain Foundation
Make the fifteen-chain foundation. The source chart shows the first round traveling along one side of the chain, around its far end and back along the other side. Keep the foundation visible as the center line of the long oval component while working the two graduated side sequences.
This is a single chain foundation with a return path on its opposite side, rather than two separate chains sewn together. The far-end fan anchors the turning section. Use the source chart to distinguish that end anchor from the neighboring chain positions receiving the longer treble stitches.

Work the First Side of Round One
Begin the round with one single, one double, ten trebles and one double. The lower stitches establish the narrow base, while ten consecutive treble posts create the long side. Keep their height changes in the printed order so that the base stays shorter than the main body of the petal.
Count the ten trebles as ten separate complete stitches along their chain positions. The next double is the transition toward the fan, not the first member of the nine-double group itself. Separating those sections in your count makes it easier to find the correct far-end anchor before working the turn.
Make the Nine-Double Far-End Fan
Work nine complete double crochets together in the charted end anchor. All nine share the same base and remain open at the top as individual stitches. This broad fan turns the work around the chain end, providing the upper section that will later receive the lobed wired edging.
Keep the fan distinct from the long treble sides. Its double crochets are shorter than the trebles but spread across several tops from one anchor. The combination creates the source’s elongated rounded petal without adding an extra chain ring, a separate tip or a cluster that closes into only one stitch.
Return along the Other Side
Continue with one double, ten trebles, one double and one single on the opposite side of the foundation. This mirrors the written stitch-height progression from the first side. Break off the yarn at the end of the round as supplied, preserving the complete long oval before beginning its outer support round.
The first round contains thirteen stitches on either side of the nine-double fan, making thirty-five worked stitch tops. This count is a useful check on the component sequence, not an additional round. If the two sides seem different in length, compare their ten-treble runs and the single and double transitions at each end.
Prepare the Wire for the Outer Round
Prepare the 0.6 mm wire and position it for incorporation during round two. The source chart marks the wire path around the petal, and the prose explicitly instructs that this outer round be worked while incorporating wire. The wire is therefore part of the perimeter support rather than a later central spine insertion.
The source gives no measured cut length or fixed wire-tail allowance. Follow the perimeter of the actual petal when preparing the support and keep its lower ends available for the later twisting stage. Preserve the distinction between this thicker petal support and the thinner wire used through the pearls.
Petal Construction Note
Round one creates thirteen stitches on each side of a nine-double end fan. Round two uses fifteen singles on either side of its central double-and-fan shaping, while enclosing the0.6mm support wire.
Work the First Side of the Wired Border
Start round two with fifteen singles, followed by one double. Work these stitches while incorporating the prepared wire. The longer single-crochet run follows the side of the oval and reaches into the upper section; the double begins the transition toward the small lobed shaping at the top.
Keep the wire beside the perimeter as the stitches enclose it. The source does not route the support through the center foundation or through the body of each treble post. Use the chart’s perimeter line to keep the supported edge associated with the outer round rather than the original fifteen-chain center line.
