

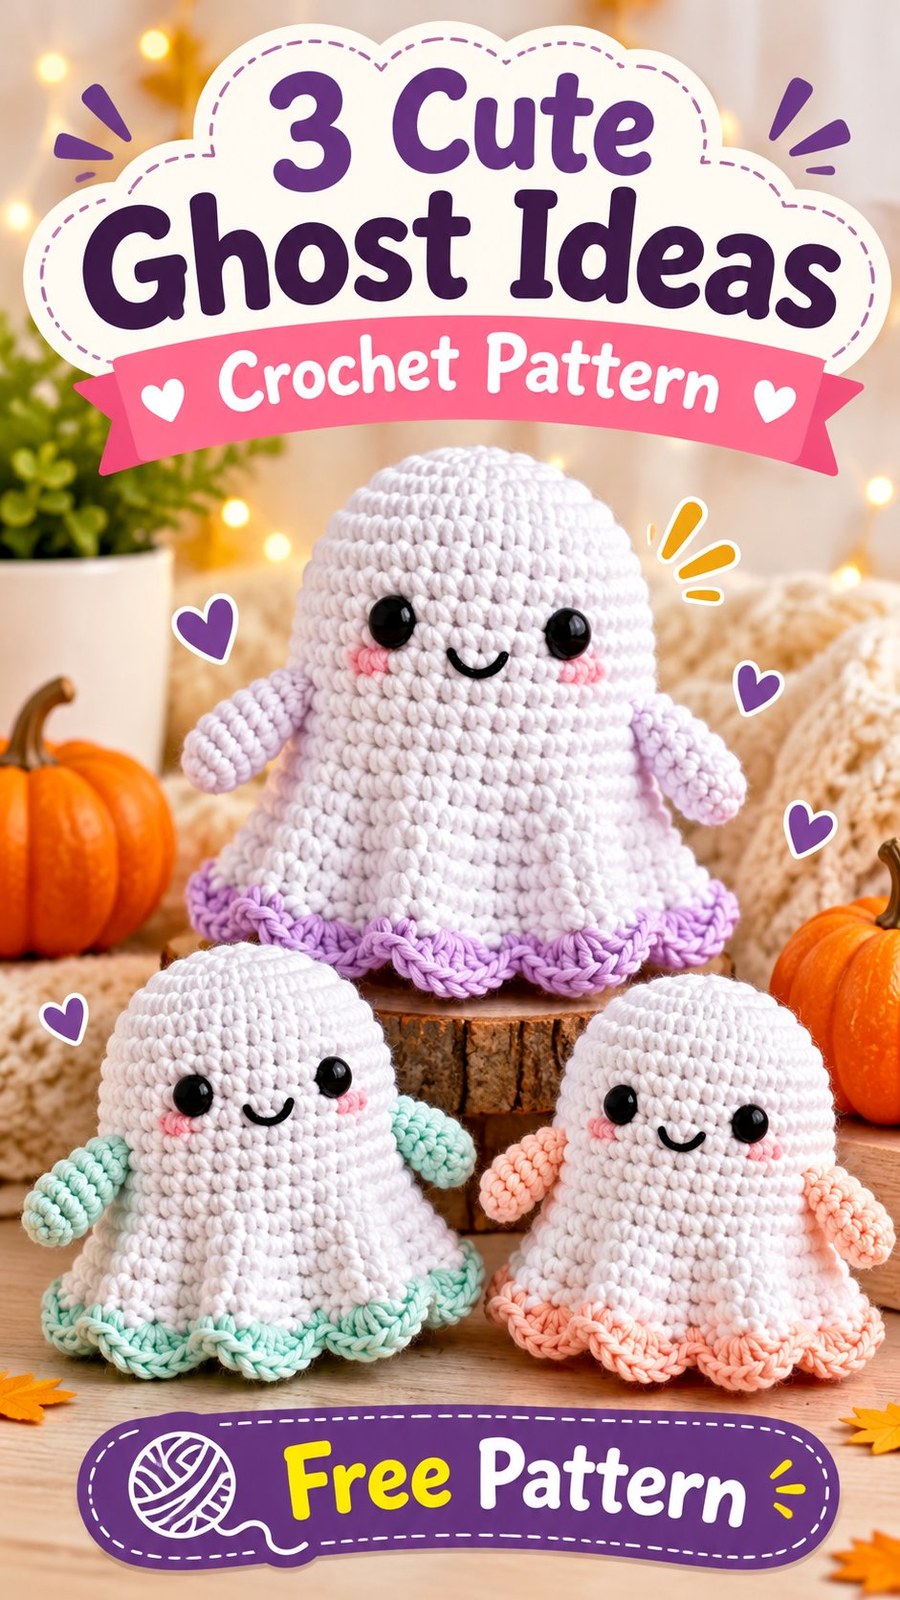
Bring a little handmade Halloween magic to your crochet collection with these adorable crochet ghost amigurumi! These sweet little ghosts feature soft white bodies, cheerful embroidered smiles, tiny rounded arms, and pretty scalloped hems in pastel purple, mint green, and peach. Their friendly expressions and charming bell-shaped silhouettes make them perfect for seasonal decorations, handmade gifts, and cute Halloween displays.
This original crochet ghost pattern is designed to help you create a similar look using simple amigurumi techniques. The body is worked from the top down in continuous rounds, gradually widening into a soft, flared shape. Small crocheted arms are attached to the sides, while a decorative scalloped border adds a lovely finishing touch. You can make one ghost or create an entire collection in different pastel colors.
With basic single crochet stitches, simple increases, and a little embroidery, this is an enjoyable project for crocheters who are comfortable with amigurumi basics. The finished ghost is also easy to personalize with different facial expressions, yarn colors, and decorative details.
Key Takeaways
- Project type: Cute crochet ghost amigurumi with a flared, dress-like body.
- Skill level: Confident beginner, with basic knowledge of working in continuous rounds.
- Main stitches: Single crochet, slip stitch, double crochet, and simple increases.
- Recommended yarn: Soft DK or light worsted-weight cotton or cotton-blend yarn.
- Customization: Choose pastel purple, mint, peach, or any favorite accent color.
- Best use: Halloween decorations, seasonal displays, and handmade gifts.
Adorable Crochet Ghost Amigurumi for Halloween
These crochet ghosts combine the classic spooky Halloween theme with a soft, playful appearance. Instead of looking frightening, they have rounded shapes, little smiling faces, and gentle pastel accents that make them feel welcoming and cheerful.
The main body is white and resembles a small floating ghost or a miniature bell-shaped dress. It starts with a rounded crown, gradually widens toward the bottom, and finishes with a decorative wavy edge. Two small arms extend from the sides, adding to the traditional ghost silhouette.
The three color variations offer plenty of inspiration. One ghost has lavender arms and a matching scalloped hem, another uses a soft mint-green accent, and the third features a warm peach color. Keeping the main body white allows the accent colors to stand out without overwhelming the simple design.
Small black eyes and a curved embroidered smile give each ghost its personality. These facial details are simple but important because they transform a basic crocheted shape into a charming amigurumi character.
What Makes These Little Ghosts Special?
- Soft rounded crown: The upper section creates a smooth, dome-like head.
- Flared lower body: Gradual increases create the floating ghost appearance.
- Decorative scallops: A contrasting crochet border creates a playful wavy hem.
- Small rounded arms: Two simple crocheted pieces give the ghost its recognizable shape.
- Friendly expression: Black eyes and an embroidered smile create a cute character.
The overall design is versatile enough to work as a small shelf decoration, a Halloween centerpiece, or a handmade seasonal gift. You can also make several ghosts in different colors to create a coordinated collection.
Crochet Construction and Stitch Details
Understanding the construction makes this crochet ghost pattern easier to follow. The original interpretation uses a practical amigurumi construction that recreates the rounded top, widening body, small arms, and decorative hem.
The Main Ghost Body
The body is worked as one continuous piece from the top down. It begins with a magic ring containing six single crochet stitches. Regular increases gradually expand the crown until it reaches 48 stitches.
Several even rounds create the rounded upper section and provide enough space for the facial features. Additional increases near the lower portion expand the circumference to create the characteristic flared ghost shape.
This construction avoids complicated panel assembly and keeps the main body seamless. A stitch marker helps identify the beginning of every round, especially while working the increases.
The Rounded Crochet Arms
The arms are made separately using short tubes of single crochet stitches. Each piece starts with a small magic ring and is worked in continuous rounds without complicated shaping.
After a few rounds, the opening is flattened and closed with single crochet stitches through both layers. This creates a soft, slightly curved arm that can be sewn securely to the sides of the body.
The Decorative Scalloped Hem
The scalloped border is one of the most recognizable details. It is worked around the final round of the ghost body using a contrasting yarn color.
Small groups of double crochet stitches form rounded shell-like sections, while slip stitches separate the scallops. This creates a wavy edge that resembles the flowing bottom of a traditional ghost costume.
Crochet Insight
The secret to a neat amigurumi ghost is maintaining consistent stitch tension. Use a hook slightly smaller than the yarn label recommends if necessary, so the stuffing stays hidden between the stitches. Keep the lower increases evenly distributed to maintain a balanced flared shape.
Free Crochet Ghost Pattern
This free crochet ghost pattern creates a friendly, rounded amigurumi character with a flared body, small arms, embroidered facial features, and a contrasting scalloped edge. The suggested construction uses continuous rounds for the body and arms, followed by simple sewing and decorative finishing.
The stitch counts, measurements, yarn quantities, and hook size below are recommended specifications for this original interpretation. They are intended to create a similar appearance while keeping the pattern practical and consistent.
Sweet Little Ghost Amigurumi
Pattern description: A small, cheerful crochet ghost with a rounded head, gently flared body, two short arms, embroidered facial details, and a decorative scalloped hem.
Pattern Overview
| Skill Level | Confident beginner |
| Finished Height | Approximately 6 to 6.5 inches (15 to 16.5 cm) |
| Finished Width | Approximately 5 inches (12.5 cm) at the hem |
| Yarn | DK weight cotton or cotton-blend yarn |
| Yarn Quantity | Approximately 75 yards (69 meters) total |
| Recommended Hook | 3.25 mm (US D/3) |
| Gauge | Approximately 24 sc and 26 rounds = 4 inches (10 cm) |
| Terminology | US crochet terminology |
| Construction | Body and arms worked in continuous rounds |
Materials and Supplies
- Approximately 50 yards (46 meters) of white DK-weight yarn for the body.
- Approximately 20 yards (18 meters) of pastel accent yarn for the arms and scalloped hem.
- Small amount of black embroidery floss or fine black yarn for the facial features.
- 3.25 mm (US D/3) crochet hook.
- Polyester fiberfill stuffing.
- Two 8 mm safety eyes, optional.
- Yarn needle.
- Locking stitch marker.
- Scissors.
- Small pins for positioning the arms and facial features.
Suggested yarn: A smooth cotton or cotton-blend DK yarn is a good choice because it creates defined stitches and helps the ghost maintain its shape. A soft acrylic DK yarn can also work if you prefer a lighter, slightly softer finish.
Abbreviations
All instructions use US crochet terminology.
- MR: Magic ring
- ch: Chain
- sc: Single crochet
- inc: Increase, work 2 single crochet stitches in the same stitch
- dec: Invisible single crochet decrease
- sl st: Slip stitch
- dc: Double crochet
- st/sts: Stitch/stitches
- rep: Repeat
- Rnd: Round
- FO: Fasten off
- BLO: Back loop only
UK terminology note: US single crochet is UK double crochet, and US double crochet is UK treble crochet. The pattern instructions themselves use US terms only.
Special Stitch Instructions
Invisible decrease: Insert the hook into the front loop of the next stitch, then into the front loop of the following stitch. Yarn over and pull through both front loops. Yarn over again and pull through the remaining two loops on the hook. This combines two stitches into one and creates a neat decrease.
Increase: Work two single crochet stitches into the same stitch.
Scallop: Work five double crochet stitches into one stitch to create a rounded shell.
Construction Notes Before Starting
- The body is worked from the top downward in continuous rounds.
- Do not join rounds with slip stitches unless specifically instructed.
- Use a stitch marker to mark the first stitch of every round.
- Turning chains are not used for the body.
- Slip stitches used for finishing or edging do not count as body stitches.
- Keep the right side of the amigurumi facing outward.
- Stuff the body gradually before the opening becomes too small.
- Make two identical arms in the chosen accent color.
Safety note: Plastic safety eyes can pose a choking hazard and may not be appropriate for babies or children under three. For a child-safe version, embroider the eyes and smile securely with black yarn. Avoid beads, buttons, and other detachable decorations.
Part 1: Crochet the Ghost Body
Using white yarn and your 3.25 mm crochet hook, begin at the top of the ghost’s head.
- Rnd 1: Make a magic ring and work 6 sc into the ring. Pull the ring closed. (6 sts)
- Rnd 2: Work 2 sc in each stitch around. (12 sts)
- Rnd 3:Repeat around. (18 sts)
- Rnd 4:Repeat around. (24 sts)
- Rnd 5:Repeat around. (30 sts)
- Rnd 6:Repeat around. (36 sts)
- Rnd 7:Repeat around. (42 sts)
- Rnd 8:Repeat around. (48 sts)
- Rnd 9: Sc in each stitch around. (48 sts)
- Rnd 10: Sc in each stitch around. (48 sts)
- Rnd 11: Sc in each stitch around. (48 sts)
- Rnd 12: Sc in each stitch around. (48 sts)
- Rnd 13: Sc in each stitch around. (48 sts)
- Rnd 14: Sc in each stitch around. (48 sts)
- Rnd 15: Sc in each stitch around. (48 sts)
- Rnd 16: Sc in each stitch around. (48 sts)
- Rnd 17: Sc in each stitch around. (48 sts)
- Rnd 18: Sc in each stitch around. (48 sts)
- Rnd 19:Repeat around. (54 sts)
- Rnd 20:Repeat around. (60 sts)
- Rnd 21: Sc in each stitch around. (60 sts)
- Rnd 22: Sc in each stitch around. (60 sts)
Fasten off if you want to complete the scalloped hem separately, or leave the working yarn attached if you are ready to add the border. If changing colors, finish the last stitch of Round 22 with the accent color so the transition is neat.
Positioning the Face
The face should be placed on the upper front section of the body. For a balanced expression, position the eyes approximately between Rounds 9 and 10, leaving about 8 stitches between them. Adjust the spacing slightly depending on your tension and preferred expression.
If using safety eyes, install them before stuffing and closing the body. Follow the manufacturer’s attachment instructions and make sure the backs are secured properly.
For an embroidered face, use black embroidery floss or fine yarn. Stitch two small rounded eyes, then add a curved smile beneath them. Keep the smile centered between the eyes and use short, controlled stitches for a smooth finish.
Stuffing the Body
Begin adding polyester fiberfill after completing the upper section. Use small amounts at a time and distribute the stuffing evenly toward the crown and sides.
Continue stuffing as you work toward the lower rounds. The ghost should feel softly filled without becoming stiff or stretched. Leave the lower edge free to flare naturally rather than forcing it into a rigid shape.
Important: This design is intentionally open at the bottom. Do not decrease or close the body like a conventional spherical amigurumi. The flared silhouette is an essential part of the finished ghost.
Part 2: Add the Scalloped Crochet Border
Use your chosen accent color, such as lavender, mint green, or peach. The scallops are worked directly around the 60 stitches of the final body round.
- Join the accent yarn to the first stitch of Round 22 with a slip stitch.
- Border Round: Repeat the following sequence 15 times: slip stitch in the next stitch, skip the next stitch, work 5 dc in the next stitch, skip the next stitch.
- After completing all 15 scallops, slip stitch into the first joining point.
- Fasten off and weave in the yarn ends securely on the inside of the body.
Each repeat uses four stitches from the previous round, so 15 repeats cover all 60 stitches. The five double crochet stitches form the rounded shell shape, while the spaces between shells create the wavy edge.
Arrange the scallops gently with your fingers. They should curve naturally without pulling the body inward.
