


Ears (Make 2)
Use the main head color.
Rnd 1: 6 sc in MR. (6)
Rnd 2: (1 sc, inc) x 3. (9)
Rnd 3–4: 9 sc in each round. (9)
Rnd 5: (2 sc, inc) x 3. (12)
Rnd 6–8: 12 sc in each round. (12)
Rnd 9: (2 sc, dec) x 3. (9)
Rnd 10–11: 9 sc in each round. (9)
Sl st in the next st. Fasten off, leaving a long yarn tail. Do not stuff the ears (See Photo 1).
Ami_esnek (yatay)
Thighs (Make 2)
Use the body color.
Rnd 1: 6 sc in MR. (6)
Rnd 2: Inc in each st. (12)
Rnd 3: (1 sc, inc) x 6. (18)
Rnd 4: (2 sc, inc) x 6. (24)
Rnd 5: (3 sc, inc) x 6. (30)
Rnd 6: (4 sc, inc) x 6. (36)
Rnd 7–8: 36 sc in each round. (36)
Sl st in the next st. Fasten off, leaving a long yarn tail. Stuff the thighs while sewing them to the body.
Tail
Use the body color.
Rnd 1: 6 sc in MR. (6)
Rnd 2: (1 sc, inc) x 3. (9)
Rnd 3: 9 sc. (9)
Rnd 4: (2 sc, inc) x 3. (12)
Rnd 5–10: 12 sc in each round. (12)
Rnd 11: (3 sc, inc) x 3. (15)
Rnd 12–16: 15 sc in each round. (15)
Rnd 17: (4 sc, inc) x 3. (18)
Rnd 18–20: 18 sc in each round. (18)
Sl st in the next st. Fasten off, leaving a long yarn tail. Stuff the tail firmly with fiberfill (See Photo 2).
Ami_esnek (yatay)
Pouch
Use the body color. Work back and forth in rows.
Ch 2. Begin in the second ch from the hook.
Row 1: 3 sc in the next ch. (3) Ch 1, turn.
Row 2: 1 sc, inc, 1 sc. (4) Ch 1, turn.
Row 3: 1 sc, inc in each of the next 2 st, 1 sc. (6) Ch 1, turn.
Row 4: 2 sc, inc in each of the next 2 st, 2 sc. (8) Ch 1, turn.
Row 5: 2 sc, inc, 2 sc, inc, 2 sc. (10) Ch 1, turn.
Row 6: 3 sc, inc, 2 sc, inc, 3 sc. (12)
Row 7–9: 12 sc in each row. (12) Ch 1 and turn after each row.
If you are not making a baby kangaroo, skip Row 10.
Row 10 (with baby kangaroo): 4 sc, inc, 2 sc, inc, 4 sc. (14)
Work sc down both sides of the pouch to create neat edges. Sl st in the next st. Fasten off, leaving a long yarn tail for sewing (See Photo 3).
Hind Legs (Make 2)
Use white yarn.
Rnd 1: 6 sc in MR. (6)
Rnd 2: (1 sc, inc) x 3. (9)
Rnd 3: 9 sc. (9)
Rnd 4: (2 sc, inc) x 3. (12)
Rnd 5–15: 12 sc in each round. (12)
Stuff the legs lightly with fiberfill. Press each leg flat and sc through both sides to close. Sl st in the next st. Fasten off, leaving a long yarn tail.
Ami_esnek (yatay)
Arms (Make 2)
Use white yarn.
Rnd 1: 6 sc in MR. (6)
Rnd 2: (1 sc, inc) x 3. (9)
Rnd 3–10: 9 sc in each round. (9)
Do not stuff the arms. Press each arm flat and sc through both sides to close. Sl st in the next st. Fasten off, leaving a long yarn tail.
Baby Kangaroo (Optional)
Use white yarn and a color that matches the mother kangaroo.
Rnd 1: With white yarn, 6 sc in MR. (6)
Rnd 2–3: 6 sc in each round. (6)
Rnd 4: Change to the second color and inc in each st. (12)
Rnd 5: (1 sc, inc) x 6. (18)
Rnd 6: 18 sc. (18)
Rnd 7: 9 sc, ch 4, beginning in the second ch from the hook work 3 sc back along the chain, sl st in the same st where the chain began; 4 sc, ch 4, beginning in the second ch from the hook work 3 sc back along the chain, sl st in the same st where the chain began; 5 sc. (18 main-round stitches)
Rnd 8: 18 sc, skipping the sl st from the previous round. (18)
Ami_esnek (yatay)
Place the 6 mm safety eyes between Rnds 4 and 5, with 2 stitches between them. Insert the remaining 6 mm safety eye into the center of the MR as a nose. Align the eyes with the ears. Start stuffing the head and continue as you work.
Rnd 9: (1 sc, dec) x 6. (12)
Rnd 10: Dec x 6. (6)
Sl st in the next st. Fasten off, leaving a long yarn tail for sewing (See Photo 4).
Assembly
- Sew the ears onto the head between Rnds 15 and 17, leaving approximately 5 stitches between them (See Photo 5). Optionally, shape the face by indenting the eyes.
- If you are not including a baby kangaroo, sew the pouch onto the belly before attaching the thighs.
- Pin the thighs to the sides of the body and sew them in place approximately between Rnds 6 and 18 (See Photos 6 and 7). Ensure that the larger part of the body and the higher back of the neck face backward.
- Pin the head onto the body. Position it to look forward or slightly downward, then sew it securely in place. Add extra stuffing to the neck as you sew (See Photo 8).
- Pin the arms to the sides of the body, just above the thighs. Sew them in place so they point forward toward the belly (See Photo 9).
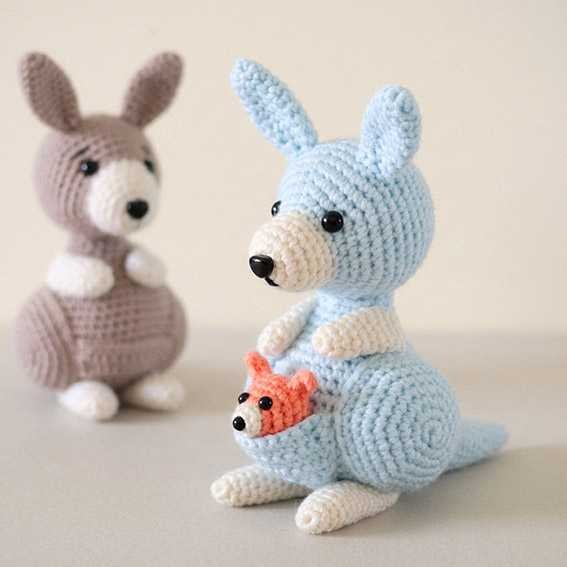
- If making the baby kangaroo, sew its head to the middle of the belly, between the thighs (See Photo 10).
- Position the pouch around the underside of the baby kangaroo’s face and sew its edges to the belly (See Photo 11).
- Sew the bases of the hind legs to the middle of the underside of the body. Point them forward and secure them with additional stitches along the underside of the belly (See Photo 12).
- Sew the stuffed tail to the back of the body, using the completed tail piece shown in Photo 2 as a reference.
- Optionally, embroider a short vertical line below the nose and/or add eyebrows.
Copyright & Credits
The crochet pattern, design, and photos belong to Like a liger crochet @likealigercrochet. The written instructions and photos on this page may not be copied, republished, translated, or used for commercial purposes without permission. Please credit @likealigercrochet when sharing finished items.
Ami_esnek (yatay)
Pick Your Favorite & Pin It
CONTENT END 1
