

comp
for
it

/it
it
Introduction
/it
it
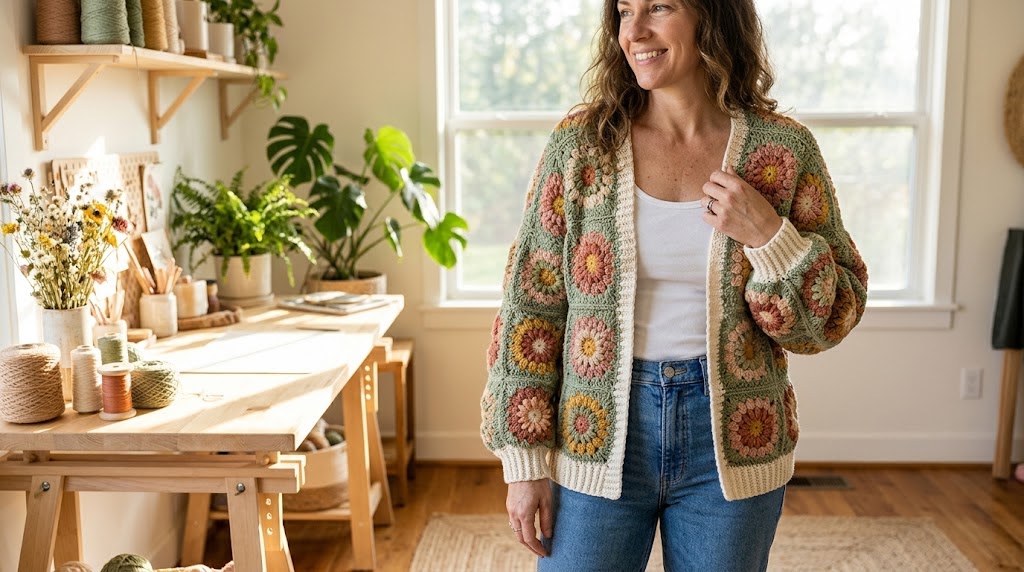
Have you ever seen a colorful handmade cardigan covered in cheerful floral squares and wished you could make one yourself? A granny square cardigan is one of the most rewarding crochet projects because it combines simple techniques with endless creative possibilities.
/it
it
Inspired by vintage crochet blankets and modern bohemian fashion, this cardigan features colorful floral granny squares, a relaxed silhouette, long sleeves, and cozy ribbed cuffs. The combination of small, individually crocheted motifs creates a beautiful patchwork effect that looks intricate without requiring complicated shaping throughout the entire garment.
/it
it
The best part is that you can customize almost everything. Choose soft sage green and cream for a natural look, or combine dusty pink, mustard yellow, terracotta, and olive green for a more colorful design. You can even use leftover yarn from previous projects.
/it
it
This tutorial explains how to plan your cardigan, crochet floral granny squares, join the pieces, shape the sleeves, and finish the edges. It is designed for confident beginners who know the basic crochet stitches, although patient beginners can also follow along.
/it
it
Please note that this is a modular construction guide rather than a tested, size-graded commercial pattern. The number of squares and final dimensions will depend on your measurements, yarn, and individual gauge.
/it
it
Why You Will Love This Crochet Cardigan
/it
it
There are several reasons why granny square cardigans remain popular among handmade clothing enthusiasts.
/it
it
First, you can make the squares individually. This means you can work on a few motifs whenever you have spare time instead of carrying a large garment around.
/it
it
Second, the design is highly customizable. Each square can feature different color combinations while maintaining a coordinated overall appearance.
/it
it
Third, granny squares are an excellent way to practice color changes, chain spaces, double crochet stitches, and joining techniques.
/it
it
Finally, the finished cardigan makes a thoughtful handmade gift. Because you can adjust the colors, sleeve length, and overall fit, it is easy to create a garment that reflects someone’s personal style.
/it
it
Materials and Tools
/it
it
Before starting, gather the following supplies.
/it
it
- Medium-weight yarn, preferably category 4, in five complementary colors.
- A crochet hook appropriate for your yarn label, often between 5 mm and 6 mm.
- Scissors.
- A yarn needle with a large eye.
- Stitch markers.
- A measuring tape.
- A notebook or printed layout chart.
- Optional blocking mats and rust-resistant pins.
/it
it
For the color palette, try cream, sage green, olive green, dusty pink, and mustard yellow. Use cream as a recurring background color to help the different floral motifs feel connected.
/it
it
Choose yarn with a comfortable drape. Cotton blends can provide excellent stitch definition, while acrylic or wool blends may create a softer, warmer cardigan. Check the care label before selecting yarn, especially if you intend to wash the finished garment frequently.
/it
it
For a wearable cardigan, avoid yarn that feels scratchy against your skin. A soft yarn can make a considerable difference in how often you reach for the finished piece.
/it
it
Understanding Granny Square Construction
/it
it
A granny square is a small crochet motif built outward from a center. Traditional versions use groups of double crochet stitches separated by chain spaces.
/it
it
For a floral cardigan, you can begin with a small flower center, add petals in a contrasting color, and finish with square-shaped rounds. The flower creates a decorative focal point, while the outer rounds provide the structure needed to join the motifs together.
/it
it
You will need to understand four basic techniques:
/it
it
Chain stitch (ch): Creates the foundation and spaces between stitch groups.
/it
it
Slip stitch (sl st): Joins rounds and helps move the yarn to the next working position.
/it
it
Double crochet (dc): Forms the familiar granny-square clusters.
/it
it
Magic ring: Creates an adjustable center for a flower motif. If you find it difficult, use a small chain ring instead.
/it
it
In this tutorial, US crochet terminology is used. A US double crochet is equivalent to a UK treble crochet, so make sure any additional video tutorials you follow use the same terminology.
/it
it
Step 1: Make a Gauge Square
/it
it
Before producing dozens of motifs, crochet one complete square using your chosen yarn and hook.
/it
it
Measure the square after it has been gently blocked or washed according to the yarn manufacturer’s instructions.
/it
it
For planning purposes, imagine that each finished square measures approximately 4.5 inches across. This is an example measurement, not a guaranteed result. Your actual size will depend on yarn thickness, hook size, and tension.
/it
it
Write down your finished measurement. It will help you calculate how many squares are needed for the body and sleeves.
/it
it
If your square feels stiff, try a larger hook. If it is too loose and the corners look distorted, try a smaller hook or adjust your tension.
/it
it
Step 2: Crochet the Flower Center
/it
it
Begin with a magic ring.
/it
it
- Make the magic ring and chain 1 to secure your working position.
- Work six single crochet stitches into the ring.
- Pull the ring closed and join with a slip stitch.
- Change to your petal color.
- Work a round of small petal groups using chain spaces and taller stitches.
/it
it
One simple decorative option is to work a group of three double crochet stitches into each selected space, separated by chains. You can vary the number of groups and stitch heights to create rounded or pointed petals.
/it
it
For a more dimensional flower, experiment with puff stitches or clusters. Practice one motif before committing to a large batch.
/it
it
Fasten off and weave in the center ends neatly. Avoid leaving long loose strands on the back, because they can catch on clothing or become visible through open stitches.
/it
it
Step 3: Turn the Flower Into a Square
/it
it
Once the flower center is complete, add an outer round that transforms the circular motif into a square.
/it
it
The important principle is to create four corners, each with enough chain space to allow the fabric to turn naturally.
/it
it
Work granny-style clusters along the sides and increase at each corner. A typical corner may contain two groups of three double crochet stitches separated by two chain stitches.
/it
it
Continue around the flower, distributing the side clusters evenly. When you reach each corner, place the corner groups into the same corner space.
/it
it
Join the round and check that the motif lies flat.
/it
it
If the square curls upward, it may need additional stitches or a larger hook. If the corners wave excessively, you may have added too many stitches.
/it
it
For a consistent cardigan, all squares should have approximately the same finished dimensions.
/it
it
Step 4: Make a Collection of Matching Squares
/it
it
Now repeat your chosen motif until you have enough squares for your planned garment.
/it
it
A simple way to stay organized is to make a small color chart. For example:
/it
it
- Square A: pink flower, cream background, olive border.
- Square B: mustard flower, cream background, sage border.
- Square C: terracotta flower, cream background, dark green border.
- Square D: multicolored flower with a cream outer round.
/it
it
Repeat the palette rather than making every square completely different. This creates visual rhythm and helps the cardigan look professionally designed.
/it
it
Keep the number of rounds consistent across all motifs. If one square is larger than the others, adjust it before joining rather than trying to force the seams into alignment later.
/it
it
Place finished squares in a labeled bag or container so you can easily count and arrange them.
/it
it
Step 5: Plan the Cardigan Layout
/it
it
The final number of squares depends on the desired size, motif dimensions, and construction method.
/it
it
For a sample planning exercise, suppose each square measures 4.5 inches after finishing. A panel measuring about 18 inches wide would require approximately four squares across, before accounting for seams and edging.
/it
it
For the back, arrange squares into a rectangle that matches your desired back width and length. For the two front panels, use narrower arrangements, allowing space for the opening. For the sleeves, create rectangular panels that can be folded and seamed into tubes.
/it
it
Do not assume that one layout fits every body shape. Measure a cardigan you already own and like, or measure the intended wearer over comfortable clothing.
/it
it
Record the desired back width, total body length, upper-arm circumference, sleeve length, and opening width.
/it
it
