

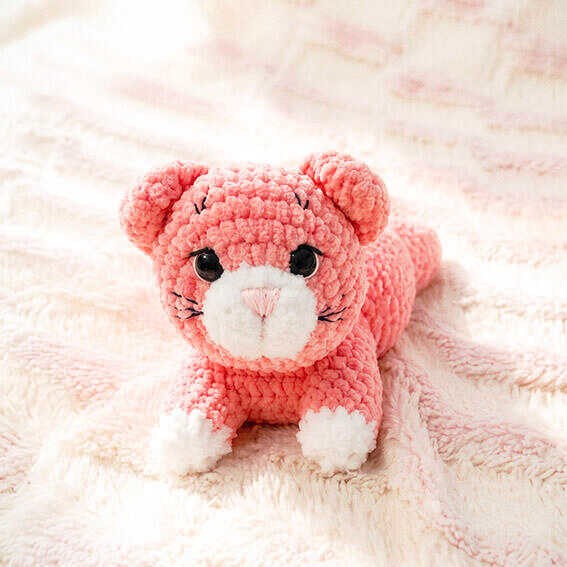
Count 6 sts from the completed front leg. Begin the second front leg in the 7th st with the main color. Work 12 sc in the round for 4 rounds.
Change to white.
Next Rnd: 12 sc (12)
Next Rnd: 6 dec (6)
Pull the opening closed.
Sew the remaining 12 sts between the front legs closed. There may be small gaps beside the legs; sew these closed as well.
Ami_kare 300×250
Tail
Do not stuff. Start with white.
Rnd 1: 4 sc in MR (4)
Rnd 2: 4 inc (8)
Rnd 3: 8 sc (8)
Change to the main color.
Rnds 4-10: 8 sc (8)
Fold the tail in half and crochet both sides together with 4 sc. Make 1 sl st and fasten off, leaving a long tail for sewing.
Ami_esnek (yatay)
Head
Stuff the piece as you work. Insert the nose between Rnds 2 and 3 of the muzzle, or embroider it later. Insert the 12 mm safety eyes between Rnds 5 and 6 with 8 sts between them. Start with white.
Rnd 1: Ch 5. Starting in the 2nd ch from the hook, inc, 2 sc, 3 sc in the last ch, then work 3 sc along the opposite side of the foundation chain (10)
Rnd 2: 2 inc, 2 sc, 3 inc, 2 sc, inc (16)
Rnd 3: 16 sc (16)
Rnd 4: 16 sl st (16)
Change to the main color.
Rnd 5: 16 inc (32)
Rnd 6: (2 sc, inc) x 7, 11 sc (39)
Rnd 7: 4 sc, (5 sc, inc) x 3, 17 sc (42)
Rnds 8-11: 42 sc (42)
Rnd 12: (5 sc, dec) x 6 (36)
Rnd 13: (4 sc, dec) x 6 (30)
Rnd 14: (3 sc, dec) x 6 (24)
Rnd 15: (2 sc, dec) x 6 (18)
Rnd 16: (1 sc, dec) x 6 (12)
Rnd 17: 6 dec (6)
Ami_esnek (yatay)
Pull the opening closed.
Ears — Make 2
Do not stuff. Start with the main color.
Rnd 1: 6 sc in MR (6)
Rnd 2: (1 sc, inc) x 3 (9)
Rnd 3: (2 sc, inc) x 3 (12)
Rnd 4: (3 sc, inc) x 3 (15)
Ami_esnek (yatay)
Fold the ear in half and crochet both sides together with 7 sc. Make a sl st in the last st and fasten off, leaving a long tail for sewing.

Assembly
- Sew the tail to the body between Rnds 12 and 13.
- Sew the ears to the head between Rnds 11 and 12.
- If the nose was not inserted earlier, embroider it with light pink yarn on Rnd 2 of the muzzle.
- Needle-sculpt the muzzle using the same yarn used for the nose.
- Needle-sculpt around the eyes.
- Embroider the eye whites. Add the eyelashes and V-shaped eyebrows on the 3rd round above the eyes. With thin black yarn, embroider 3 whiskers on each side, extending 3 sts outward from the center.
- Flatten the head slightly and sew it to the body approximately across Rnds 19-23.
- Embroider the paw pads with light pink yarn.
Copyright & Credits
The original crochet pattern, design, and photos belong to @victoriav_crochet [@victoriav_crochet]. The written instructions and photos on this page may not be copied, republished, translated, or used for commercial purposes without permission. Please credit @victoriav_crochet when sharing finished items.
Ami_esnek (yatay)
Pick Your Favorite & Pin It
CONTENT END 1
