

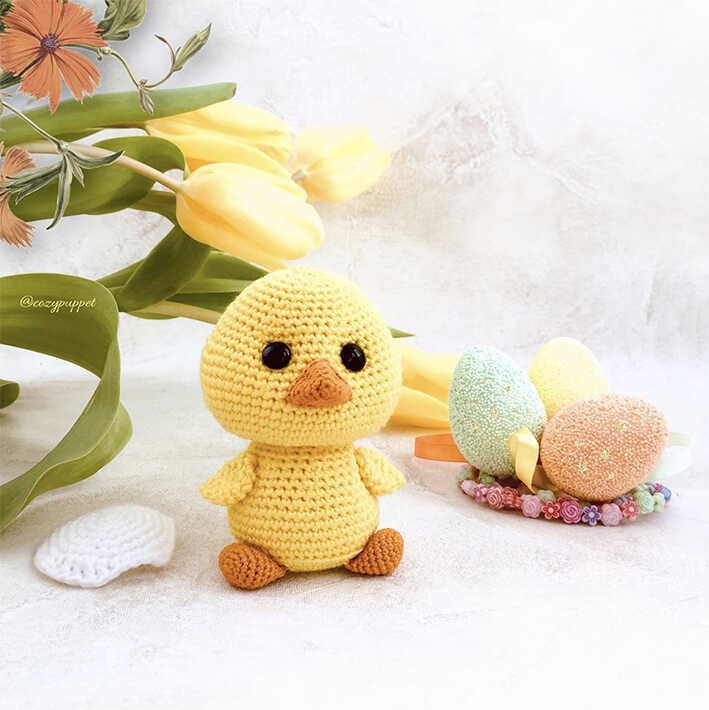
Head and body (one piece)
With Alize Diva yarn and 2.5 mm crochet hook:
R 1: 7 sc in mc (7)
R 2: (inc)* 7 (14)
R 3: (1 sc, inc)* 7 (21)
R 4: (2 sc, inc)* 7 (28)
R 5: (3 sc, inc)* 7 (35)
R 6: (4 sc, inc)* 7 (42)
R 7: (5 sc, inc)* 7 (49)
R 8: BLO: 49 sc
R 9-12: 49 sc (4 rows)
R 13: (5 sc, dec)* 7 (42)
R 14: 42 sc
Ami_kare 300×250
R 15: (4 sc, dec)* 7 (35)
R 16: 35 sc
R 17: (3 sc, dec)* 7 (28)
R 18: 28 sc
R 19: (2 sc, dec)* 7 (21)
R 20: 21 sc
R 21: (inc)*21 (42)
R 22: (5 sc, inc)* 7 (49)
R 23: (6 sc, inc)* 7 (56)
Stuff the body with fiberfill.
R 24-31: 56 sc (8 rows)
R 32: 12 sc, 2 dec, 24 sc, 2 dec, 12 sc (52)
R 33: 11 sc, 2 dec, 22 sc, 2 dec, 11 sc (48)
R 34: 48 sc
R 35: (6 sc, dec)* 6 (42)
R 36: 42 sc
R 37: (5 sc, dec)* 6 (36)
R 38: 36 sc
R 39: (4 sc, dec) * 6 (30)
R 40: 30 sc
Stuff the head with fiberfill.
R 41: (3 sc, dec)* 6 (24)
R 42: (2 sc, dec)* 6 (18)
R 43: (1 sc, dec)* 6 (12)
Finish stuffing.
R 44: (dec)* 6 (6)
Tight the remaining loops with a needle and the rest of yarn. Hide the end of yarn inside the head.
Ami_kare 300×250

Assembly
1. Sew the feet to the body.
Mark the center of the front of the body with a bright thread.
To ensure that the feet are positioned symmetrically, count 4 sс from the center line to the left and right along the R 8. But sew the feet at the level of R 6. The distance between the feet are 8 sc.
2. Sew the wings to the body.
For the wings, we also count 6 sc from the center line. The height of the top point of the wing is R 18. The wings are sewn on at a 45-degree angle. Sew the wings only at the top points. The distance between the wings are 12 sc.
Ami_esnek (yatay)
3. Sew the eyes to the head.
Mark the place for eyes between R 33 and R 34 at the distance of 8 sc between them.
Make eye tightening:
• Insert the needle with yellow thread from the bottom of the toy (the beginning of the crocheting), bringing it out at the location of the first marker. Thread the thread through the eye loop and insert the needle through the same hole.
• Return the thread to the beginning of the crocheting, but step back from the insertion point of the first sc so that you can pull the thread taut and secure the tightening with a knot. The eye stem should be pulled into the body of the toy. Repeat with the second eye, ensuring that the tightenings are symmetrical. This also makes the bottom of the toy flatter and more stable.
4. Sew the tail to the center of the back in R 8.
Position it so it serves as a support for your chick. It runs along R 8. The distance between the outer points is 8 sc. Mine takes up 4 rows in height. You can add stuffing if desired.
5. Finally, sew the beak to the head.
Using your fingers, form a triangle along the increase lines. Pin the top corner between the eyes between R 32 and R 33. Place and sew the bottom corners between R 28 and R 29. The distance between the left and right corners are 6 sc. Add a small amount of stuffing just before closing. Adjust the shape with your fingers.
Ami_esnek (yatay)
Eggshell
With Alize Diva yarn and 2.5 mm crochet hook:
R 1: 6 sc in mc (6)
R 2: (inc)* 6 (12)
R 3: (1 sc, inc)* 6 (18)
R 4: (2 sc, inc)* 6 (24)
R 5: (3 sc, inc)* 6 (30)
R 6: (4 sc, inc)* 6 (36)
R 7: 2 dc, 1 tr, 1 dc, 1 hdc, 4 sc, 1 dc, 5 sc, 1 hdc, 1 dc, 1 tr, 1 dtr, 1 tr, 1 dc, 1 hdc, 14 sc (36)
F. o.
If you wish, you can embroider eyewhites and eyelashes, and add a tuft.
Spring-inspired amigurumi projects always bring a cheerful touch to crochet collections. These adorable little chick designs highlight simple shapes, bright colors, and playful details that make them perfect for seasonal decor or sweet handmade toys.
Ami_esnek (yatay)
Cute Amigurumi Chick Designs for Your Next Crochet Project
CONTENT END 1
