

TR – treble crochet
sl st – slip stitch
sp – space
st(s) – stitch(es)
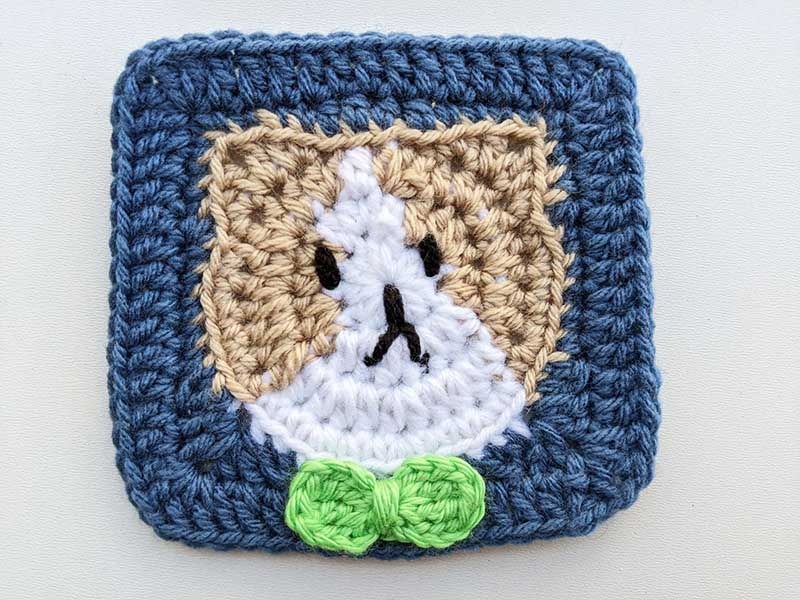
Kitty face granny square crochet pattern:
Round 1: Color A: Begin with the magic ring. Ch 2, work 11 HDC into the ring. Join with a sl st to the 1st HDC. (11 sts)
Color change: When you complete the stitch, prior to the start of a new color, work the stitch until the last yarn over (or last 3 loops on your hook). On the last yarn over, pick up a new color, make yarn over and pull through all loops. Now you are ready to work with a new color. Carry color that you are not using across top of your row and work stitches around it.
Round 2: ch 2, 2 HDC in the same stitch as the join, HDC in next st, Color B: HDC into the same stitch, 2 HDC in next two stitches, HDC in next st, Color A: HDC into the same stitch, 2 HDC in next 3 sts, Color B: 2 HDC in next 3 sts. Join with a sl st to the 1st HDC. (22 sts)
Round 3: Color B: ch 2, 2 HDC in the same stitch as the join, Color A: HDC in next st, Color B: 2 HDC in next stitch, – repeat 3 times,Color A:– repeat 3 times, HDC in next st,Color B:– repeat 3 times. Join with a sl st to the 1st HDC. (33 sts)
Round 4: No beginning chain needed. Mark the first stitch of the round with a stitch marker for ease. Color B(continue carrying color not in use): sl st in next 4 sts, – in next st, – in next st, – in next st, sl st in next st, SC in next st, 2 SC in next st, SC in next 2 sts, 2 SC in next st,Color A:– repeat 3 times, SC in next st,Color B:SC in next st, 2 SC in next st, SC in next 2 sts, 2 SC in next st, sl st in next st, – in next st, – in next st, – in next st, sl st to the 1st st. Join. weave in the end.
Squaring: With right side facing, attach Color C to the last single crochet made with Color A in the previous round.
Round 5: Work all stitches in back loops only. – in the attached st. DC2tog, SC in next 5 sts, HDC2tog, SC in next 3 sts, ch1, SC in next 4 sts, HDC in next 4 sts, SC in next 4 sts, ch 1, SC in next 3 sts, HDC2tog, SC in next 5 sts, DC2tog, – in next st, DC2tog, SC in next 2 sts, SC2tog, SC in next 3 sts, DC2tog. Sl st to top of beginning ch-3.
Round 6:ch 3 (count as DC), DC in next st, – in ch-1 space, DC in next 12 sts, – in ch-1 space, DC in next 12 sts, – in ch-1 space, DC in next 12 sts, – in ch-1 space, DC in next 10 sts. Sl st to top of beginning ch-3.
Embroider the kitty’s face using a piece of black yarn (for eyes, nose, and mouth), or alternatively, glue on ready-made rolling eyes and a nose.
Kitty Bow:With a new color of yarn, begin with a magic ring. Work the following stitches into the center of the ring: — repeat this sequence twice.
Pull the yarn tail to close the center of the ring. Cut the yarn, leaving a 20–25 cm (8–10 inch) tail. Wrap this tail tightly around the center of the bow to shape it, then secure the end by weaving it in or knotting it neatly.
Attach the bow to your kitten, positioning it on the side of the head for a feminine look or at the neck for a masculine look, as desired.
Explore other granny square patterns:
- Basic Lace Granny Square
- Cross Granny Square
- 3-D Daisy Granny Square
- Daisy Flower Granny Square
- Diamond Granny Square
- Eye Granny Square
- Heart Granny Square
- Lace Granny Rectangle
- Leaf Granny Square
- Mosaic Granny Square
- Moss Stitch Granny Square
- Paw Print Granny Square
- Peace Sign Granny Square
- Perfect Solid Granny Square
- Santa’s Belt Granny Square
- Single Crochet Granny Square
- Snowflake Granny Square
- Spiral Granny Square
- Strawberry Granny Square
- Sun Granny Square
- Sunburst Granny Square
- Sunflower Granny Square
- Textured Granny Square
- Traditional Granny Square
