

Row 1: Work 3 sc into MR, turn. (3)
Row 2: Ch 1, 3 inc, turn. (6)
Rows 3-9: Ch 1, turn, 6 sc. (6)
Fasten off, leaving a sewing tail.
Join off-white yarn at one lower corner and work sl sts around the sides and rounded top.
Sew the wooden bead to the right side as the doorknob.
Ami_esnek (yatay)
Holly Leaves — Make 6
With holly green.
Ch 7.
Starting in the 2nd ch from hook: sl st, (sc, ch 2, sl st in same ch), hdc, (dc, ch 2, sl st in same ch), hdc, 3 sc in last ch.
Working along the opposite side: hdc, (dc, ch 2, sl st in same ch), hdc, (sc, ch 2, sl st in same ch), sl st.
Fasten off, leaving a sewing tail.
Holly Berries — Make 5
With deep red.
Rnd 1: 6 sc in MR. (6)
Rnd 2: 6 sc. (6)
Add a tiny amount of fiberfill or use the starting yarn tail as filling.
Rnd 3: 3 dec. (3)
Close and leave a sewing tail.
Ami_esnek (yatay)
Outer Lid — Deep Red
With 2.5 mm hook.
Rnd 1: 6 sc in MR. (6)
Rnd 2: 6 inc. (12)
Rnd 3: (1 sc, inc) x6. (18)
Rnd 4: (2 sc, inc) x6. (24)
Rnd 5: (3 sc, inc) x6. (30)
Rnd 6: (4 sc, inc) x6. (36)
Rnd 7: (5 sc, inc) x6. (42)
Rnd 8: (6 sc, inc) x6. (48)
Rnd 9: (7 sc, inc) x6. (54)
Rnd 10: (8 sc, inc) x6. (60)
Rnd 11: (9 sc, inc) x6. (66)
Rnd 12: (10 sc, inc) x6. (72)
Rnd 13: (8 sc, inc) x8. (80)
Rnd 14: 80 sc BLO. (80)
Rnds 15-17: 80 sc. (80)
Fasten off, leaving a long tail.
Ami_esnek (yatay)
White Scalloped Lid Trim
Join white yarn into the exposed FLO of Lid Rnd 13.
Repeat around: sl st in next FLO, skip 1 FLO, 5 dc in next FLO, skip 1 FLO. (20 scallops)
Fasten off.
Inner Lid Panel — Deep Red
With 2.25 mm hook.
Rnd 1: 6 sc in MR. (6)
Rnd 2: 6 inc. (12)
Rnd 3: (1 sc, inc) x6. (18)
Rnd 4: (2 sc, inc) x6. (24)
Rnd 5: (3 sc, inc) x6. (30)
Rnd 6: (4 sc, inc) x6. (36)
Ami_esnek (yatay)
Rnd 7: (5 sc, inc) x6. (42)
Rnd 8: (6 sc, inc) x6. (48)
Rnd 9: (7 sc, inc) x6. (54)
Rnd 10: (8 sc, inc) x6. (60)
Rnd 11: (9 sc, inc) x6. (66)
Rnd 12: (10 sc, inc) x6. (72)
Rnd 13: (8 sc, inc) x8. (80)
Fasten off.
Peppermint Topper — Deep Red
Rnd 1: 6 sc in MR. (6)
Rnd 2: 6 inc. (12)
Rnd 3: (1 sc, inc) x6. (18)
Rnds 4-6: 18 sc. (18)
Rnd 7: (1 sc, dec) x6. (12)
Stuff firmly but keep the piece round.
With white yarn, make 6 surface-crochet spiral lines. Begin each line near the top MR, spacing the starting points evenly. As each line travels downward, move approximately 1 stitch sideways for every Round crossed so the line curves diagonally around the sphere. Finish each line near the lower center.
Rnd 8: 6 dec. (6)
Close and hide the yarn ends.
Plastic Canvas Body Frame
Measure the inside of the completed Outer Box.
Cut 1 base circle 3–5 mm smaller than the measured inside diameter.
Cut 1 wall strip approximately 5–7 mm shorter than the crocheted wall height.
Curve the strip into a cylinder. Adjust its length so the finished ring is 3–5 mm smaller than the inside circumference of the Outer Box; allow approximately 5 mm overlap for joining.
Whipstitch the overlap securely, then whipstitch the lower edge of the cylinder to the plastic-canvas base.
Ami_esnek (yatay)
Plastic Canvas Lid Frame
Measure the inside of the completed Outer Lid.
Cut 1 circle 3–5 mm smaller than the inside diameter of the Lid.
Cut 1 narrow strip approximately 3–4 mm shorter than the Lid skirt.
Form the strip into a ring so the finished circumference is 3–5 mm smaller than the inside of the Lid; allow approximately 5 mm overlap.
Whipstitch the ring closed, then attach it around the plastic-canvas Lid circle.

Assembly
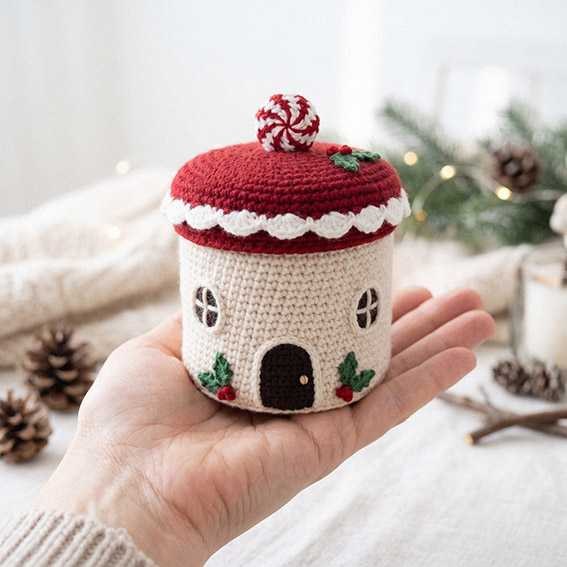
- Sew the Door to the front center of the Outer Box about 1 Round above the base. Position one Window on each side above the Door midpoint. Sew 2 Holly Leaves and 1 Berry beside each lower front side.
- Insert the Body plastic-canvas frame into the Outer Box, place the Inner Liner inside, align the 72 top sts, and sew both crochet layers together around the rim so the canvas is completely enclosed.
- Sew the Peppermint Topper slightly left of the Lid center. Sew the remaining 2 Holly Leaves to the right of center with 3 Berries grouped at their base.
- Insert the Lid plastic-canvas frame, place the Inner Lid Panel beneath it, and sew the 80 panel sts evenly to the 80-st lower edge of the Lid. Check that the Lid sits level and slides over the Box rim without stretching.
Copyright & Credits
This crochet pattern and all accompanying photos belong to AmigurumiAllFreePatterns.com. The written instructions and photos may not be copied, redistributed, translated, republished, or used for commercial purposes without permission. Finished items made from this pattern may be sold in small quantities with credit to AmigurumiAllFreePatterns.com.
Pick Your Favorite & Pin It
CONTENT END 1
