

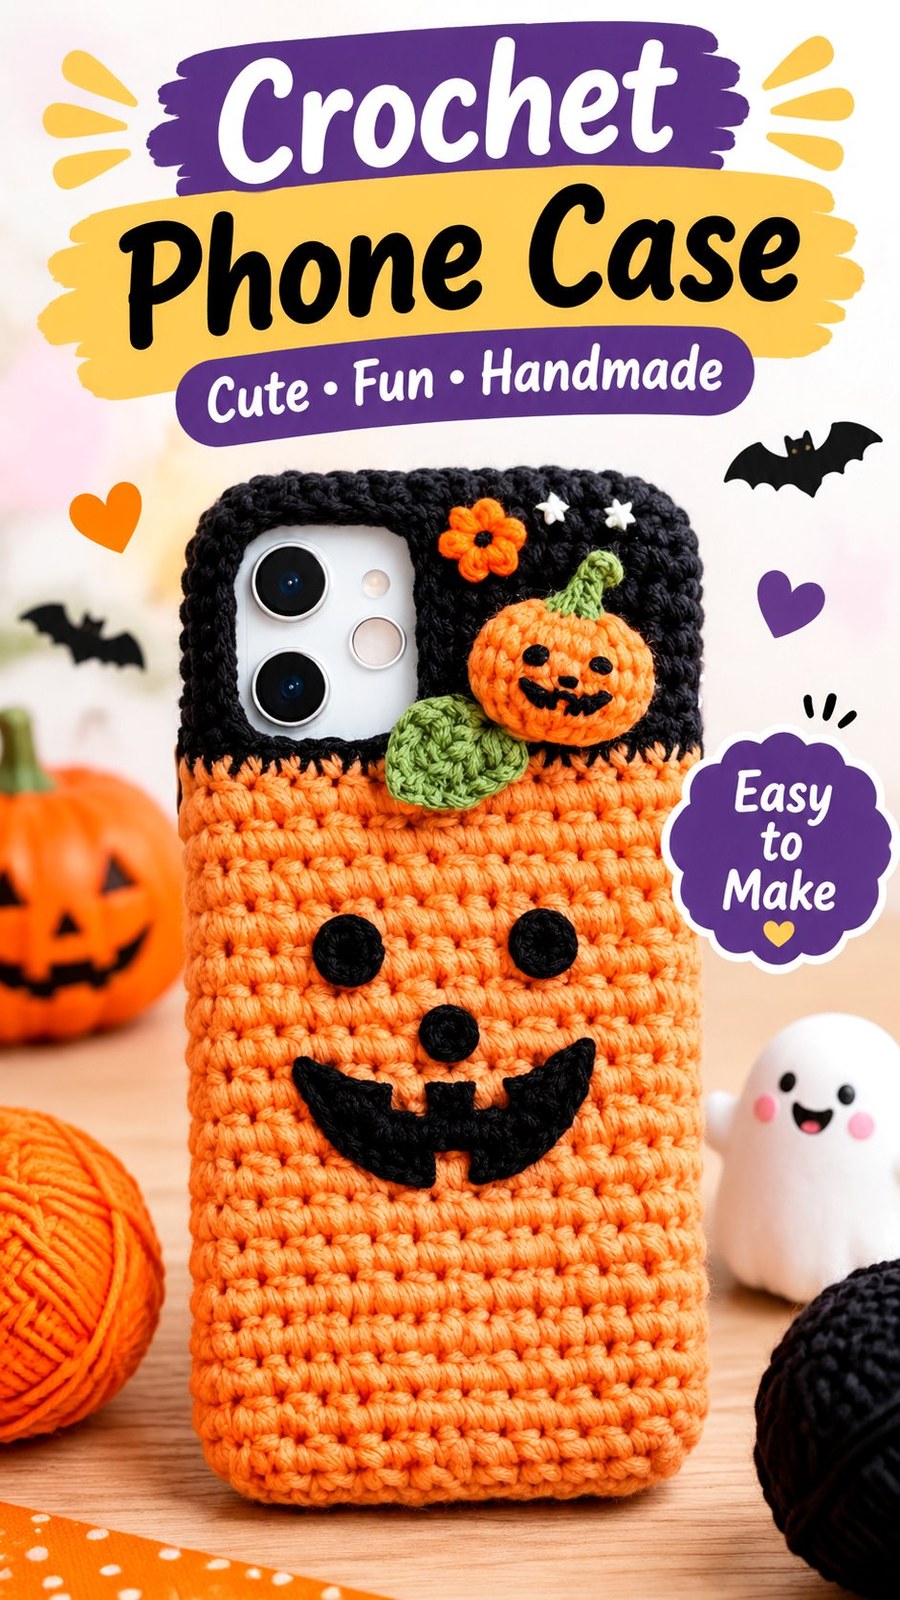
- Mark the center of the front panel.
- Position the mouth approximately 1.5 inches (3.8 cm) below the eyes.
- Use short satin stitches to fill a shallow curved shape.
- Extend the corners upward to create a cheerful jack-o’-lantern expression.
- Add a few short orange stitches over the black area if you want small teeth or separated sections.
- Secure the yarn on the wrong side without leaving long loose strands.
For a more dimensional appearance, crochet a small mouth-shaped piece separately using black yarn and sew it securely onto the panel.
Part 7: Add the Decorative Flower and Stars
Small Orange Flower
- With orange yarn, make a magic ring.
- Work 5 repetitions of the following sequence into the ring: sl st, ch 2, 2 dc, ch 2, sl st.
- Pull the ring closed.
- Join with a sl st and fasten off.
Arrange the five petals evenly and sew the flower near the pumpkin on the black section.
Optional White Stars
- With white yarn, make a magic ring.
- Work 5 repetitions of: ch 3, sl st in the second ch from the hook, sc in the next ch, sl st into the magic ring.
- Pull the ring closed and fasten off.
- Make two stars and sew them near the flower.
Keep the decorative pieces relatively small so the black upper section remains visible.
Part 8: Assemble the Crochet Phone Case
Place the front and back panels together with their wrong sides facing inward. The orange sections should align, and the black upper sections should meet at the top.
- Use stitch markers to secure the bottom corners and side edges.
- Start at one bottom corner using orange yarn.
- Join the panels with a neat single crochet seam, working through both layers along the side.
- Continue across the bottom edge, keeping the stitches evenly spaced.
- Work up the opposite side, changing to black yarn when the seam reaches the black section.
- Fasten off at the top edge.
- Leave the entire top edge open so the phone can slide into the sleeve.
Keep the seam close to the outer edges of the panels. A very wide seam can make the phone case too narrow.
Alternatively, use a yarn needle and mattress stitch for a flatter, less noticeable seam.
Part 9: Finish the Top Edge
- Attach black yarn to one top corner.
- Work 1 sc into each stitch across the front top edge.
- Continue around the top opening and work 1 sc into each available stitch along the back top edge.
- Sl st into the first sc to join.
- Fasten off and weave in the yarn ends.
This border gives the top opening a tidy appearance and helps it maintain its shape.
Part 10: Attach the Decorative Appliques
Before sewing the decorations permanently, lay all the pieces on the panels and experiment with their placement.
For the front:
- Position the two larger black circles symmetrically in the orange section.
- Place the smaller nose between and slightly below the eyes.
- Center the smiling mouth beneath the nose.
For the back:
- Position the orange pumpkin near the right side of the black section.
- Place the green leaf partly underneath the pumpkin.
- Arrange the orange flower above or beside the pumpkin.
- Add two small white stars for extra Halloween detail.
Use small, secure stitches to attach every decoration. Avoid covering the camera opening or placing bulky details where they could interfere with inserting or removing the phone.
Finally, weave in every loose end and inspect the seams to make sure the cover is secure.
How to Customize Your Crochet Phone Case Size
One of the best features of a handmade crochet phone case is that you can adjust its measurements to fit different phone models. Because phones have different widths, heights, and camera arrangements, it is important to measure before starting.
Adjusting the Width
The foundation chain determines the width of the rectangular panels. To make a wider cover, add chains to the foundation. Each additional chain creates one additional hdc in the first row.
At the recommended gauge, approximately 4.5 hdc stitches fit into one inch. Therefore, adding two stitches increases the panel width by approximately 0.45 inches (1.1 cm).
For example, if your phone is wider than the suggested base size, increase the foundation chain by two or four stitches. Make both panels with the same number of stitches.
Adjusting the Length
The number of rows determines the length of the phone cover. Add or remove rows from the orange section to accommodate taller or shorter phones.
At the recommended gauge, approximately 5.5 rows equal one inch. Adding four rows increases the length by approximately 0.73 inches (1.85 cm).
Keep the black upper section approximately 12 rows tall if you want to maintain the same visual proportions. Most length adjustments can be made in the orange body.
Adjusting the Camera Opening
Camera layouts vary significantly between devices. Some phones have a large rectangular camera bump, while others have smaller circular camera openings.
- Measure the full camera bump, not only the individual lenses.
- Add a small amount of clearance around the camera area.
- Adjust the number of unworked stitches to change the opening width.
- Add or remove split rows to adjust the opening height.
- Keep the opening positioned according to the actual camera location.
Make a quick paper template of the camera area if the shape is unusual. This can help you plan the crochet opening before working the black section.
Alternative Color Combinations
The pumpkin theme works beautifully with several different color combinations. Although orange and black are classic Halloween colors, you can personalize the project with other shades.
- Traditional Halloween: Bright orange, black, and leaf green.
- Soft autumn: Burnt orange, chocolate brown, and sage green.
- Pastel Halloween: Peach, lavender, and cream.
- Spooky style: Deep orange, charcoal black, and dark purple.
- Minimal pumpkin: Terracotta, warm beige, and muted green.
Customization Tip
You can turn this basic pumpkin phone case into a different seasonal design by changing the appliques. Replace the pumpkin with a snowflake for winter, a flower for spring, or a small heart for an everyday accessory. Keep the same two-panel construction and simply change the decorative details.
Common Crochet Phone Case Mistakes and How to Fix Them
Small crochet accessories require consistent tension and careful measuring. A few simple checks during construction can prevent problems during assembly.
1. The Phone Case Is Too Tight
If the panels are too narrow, the finished sleeve may be difficult to use. This often happens when the crocheter works with very tight tension or uses a smaller hook than recommended.
Solution: Make a gauge swatch before starting. If your stitches are smaller than the recommended gauge, try a larger hook or add stitches to the foundation chain.
2. The Panels Have Different Sizes
Uneven tension can cause one panel to become longer or wider than the other. This makes joining difficult and can create a twisted phone sleeve.
Solution: Count the stitches after each row and compare the panels before assembly. Both should have 15 stitches across and 36 rows for the suggested base size.
3. The Camera Opening Looks Uneven
The camera window can become distorted if the split sections are worked with different tension or if the border stitches are too tight.
Solution: Keep the left and right sections consistent, use stitch markers to identify the opening boundaries, and work the border loosely enough to preserve the original shape.
4. The Color Changes Look Messy
Visible gaps or loose loops sometimes appear where orange changes to black.
Solution: Change colors during the final yarn-over of the last stitch in the previous color. Keep the unused yarn tails on the wrong side and weave them in carefully.
5. The Appliques Do Not Sit Flat
Decorative crochet pieces can curl if the yarn is too tight or if the pieces are not shaped before sewing.
Solution: Gently flatten each applique before attaching it. Use small stitches around the edges instead of pulling the sewing yarn tightly.
6. The Seams Make the Case Too Narrow
Thick joining stitches can reduce the available space inside the phone sleeve.
Solution: Keep the joining stitches close to the outer edges. If you need extra room, use mattress stitch rather than a thick single crochet seam.
Finishing, Shaping, and Caring for Your Crochet Phone Case
Finishing is an important part of creating a neat crochet phone accessory. Even a simple project looks more professional when the seams, camera opening, and decorative details are carefully arranged.
Weaving in Loose Ends
Use a yarn needle to weave every loose end through several stitches on the wrong side of the fabric. Change direction once or twice to help secure the yarn. Trim any excess carefully without cutting into the crochet stitches.
Pay particular attention to the camera opening and the places where the decorative pieces are attached. These areas should have no loose loops that could catch on the phone.
Blocking the Crochet Panels
Blocking can help even out the panels and improve the appearance of the ribbed texture. Lightly mist the pieces with water if the yarn care instructions allow it. Lay them flat on a clean towel and gently shape them to the suggested measurements.
Allow the panels to dry completely before joining them. Avoid stretching the camera opening or flattening the decorative details too aggressively.
Washing and Everyday Care
For a cotton or washable cotton-acrylic yarn, gentle hand washing is generally a suitable care option, provided the yarn label permits it.
- Use cool or lukewarm water.
- Choose a gentle detergent suitable for the yarn fiber.
- Avoid twisting or stretching the crochet fabric.
- Press excess water out with a clean towel.
- Reshape the case and allow it to air dry completely.
- Do not place a phone inside a damp crochet cover.
Because the cover is an accessory rather than a protective phone case, it should not be relied upon to prevent damage from drops or impacts. A suitable protective case underneath is recommended.
Care and safety reminder: Make sure all appliques, seams, and decorative pieces are securely attached. Keep the phone’s camera, microphone, speakers, charging port, and other openings unobstructed. Remove the cover before charging if its design interferes with access to the charging port.
Creative Ways to Style Your Handmade Pumpkin Phone Case
This Halloween crochet phone case is a fun accessory for autumn and seasonal celebrations. Its bright colors and smiling pumpkin face make it stand out without requiring complicated construction.
You can personalize the finished project in several ways:
- Make it extra spooky: Add small white ghost appliques or purple stars to the black section.
- Choose a friendly face: Embroider a simple curved smile instead of a toothy jack-o’-lantern expression.
- Create a mini pumpkin collection: Make several small pumpkins in different orange shades and use them as decorative motifs.
- Add a seasonal flower: Replace the tiny orange flower with a crochet sunflower or autumn leaf.
- Use contrasting edging: Add a thin green or cream border around the upper edge.
- Make a matching set: Use the same pumpkin applique on a crochet pouch, keychain, or small accessory bag.
If you plan to give the finished case as a gift, measure the recipient’s phone carefully. A handmade phone sleeve is most useful when the opening, overall length, and camera placement suit the actual device.
Crochet Pumpkin Phone Case: At a Glance
- Best yarn choice: Medium-weight cotton or cotton-acrylic yarn for a firm, defined texture.
- Skill level: Advanced beginner, with basic color changes, flat panels, and small appliques.
- Key technique: Half double crochet BLO rows create the horizontal ribbed texture.
- Size adjustment: Change the foundation chain for width and the number of rows for length.
- Finishing method: Join the front and back panels along the sides and bottom, then add a neat top border.
Make Your Own Cute Crochet Pumpkin Phone Case
This crochet pumpkin phone case is a delightful way to combine practical handmade accessories with playful Halloween creativity. The textured orange body, contrasting black top, and cheerful jack-o’-lantern face create a recognizable seasonal design that is enjoyable to personalize.
The construction is approachable for crocheters who are comfortable with basic stitches and want to practice color changes, panel assembly, and decorative applique techniques. The separate pieces also make it easier to experiment with different colors and facial expressions.
Before beginning, choose a yarn that creates a firm but flexible fabric, check your gauge, and measure your phone carefully. Read through the complete pattern, especially the camera-opening instructions, before working the back panel.
Once the basic case is complete, have fun arranging the pumpkin, leaf, flower, and facial details to create a design that reflects your own style. You can keep the classic orange-and-black Halloween look or experiment with softer autumn shades for a different seasonal finish.
Gather your yarn, prepare your crochet hook, and enjoy making a charming handmade phone accessory that celebrates the cozy creativity of crochet. This little pumpkin project can also become a thoughtful crochet gift idea for anyone who loves handmade accessories and Halloween-inspired crafts.
Tags
Crochet Phone Case
Pumpkin Crochet
Halloween Crochet
Crochet Phone Cover
Jack-o’-Lantern Crochet
Crochet Applique
Easy Crochet Accessories
Free Crochet Pattern
