

qjkbq
Crochet a Whimsical Woodland Deer Scene: A Beginner-Friendly Pattern
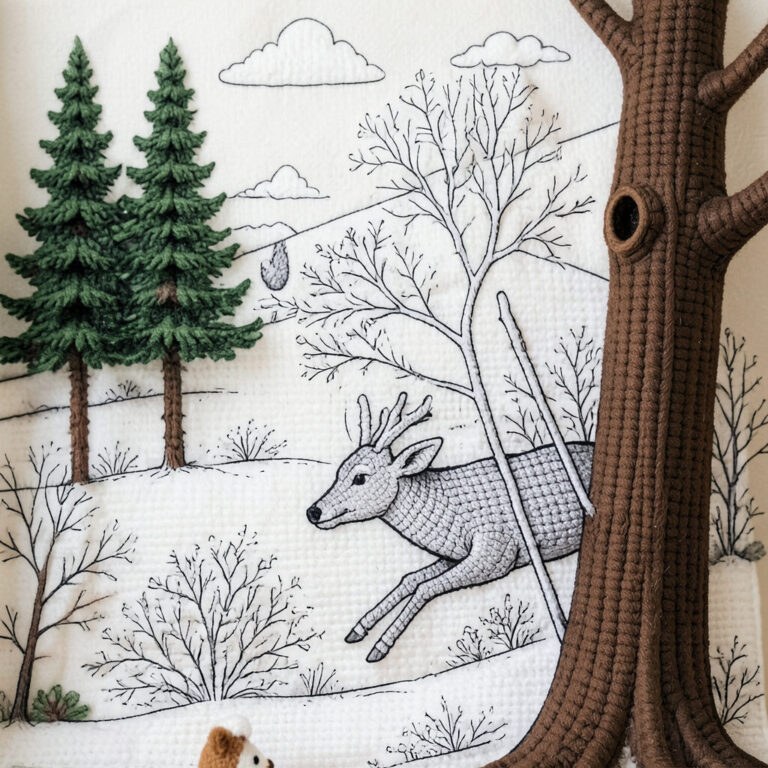
Hello, fellow yarn lovers! Isn’t there something utterly magical about a peaceful woodland scene, especially one featuring a graceful deer? Today, I’m so excited to share a project that brings that serene beauty into your home through the art of crochet. We’re going to create a whimsical woodland deer scene, inspired by those lovely black-and-white illustrations that evoke a sense of calm and wonder.
This pattern is perfect for anyone who loves nature and enjoys creating unique home decor or heartfelt handmade gifts. Imagine this charming deer leaping across your mantelpiece, gracing a shelf, or becoming a delightful centerpiece. It’s a wonderful way to practice various crochet techniques, from amigurumi shaping to surface embroidery, all while creating something truly special. Even if you’re relatively new to crochet, I’ll guide you through each step, making it a fun and rewarding experience!
Project Overview
This project involves crocheting several individual components: a leaping deer, a few coniferous trees, bare deciduous trees, and simple hill shapes. We’ll be using mostly single crochet stitches to create tight, defined shapes, ideal for amigurumi and scenic elements. The pieces will then be assembled to form a layered, dimensional woodland scene. While the inspiration image is black and white, you can choose to stick to a monochromatic palette for a sophisticated look or introduce subtle shades of green, brown, and grey for a more natural feel. The pattern is designed to be flexible, allowing for your creative touch!
Skill Level
Beginner to Intermediate. This pattern assumes basic knowledge of crochet stitches like single crochet, increases, and decreases. Techniques like working in the round and simple assembly will be covered in detail, making it accessible for enthusiastic beginners. More experienced crocheters will enjoy the creative freedom and quick construction.
Approximate Finished Size
The assembled scene will be approximately 8-10 inches tall and 10-12 inches wide, depending on your yarn weight, hook size, and personal tension. The deer itself will be about 5-6 inches tall.
Materials
- Worsted weight yarn in main colors (e.g., White, Light Grey, Dark Grey, Forest Green, Brown)
- Crochet hook (see Yarn section)
- Stuffing (polyester fiberfill)
- Yarn needle
- Scissors
- Stitch markers
- Optional: Floral wire or pipe cleaners for tree stability (for larger trees)
Yarn
For this project, I recommend using a worsted weight (Aran/10-ply) acrylic yarn. It’s affordable, widely available, and comes in a beautiful range of colors. Its slight stretch also makes it forgiving for beginners. For a good balance of stitch definition and softness, I suggest using a 3.5mm (E/4) or 4.0mm (G/6) crochet hook with worsted weight yarn. If you want a tighter fabric for your amigurumi pieces to prevent stuffing from showing through, go down half a hook size.
Crochet Hook
3.5mm (E/4) or 4.0mm (G/6) crochet hook, depending on your yarn choice and desired tightness.
Abbreviations (US Terminology)
- MR – magic ring
- ch – chain
- st/sts – stitch/stitches
- sl st – slip stitch
- sc – single crochet
- inc – increase (2 sc in one st)
- dec – decrease (sc2tog – single crochet 2 together)
- FO – fasten off
- Rnd – round
- FLO – front loop only
Before You Begin / Pattern Notes
- This pattern is worked in continuous rounds unless otherwise specified. Use a stitch marker to keep track of the first stitch of each round.
- Stuff pieces firmly as you go, but don’t overstuff to distort the shape.
- For a cleaner look, use the invisible decrease method (insert hook into FLO of next two stitches, yarn over, pull through both loops, yarn over, pull through remaining two loops).
- Color changes are indicated where necessary. When changing colors, complete the last yarn over of the previous stitch with the new color.
- The image inspiration is black and white, so feel free to use shades of grey, black, and white. Or, choose natural browns, greens, and muted tones for a more realistic forest.
The Leaping Deer
We’ll start with the most captivating element – the deer!
Head (Light Grey or Brown)
Rnd 1: 6 sc in MR (6)
Rnd 2: inc in each st around (12)
Rnd 3: (sc, inc) x 6 (18)
Rnd 4: (2 sc, inc) x 6 (24)
Rnd 5-8: sc in each st around (24) (4 rounds)
Rnd 9: (2 sc, dec) x 6 (18)
Stuff firmly.
Rnd 10: (sc, dec) x 6 (12)
Rnd 11: dec x 6 (6)
FO, leaving a long tail for sewing. Cinch closed.
Body (Light Grey or Brown)
Rnd 1: 6 sc in MR (6)
Rnd 2: inc in each st around (12)
Rnd 3: (sc, inc) x 6 (18)
Rnd 4: (2 sc, inc) x 6 (24)
Rnd 5: (3 sc, inc) x 6 (30)
Rnd 6-12: sc in each st around (30) (7 rounds)
Rnd 13: (3 sc, dec) x 6 (24)
Rnd 14: sc in each st around (24)
Rnd 15: (2 sc, dec) x 6 (18)
Stuff firmly.
Rnd 16: (sc, dec) x 6 (12)
FO, leaving a long tail for sewing. Cinch closed.
Ears (Make 2, Light Grey or Brown)
Ch 5.
Row 1: Sc in 2nd ch from hook, sc in next 2 ch, 3 sc in last ch. Working down other side of chain: sc in next 3 st. (9)
Sl st to first sc.
FO, leaving a long tail for sewing. Flatten the ear.
Antlers (Make 2, Dark Grey or Brown)
Ch 6.
Sl st in 2nd ch from hook, sl st in next 2 ch, ch 3, sl st in 2nd ch from hook, sl st in next ch. Continue sl st down main chain: sl st in last 2 ch.
FO, leaving a long tail for sewing.
Legs (Make 4, Light Grey or Brown)
Rnd 1: 6 sc in MR (6)
Rnd 2-8: sc in each st around (6) (7 rounds)
Stuff lightly, especially the bottom.
FO, leaving a long tail for sewing.
Forest Elements
Now for the beautiful backdrop!
