

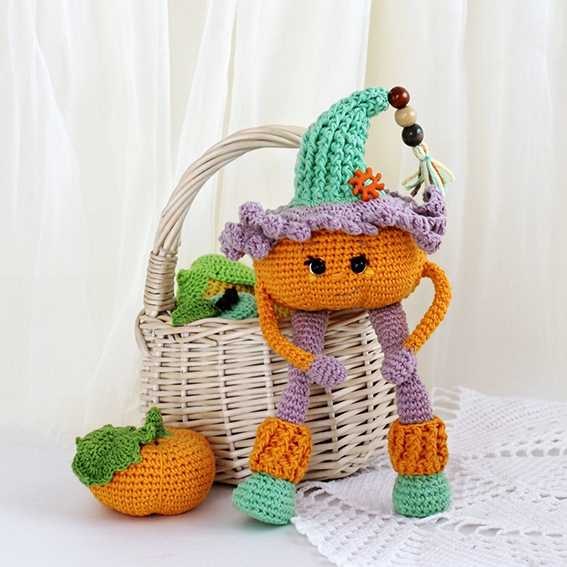
A pumpkin with dangling legs and a curly wig takes center stage in this free pumpkin doll amigurumi crochet pattern. Its orange head is shaped into eight deep segments, with brown curls peeking beneath a tall, pointed hat. Slender arms, bendable knees, green shoes, and ribbed orange gaiters give the seated character its distinctive look. The finished figure is designed to sit rather than stand, with the pumpkin head serving as the body.
Ami_kare 300×250

Ami_kare 300×250
How the Pumpkin Doll Comes Together
The construction starts with a stuffed spiral-round pumpkin, followed by two oval-based shoes, long narrow legs, and separate arms. A circular crocheted wig carries 32 curls, while the hat uses raised post stitches for its ribbed texture. Plastic insoles support the shoes, and the head is divided with a long yarn needle before the features are attached. The accompanying step photos show the shaping, fitting, and careful assembly in order.
FREE PUMPKIN DOLL AMIGURUMI CROCHET PATTERN
Designer: Natalia Balyk / @kurs_vyagusama
Difficulty Level: Intermediate
Materials and Tools
- Cotton yarn in orange, brown, and green, or another suitable yarn (the designer used cotton, 200 m / 50 g)
- 1.3 mm crochet hook, or a hook suitable for your yarn
- Polyester fiberfill
- Two 5 mm half-bead eyes
- Super glue
- Plastic sheet for two shoe insoles
- Embroidery needle
- Sewing pins
- Beads and a button for optional decoration
Abbreviations
MR – magic ring
ch – chain
sc – single crochet
dc – double crochet
sl st – slip stitch
inc – increase (2 sc in the same stitch)
dec – decrease (sc2tog through the front loops)
FPdc – front post double crochet
BPdc – back post double crochet
dc2tog – double crochet 2 stitches together
BLO – back loop only
(…) × n – repeat the instructions in parentheses n times
Ami_esnek (yatay)
Finished Size
Approximately 5.5 in (14 cm) from the heels to the top of the head, excluding the hat, using the designer’s yarn and hook.
Thicker yarn will produce a larger toy.
Ami_esnek (yatay)
Notes
- The pumpkin is designed to sit, not stand.
- The legs bend at the knees.
- Work all circular pieces in continuous spiral rounds unless otherwise stated.
- The gaiters and hat are worked in joined rounds with a ch-2 at the beginning and a sl st at the end.
- The hat uses post stitches to create a raised ribbed texture.
- Each decrease in the sc sections is worked through the front loops.
- The hat has its own dc decrease instructions.
- The gaiters and hat require experience with post stitches.
- The source lists orange, brown, and green yarn, although the photographs show additional colors. The extra color changes are not specified in the written instructions.
Head
Make 1 with orange yarn. Work in continuous spiral rounds without a turning chain.
Round 1: 8 sc in MR. (8)
Round 2: 8 inc. (16)
Round 3: (sc, inc) × 8. (24)
Round 4: (2 sc, inc) × 8. (32)
Round 5: (3 sc, inc) × 8. (40)
Round 6: (4 sc, inc) × 8. (48)
Round 7: (5 sc, inc) × 8. (56)
Round 8: (6 sc, inc) × 8. (64)
Rounds 9–19: 64 sc (11 rounds). (64)
Ami_esnek (yatay)
You can crochet more rounds here to increase the height of the pumpkin.
Round 20: (6 sc, dec) × 8. (56)
Round 21: 56 sc. (56)
Round 22: (5 sc, dec) × 8. (48)
Round 23: 48 sc. (48)
Round 24: (4 sc, dec) × 8. (40)
Round 25: (3 sc, dec) × 8. (32)
Round 26: (2 sc, dec) × 8. (24)
Stuff the piece firmly.
Round 27: (sc, dec) × 8. (16)
Round 28: 8 dec. (8)
Cut the yarn and pull the remaining stitches closed.
Shaping the Pumpkin Segments
- Thread a long piece of orange yarn onto a needle. Divide the pumpkin into two halves, passing the needle through the MR at the top and the closed opening at the bottom. Pull the yarn tight to form the first indentation.
- Divide each half into two sections, creating four quarters. Tighten the yarn after each pass to define the pumpkin segments.
- Divide each quarter in half again. The pumpkin will have eight segments in total.
Photo 1 shows the crocheted head before shaping. Photo 2 shows the yarn passing through the pumpkin, and Photo 3 shows the completed eight-segment shape.
Legs — Make 2
Start with green yarn.
Ch 4, then ch 2 for turning.
Round 1: 3 sc, 4 sc in the last ch, 2 sc along the opposite side of the foundation chain, inc. (11)
Continue in continuous spiral rounds without a turning chain. Work the first sc of Round 2 into the first sc of Round 1.
Round 2: Inc, 2 sc, 4 inc, 2 sc, 2 inc. (18)
Round 3: Sc, inc, 2 sc, (sc, inc) × 4, 3 sc, inc, 2 sc. (24)
Ami_kare 300×250
