

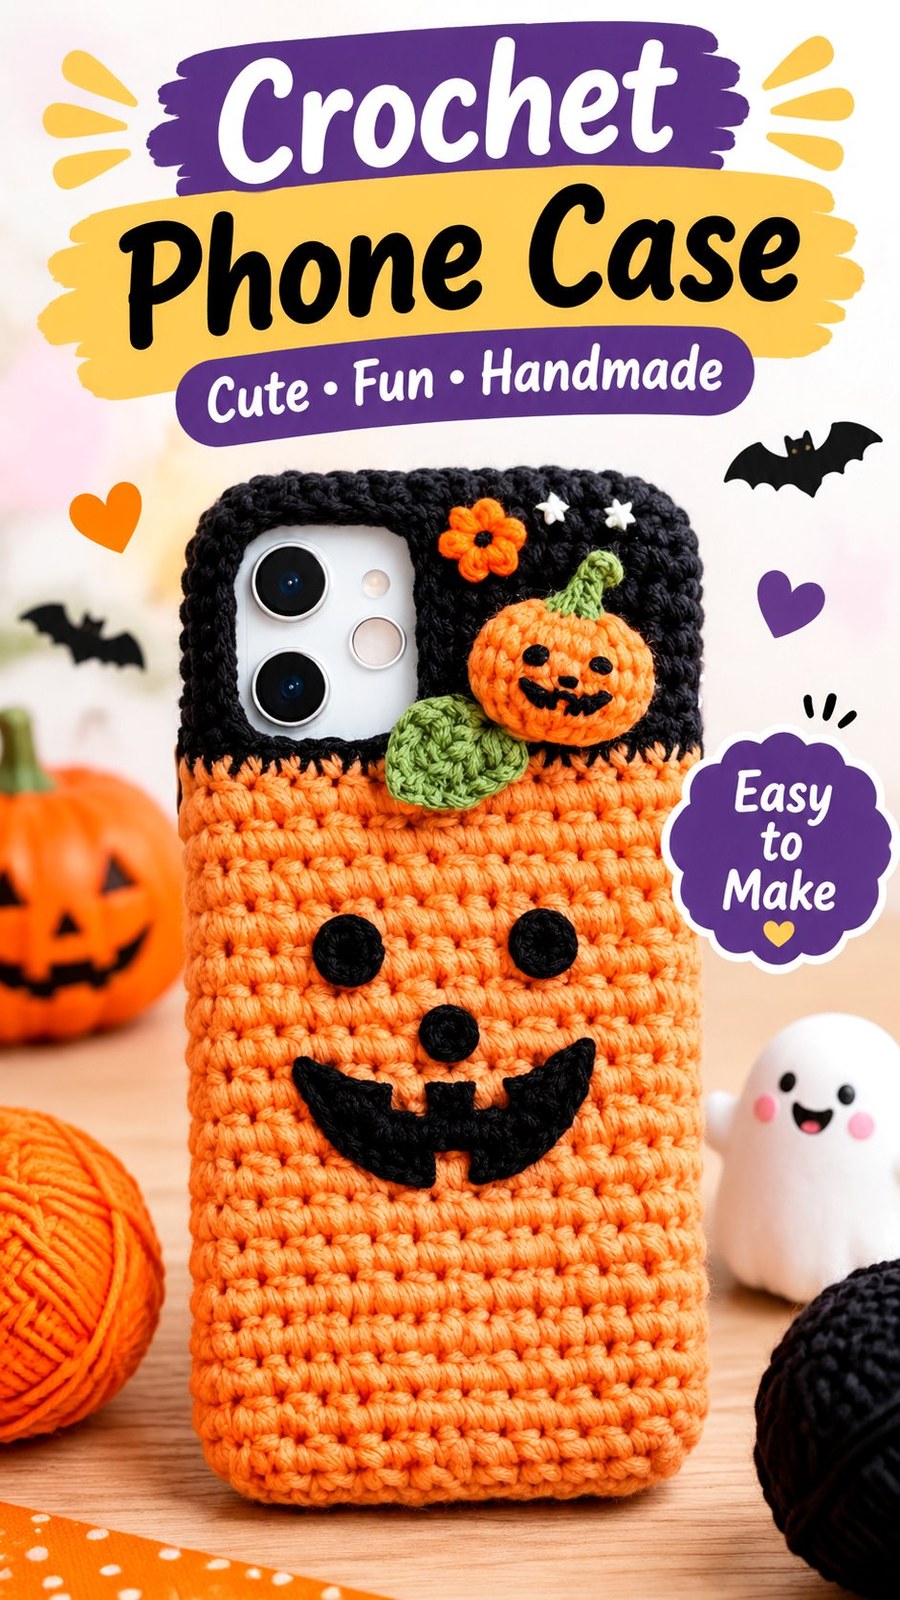
Add a playful handmade touch to your everyday accessories with this adorable crochet pumpkin phone case! Inspired by classic Halloween colors and cheerful jack-o’-lantern decorations, this cozy phone cover combines a textured orange crochet body, a black witch-hat-inspired top section, and a cute smiling pumpkin applique. The finished design is both practical and festive, making it a fun project for Halloween lovers and crochet enthusiasts.
This original crochet phone case pattern uses simple stitches, separate front and back panels, and small decorative crochet pieces to create a charming pumpkin-themed accessory. The main body features horizontal ribbed texture, while black crochet appliques form the eyes and smiling mouth. A small pumpkin, green leaf, and optional decorative stars complete the seasonal look.
Whether you want to make a unique phone accessory for yourself or create a handmade Halloween gift, this project is a lovely way to practice basic crochet techniques while experimenting with colorful yarn and playful embellishments.
Key Takeaways
- Project type: Handmade crochet phone case with a Halloween pumpkin theme.
- Skill level: Advanced beginner, with simple shaping and applique techniques.
- Main stitches: Half double crochet, single crochet, increases, and decreases.
- Construction: Two rectangular crochet panels joined along the sides and bottom.
- Recommended yarn: Medium-weight cotton or cotton-acrylic blend for a durable finish.
- Customization: Change the pumpkin expression, colors, leaves, flowers, or decorative details.
Meet This Cute Crochet Pumpkin Phone Case
The main feature of this crochet phone case is its bright orange rectangular body, designed to resemble a smiling Halloween pumpkin. Its rounded bottom corners and closely worked horizontal rows create a soft, textured surface that comfortably surrounds a phone.
The upper section introduces a contrasting black color that resembles a small Halloween hat or dark night sky. The black section frames the exposed camera area and provides a lovely background for the decorative pumpkin applique.
On the front, two round black eyes, a small circular nose, and a wide smiling mouth create the recognizable expression of a jack-o’-lantern. These facial details stand out against the orange background and give the cover its playful personality.
A small orange pumpkin with a green stem and leaf decorates the upper black section. A tiny orange flower and optional white stars add extra detail without making the design look too crowded.
The overall color combination is particularly attractive for autumn. Orange represents pumpkins, black adds a spooky Halloween contrast, and green introduces a natural accent that makes the decorative elements more noticeable.
What Makes This Phone Cover Special?
- Textured construction: Horizontal crochet ridges give the orange body a cozy handmade appearance.
- Contrasting colors: Orange and black create a recognizable Halloween palette.
- Decorative applique: The small pumpkin, leaf, flower, and facial features add dimension.
- Practical shape: Two joined panels create a sleeve-style cover with an accessible top opening.
- Personalized details: The face and decorations can be changed to suit different styles.
Crochet Construction and Stitch Analysis
The closest practical interpretation of this project is a two-panel crochet phone sleeve with a decorative camera opening in the back panel. The front and back are worked separately in rows, then joined along the sides and bottom to create a pocket.
This construction is convenient because it allows you to work the orange body and black upper sections independently before assembling the case. It also makes the camera opening easier to shape than trying to crochet an entire phone cover in one complicated piece.
The Main Crochet Stitch
The orange body has a compact horizontal texture. A useful way to recreate this appearance is to work half double crochet stitches through the back loop only after the foundation row.
Working into the back loop creates raised horizontal ridges across the fabric. These ridges give the phone cover a textured appearance while keeping the material flexible enough to fit around the phone.
The black upper section can use the same stitch so that the texture remains consistent throughout the project.
Recommended Yarn and Hook
Medium-weight yarn is a practical choice for this project. Cotton yarn provides stitch definition and structure, while a cotton-acrylic blend adds softness and flexibility.
A 4.0 mm (US G-6) crochet hook is a useful starting point. The finished fabric should be dense enough to protect the phone from everyday scratches without becoming overly stiff.
The decorative pumpkin, flower, leaf, and facial details are worked separately using small amounts of contrasting yarn.
Crochet Insight
The camera opening is one of the most important construction details. Measure your phone’s camera bump before making the back panel. The recommended opening is only a starting point, and it should be adjusted to keep every lens and sensor completely unobstructed.
Free Crochet Pumpkin Phone Case Pattern
Free Crochet Pumpkin Phone Case Pattern
This original interpretation uses two flat crochet panels, a shaped camera opening, and separate decorative appliques. The instructions below create a Halloween-inspired phone sleeve with an orange ribbed body and black upper section.
Pattern Overview
| Project | Pumpkin Halloween crochet phone case |
| Skill level | Advanced beginner |
| Finished size | Approximately 3.3 x 6.55 inches (8.4 x 16.6 cm) |
| Yarn category | Medium-weight yarn, Category 4 |
| Yarn quantity | Approximately 100 yards (91 meters) total |
| Recommended hook | 4.0 mm (US G-6) |
| Gauge | 18 hdc x 22 rows = 4 x 4 inches (10 x 10 cm) |
| Construction | Two flat panels joined at sides and bottom |
| Terminology | US crochet terminology |
| Time estimate | Approximately 4 to 6 hours, depending on experience |
Materials and Supplies
- Orange medium-weight yarn, approximately 55 yards (50 meters).
- Black medium-weight yarn, approximately 30 yards (27 meters).
- Green yarn, approximately 5 yards (4.5 meters).
- White yarn, approximately 2 yards (1.8 meters), for optional stars.
- Small amounts of black yarn for the facial details if needed.
- Small amount of yellow or orange yarn for the flower.
- 4.0 mm (US G-6) crochet hook.
- 3.0 mm (US D-3) hook for optional tighter decorative details.
- Yarn needle for sewing and weaving in ends.
- Stitch markers.
- Scissors.
- Tape measure.
- Optional stitch pins for positioning the decorations.
Crochet Abbreviations
All instructions use standard US crochet terminology.
- ch: Chain.
- st: Stitch.
- sts: Stitches.
- sl st: Slip stitch.
- sc: Single crochet.
- hdc: Half double crochet.
- inc: Increase, work 2 stitches in the same stitch.
- dec: Decrease, work 2 stitches together.
- BLO: Back loop only.
- FLO: Front loop only.
- RS: Right side.
- WS: Wrong side.
- rep: Repeat.
- FO: Fasten off.
Special Stitch Instructions
Half double crochet in the back loop only (hdc BLO): Yarn over, insert the hook into the back loop of the next stitch, yarn over and pull up a loop, then yarn over and pull through all three loops.
Single crochet increase (sc inc): Work 2 single crochet stitches into the same stitch.
Single crochet decrease (sc dec): Insert the hook into the first stitch and pull up a loop. Insert the hook into the next stitch and pull up another loop. Yarn over and pull through all three loops.
Important construction notes:
- The main panels are worked flat in rows.
- Chain 2 at the beginning of each hdc row. It does not count as a stitch.
- Turn after every row unless an instruction says otherwise.
- Work the first hdc into the first actual stitch.
- Do not count the turning chain in the stitch totals.
- Slip stitches used for assembly do not count as panel stitches.
- Keep the same tension throughout both panels.
- The camera opening is worked into the upper black section of the back panel.
Before You Begin
The measurements are suggested starting dimensions for a phone approximately 3.1 inches (7.9 cm) wide and 6.3 inches (16 cm) tall. The finished case is approximately 3.3 inches (8.4 cm) wide and 6.55 inches (16.6 cm) tall before assembly.
Measure your actual device, including any permanent phone case that will remain underneath the crochet cover. Check the camera bump and lens arrangement before making the back panel.
The pattern uses 15 stitches across and 36 rows in total for each panel. The orange body occupies 24 rows, while the black upper section occupies 12 rows.
Part 1: Crochet the Front Panel
Color: Orange for the body and black for the upper section.
- Foundation: With orange yarn, ch 17.
- Row 1: Hdc in the third ch from the hook and in each remaining ch across. You will have 15 hdc. Ch 2 and turn.
- Rows 2-24: Hdc BLO in each of the 15 sts across. Ch 2 and turn after each row.
- Color change: At the end of Row 24, change to black yarn during the final yarn-over of the last hdc. Ch 2 and turn.
- Rows 25-36: With black yarn, hdc BLO in each of the 15 sts across. Ch 2 and turn after each row.
After Row 36, fasten off and leave a yarn tail of approximately 12 inches (30 cm) for assembly.
Final count: 15 hdc in every row, 36 rows total.
Part 2: Crochet the Back Panel With Camera Opening
The back panel follows the same orange and black color arrangement but includes a rectangular opening in the upper black area.
Orange Lower Section
- Foundation: With orange yarn, ch 17.
- Row 1: Hdc in the third ch from the hook and in each remaining ch across. You will have 15 hdc. Ch 2 and turn.
- Rows 2-24: Hdc BLO in each of the 15 sts across. Ch 2 and turn after each row.
At the end of Row 24, change to black yarn on the final yarn-over of the last hdc.
Black Lower Border of the Camera Opening
- Row 25: Ch 2, hdc BLO in each of the 15 sts. Ch 2 and turn. (15 hdc)
- Row 26: Hdc BLO in each of the 15 sts. Ch 2 and turn. (15 hdc)
Shape the Camera Window
The opening is positioned toward the left side of the back panel. It is created by working one stitch on the left border and seven stitches on the right border, leaving seven center stitches unworked.
- Row 27: Ch 2 and hdc BLO in the first stitch only. Do not work into the remaining 14 stitches. Fasten off this section, leaving a yarn tail.
- Attach a new strand of black yarn to the ninth stitch of the row, leaving the seven center stitches between the two sections unworked.
- Hdc BLO in each of the remaining seven stitches. (1 hdc on the left section and 7 hdc on the right section)
- Row 28: Turn the left section. Ch 2 and work 1 hdc BLO. Fasten off.
- Attach black yarn to the first stitch of the right section. Ch 2 and work 7 hdc BLO. Fasten off.
- Rows 29-34: Repeat Row 28 six more times, working the left section as 1 hdc and the right section as 7 hdc. Fasten off each section after completing its row.
There are now eight rows of open space between the two black borders. The camera window measures approximately 1.55 x 1.45 inches (3.9 x 3.7 cm) before edging.
Note: If your camera bump is larger, increase the opening width by leaving more center stitches unworked. Adjust the height by adding or removing split rows.
Upper Border of the Camera Opening
- Row 35: With black yarn, work 1 hdc BLO across the left section. Ch 1 and fasten off.
- Attach black yarn to the right section and work 7 hdc BLO. Ch 1 and fasten off.
- Row 36: Repeat Row 35 to complete the second upper border row.
Final count: The left section has 1 hdc per row and the right section has 7 hdc per row throughout the eight split rows. The completed back panel contains 36 row levels and retains a 15-stitch total width outside the camera opening.
Important camera-fit tip: Before joining the panels, position the back panel against your phone and check that the camera bump sits inside the opening. The lens area must remain completely clear. Never force the phone through an opening that is too small or allow the yarn to cover a camera or sensor.
Part 3: Finish the Camera Opening
Use black yarn and the 4.0 mm hook to add a neat single crochet border around the rectangular opening.
- Attach black yarn to one lower corner of the opening.
- Work 1 sc into each of the 7 exposed stitch spaces along the lower edge.
- Work 1 sc into each row end along the first vertical side, placing the stitches evenly.
- Work 1 sc into each of the 7 stitch spaces along the upper edge.
- Work 1 sc into each row end along the opposite vertical side.
- Sl st into the first sc to join.
- Fasten off and weave in the yarn ends.
The border creates a cleaner edge and helps the camera opening retain its shape. Avoid pulling the yarn too tightly because this can make the opening smaller.
Part 4: Make the Pumpkin Applique
The small pumpkin is made as a flat piece using orange yarn. It is worked in turned rows to create an oval shape.
- Foundation: With orange yarn, ch 7.
- Row 1: Sc in the second ch from the hook and in each remaining ch across. (6 sc)
- Row 2: Ch 1, turn. Work 2 sc in the first st, sc in the next 4 sts, and 2 sc in the last st. (8 sc)
- Row 3: Ch 1, turn. Sc in each st across. (8 sc)
- Row 4: Ch 1, turn. Work 2 sc in the first st, sc in the next 6 sts, and 2 sc in the last st. (10 sc)
- Row 5: Ch 1, turn. Sc in each st across. (10 sc)
- Row 6: Ch 1, turn. Sc2tog, sc in the next 6 sts, sc2tog. (8 sc)
- Row 7: Ch 1, turn. Sc2tog, sc in the next 4 sts, sc2tog. (6 sc)
Fasten off, leaving a long tail for sewing. The finished pumpkin will be approximately 1.2 x 1.8 inches (3 x 4.6 cm), depending on tension.
Add the Pumpkin Stem
- Attach green yarn to the top center of the pumpkin.
- Ch 4.
- Sl st in the second ch from the hook and in the next 2 ch.
- Sl st into the pumpkin at the starting point.
- Fasten off and weave in the ends.
For a slightly curved stem, gently shape it with your fingers before sewing the pumpkin to the case.
Part 5: Crochet the Green Leaf
A small green leaf adds contrast to the pumpkin and makes the decoration look more dimensional.
- With green yarn, ch 7.
- Starting in the second ch from the hook, work 1 sc, 1 hdc, 2 dc in the next ch, 1 hdc, and 1 sc.
- Ch 2 at the end of the chain and sl st into the final chain to form the leaf tip.
- Working along the opposite side of the foundation chain, work 1 sc, 1 hdc, 2 dc in the next available chain, 1 hdc, and 1 sc.
- Sl st into the starting point and fasten off.
Leave a yarn tail for sewing. The leaf should be small enough to sit partially underneath the pumpkin without covering its face.
Part 6: Make the Black Facial Features
The front panel needs two eyes, a small nose, and a wide smiling mouth. You can crochet these details as tiny appliques or embroider them directly onto the orange body.
Crochet the Small Round Eyes and Nose
Make three small black circles using the following instructions.
- Make a magic ring with black yarn.
- Ch 1 and work 6 sc into the ring.
- Sl st into the first sc to join.
- Pull the magic ring closed.
- Fasten off, leaving a long tail for sewing.
Make two slightly larger eyes by working 2 sc into each of the 6 stitches in the next round. This creates 12 sc. Fasten off.
Use the smaller circle for the nose and the two larger circles for the eyes.
Create the Jack-o’-Lantern Smile
For a wide pumpkin grin, use black yarn and a yarn needle to embroider a curved smile across the lower half of the orange body.
