

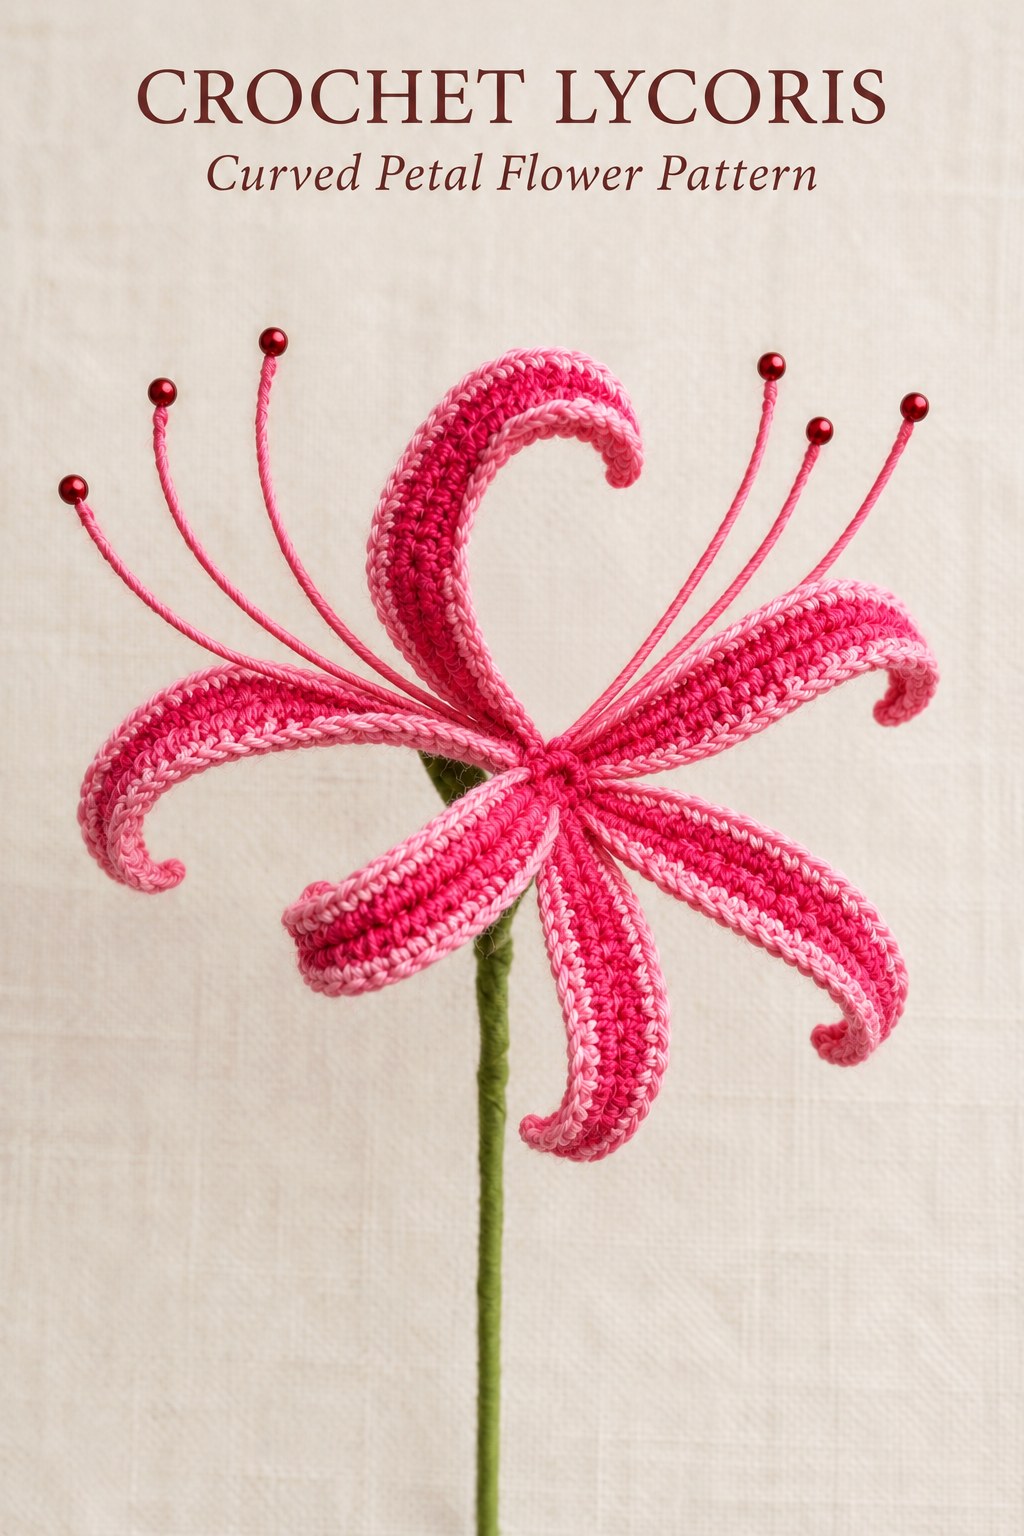
This crochet Lycoris pattern creates a light, open flower with six narrow wired petals and long pearl-tipped stamens. Pink cotton forms the petals, while pink wool covers the fine stamen supports. The supplied pages include a clear petal chart and actual photographs of the wire wrapping, knotting, joining and taped stem. The resulting shape depends as much on arranging the slender components as on the short crochet sequence, so prepare the petals and stamens separately before assembling the flowers on the wooden support.

Key Takeaways
- Make six narrow wired petals for each flower.
- Each petal begins with twenty working chains plus one height chain and twenty singles.
- The second round surrounds both sides with five singles, ten half doubles and five singles on each half.
- Red pearl tips sit on wire covered with pink wool.
- Use the source photographs to join the stamen and petal supports beneath the flower.
- The source suggests three or five completed flowers mounted on a wooden stick with green floral tape.
CROCHET LYCORIS FLOWER PATTERN
Project: Six narrow curved wired petals surround long pink wool-wrapped, red pearl-tipped stamens. Complete three or five flowers for the photographed supported arrangement.
| Skill level | Not explicitly graded. Uses a two-sided narrow petal, wire-enclosed crochet edges, wrapped stamens and floral-tape assembly. |
|---|---|
| Materials | Cotton in pink and dark pink; 1.90 mm crochet hook; pink wool; 0.6 mm wire; 6 red pearls; wooden stick; green floral tape. Yarn weight, quantities, gauge, finished dimensions and support-cut lengths are unspecified. |
| US abbreviations | ch = chain; sc = single crochet; hdc = half double crochet; ss = slip stitch. Source ST means ss. Each listed sc or hdc is a complete plain stitch in the charted path. |
| Petal foundation, make 6 | Ch20 plus 1 height chain. Work 20 sc across the working foundation. |
| Petal round 2 | Incorporate wire while working around both sides: 5 sc, 10 hdc, 5 sc, ch1, 5 sc, 10 hdc, 5 sc. The two halves contain 20 stitches each, 40 worked stitches plus the turning chain. |
| Petal finish | Ss join, cut and tie the knot. Twist the supporting wire as photographed. Complete 6 petals for the flower. |
| Pearl-tipped stamens | Insert wire through each red pearl. Twist the wire and pink wool together. Cover the wire with the wool and knot the yarn at the base, following the source process photographs. |
| Join the flower | Join the prepared stamens, trim excess yarn and twist the petal wires together around the center. Shape the long petals and stamens to the source’s open curved arrangement. No numbered color-change or measured bend-angle schedule is printed. |
| Mounting | Make 3 or 5 flowers as the source suggests. Cover the flower stems and wooden stick with green floral tape. Place the flowers on the support and lock them with tape. Repeat materials as needed for each completed flower; the listed 6 pearls are not a total for an entire multi-flower branch. |
Plan the Components Before Beginning
The crochet itself is short: one narrow foundation strip and one wired shaping round per petal. The assembly includes more separate actions. Prepare six petals, pearl-tipped stamens, covered support lengths and a wooden stick before expecting the source’s branching display to take shape.
The page lists six red pearls with the materials and calls for six petals in the flower. Its later mounting photograph suggests making three or five flowers. Treat the materials as a flower component list and repeat the needed supplies for the chosen number, rather than dividing a single set of six pearl tips across the whole arrangement.
Cotton, Wool and Wire Have Different Jobs
Use the listed pink and dark-pink cotton with a 1.90 mm hook for the crocheted petals. Pink wool is listed separately for the wrapped supports. The source shows the two yarn roles in different process photographs, so keep the wrapping material distinct from the cotton stitches when laying out the supplies.
The specified wire is 0.6 mm. The wooden stick supports the completed flower group, and green floral tape covers the supports and locks them in place. No wire length, stick length, pearl diameter, yarn brand, formal yarn-weight category, gauge or finished bloom measurement is supplied.
The finished image shows the darker pink and lighter pink together in the petals, but the written rounds do not provide a numbered color-change schedule. Follow the photograph for that placement without attributing an invented change point to the prose. The chart remains the guide to stitch positions and petal construction.
Read the Two-Sided Petal Chart
The chart shows a narrow central foundation with an initial single-crochet strip. A second circuit follows its two sides, adding taller half doubles through the middle and lower singles toward the ends. The tiny chain at the turning end separates the two halves of that wired round.
This is not a forty-stitch foundation chain. The forty worked stitches in the second round are distributed along both sides of the twenty-stitch strip. Keeping that relationship clear prevents a petal twice as long as the source and preserves the slim shape visible in the process photographs.

Foundation checkpoint: Begin with 20 working chains plus 1 height chain. The later 40-stitch edge travels along two sides; it does not require 40 starting chains.
Make the Twenty-Stitch Foundation Strip
For one petal, chain twenty plus one height chain. Work twenty single crochets along the working foundation. Keep the strip straight enough to identify the two long sides before the wire is added in the next round.
The source gives the chain count and completed strip count directly. Keep the extra height chain separate from the twenty working positions. No additional row of twenty singles is inserted between this foundation strip and the wired shaping round.
Add the Wire During the Second Round
Lay the support along the edge as shown in the source process photograph and work the second round while incorporating it. The crochet encloses the wire around the perimeter, leaving the central foundation line visible inside the narrow petal.
The photograph shows the support being worked into the edge rather than pushed through a finished petal afterward. Retain that order. A wire passed through the middle later would not reproduce the stated wired edging method or hold the two long sides in the same way.
Shape the First Side with Singles and Half Doubles
Work five single crochets, ten half double crochets and five single crochets along the first side. These twenty stitches use the first half of the two-sided path. The taller middle section gives the slim petal its gentle width without turning it into a broad oval.
Keep all ten middle stitches as half doubles. The source does not use doubles or trebles here, and the diagram’s unbarred upright symbols support that shorter height. Substituting taller stitches would broaden the petal beyond the long narrow form shown in the finished flower.
Turn and Work the Matching Second Side
Chain one at the turning end, then work five singles, ten half doubles and five singles along the other side. The two halves mirror one another around the central strip. Join with a slip stitch, cut the yarn and tie the knot as directed.
The worked edge contains forty actual stitches plus the one-chain turn. Do not count that turn as an extra single at either end. The source does not supply a third crochet round, an additional scalloped border or a separate picot edge for the Lycoris petal.
Twist the Petal Support and Repeat Six Times
Twist the petal’s support ends together, following the arrow in the source process illustration. Keep the twist below the crocheted shape so the long edges remain free to curve. The source does not specify a counted number of twists or a measured wire tail.
Complete six petals for the flower. Compare their foundation lengths and the five-ten-five shaping groups before joining them. Consistent construction helps the slender pieces sit around the stamen center, while the final curved appearance is adjusted through their individual wired outlines.
Construction Note
The petal wire and the stamen wire are prepared differently. Petal wire is enclosed by crochet stitches. Stamen wire carries a pearl at its tip and is covered with pink wool. Join these supports only after their separate finishes are ready.
Thread a Red Pearl onto the Stamen Wire
Insert wire through a red pearl as shown in the first center photograph. The image shows the pearl at the end of a doubled support, with the wire extending below. This produces the small red tip that remains visible above the pink wrapping.
The source does not specify the exact wire allowance or pearl-hole size. Prepare the listed materials so the pearl can be threaded using the photographed method, without replacing it with a crocheted bobble or an unlisted glued seed bead. The pearl is a separate supplied component.
