

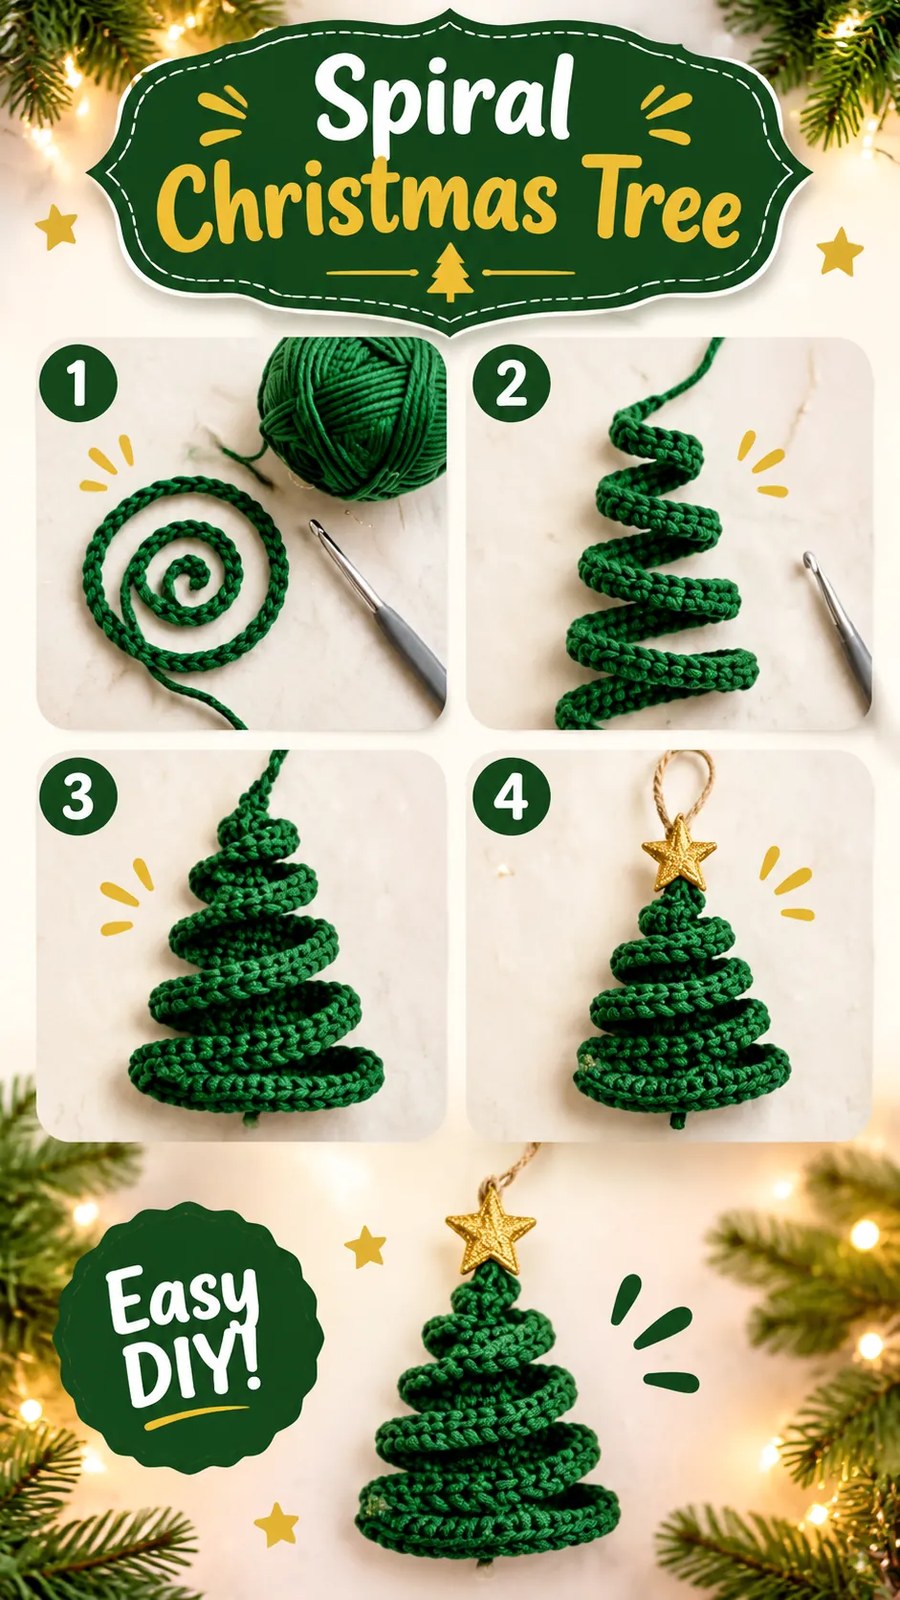
Create a charming handmade decoration for the holiday season with this beautiful crochet spiral Christmas tree! This little yarn tree has a playful, dimensional shape made from a thick crocheted cord arranged in a series of gradually widening and narrowing curves. Its deep forest-green color, textured surface, and simple golden star make it a lovely addition to a Christmas tree, festive mantel, gift wrapping, or handmade holiday display.
This original crochet Christmas tree pattern uses a simple four-stitch crocheted cord that is shaped into a miniature tree silhouette. The technique is approachable for confident beginners and offers a relaxing project for experienced crocheters who enjoy making quick seasonal decorations. You only need a small amount of bulky green yarn, a crochet hook, and a few basic finishing supplies.
The finished ornament can be customized with different yarn colors, decorative stars, hanging loops, and festive embellishments. Make one for your own home or create several to give as thoughtful handmade Christmas gifts.
Key Takeaways
- Project: A dimensional spiral crochet Christmas tree ornament.
- Skill level: Confident beginner, with simple stitches and basic shaping.
- Main technique: Crocheting a narrow four-stitch tube in continuous rounds and arranging it into a tree shape.
- Suggested yarn: Super bulky or bulky forest-green yarn for a thick, textured appearance.
- Finishing: Secure the spiral shape with matching yarn and add a decorative star.
- Customization: Adjust the tree size, change yarn colors, or add a hanging loop.
What Is a Crochet Spiral Christmas Tree?
A crochet spiral Christmas tree is a small decorative project made by crocheting a long, narrow cord and arranging it into a recognizable evergreen tree silhouette. Instead of working a traditional triangular tree from the bottom upward in rows, this design uses a continuous textured strand to create the appearance of stacked branches.
The cord begins as a small spiral and gradually becomes a longer flexible piece. Once the desired length is reached, it is positioned in horizontal tiers. The upper sections are short, while the lower sections become progressively wider. This creates the familiar triangular outline of a Christmas tree.
The overall effect is playful and dimensional. The raised crochet stitches give the cord a soft, rope-like texture, while the curved arrangement creates the appearance of individual branches.
Project Appearance and Decorative Details
The most noticeable feature is the rich green crocheted cord. A dark evergreen or forest-green shade creates a traditional Christmas look, although sage green, emerald, cream, and muted red can also work beautifully.
The tree has several visual elements:
- Rounded crochet cord: A narrow tubular structure gives the decoration its raised, dimensional appearance.
- Curved branch tiers: The cord is arranged in alternating horizontal directions to form a compact tree silhouette.
- Gradually increasing width: Each lower tier extends farther than the tier above it.
- Golden star: A small star at the top creates a traditional festive finishing touch.
- Hanging loop: A small yarn or twine loop allows the finished tree to be displayed as an ornament.
The decoration is suitable for Christmas tree ornaments, handmade gift decorations, festive garlands, seasonal table displays, and small holiday craft projects.
Crochet Construction and Stitch Texture
This original interpretation uses a small crocheted tube worked in continuous rounds. Four single crochet stitches are placed around a tiny center opening, creating a narrow cord that can bend easily without losing its rounded shape.
Unlike a flat crochet strip, a tubular cord has no obvious front or back edge. This makes it especially useful for decorative projects that need to curve in different directions. The rounded surface also helps the finished tree look fuller and more dimensional.
Why Use Four Single Crochet Stitches?
Four single crochet stitches create a compact tube with enough structure to hold its shape while remaining flexible. The small circumference keeps the cord narrow, making it easier to arrange into tight curves at the top of the tree.
Working in continuous rounds also avoids visible joining seams. A stitch marker helps identify the beginning of each round and prevents accidentally adding or losing stitches.
Crochet Insight
The secret to a neat spiral Christmas tree is a consistent cord thickness. Keep four stitches in every round, avoid pulling the yarn too tightly, and arrange the finished cord on a flat surface before securing the branches. This creates smoother curves and more balanced spacing between the tiers.
Recommended Yarn and Hook
Super bulky yarn is a good choice for a thick, noticeable cord. Choose a yarn with enough body to maintain its rounded shape but sufficient flexibility to bend comfortably.
Suggested yarn characteristics include:
- Super bulky or category 6 yarn.
- Acrylic, cotton, wool, or a suitable blend.
- A smooth or lightly textured surface that shows the stitches clearly.
- A rich green shade for a traditional evergreen appearance.
A 6 mm crochet hook is a useful starting point, although the best size depends on the thickness and structure of your yarn. If the cord feels too loose, try a smaller hook. If the stitches are difficult to work, move up one hook size.
The project is approximately beginner-friendly, but crocheting into a very small center opening can require a little patience. Once the first few rounds are complete, the repetitive construction becomes easier.
Free Crochet Pattern: Spiral Christmas Tree Ornament
Pattern description: Crochet a flexible, rounded green cord and arrange it into seven graduated horizontal tiers to create a miniature Christmas tree. The finished decoration is secured at the back and topped with a small star.
Construction clarification: This is an original pattern inspired by the visible spiral-tree design. The recommended yarn, hook, measurements, and stitch counts below are suggested specifications for a practical version of the decoration.
Pattern Overview
| Skill Level | Confident beginner |
| Project Type | Christmas ornament and home decoration |
| Finished Size | Approximately 6.75 inches wide x 5.5 inches tall (17 x 14 cm), excluding hanging loop |
| Yarn | Super bulky, category 6, forest green |
| Yarn Quantity | Approximately 25 to 35 yards (23 to 32 meters) |
| Hook | 6 mm (US J/10) |
| Gauge | Approximately 4.5 tube rounds per inch (2.5 cm) |
| Terminology | US crochet terminology |
| Construction | One continuous crocheted cord, arranged and secured by hand |
Materials and Supplies
- 25 to 35 yards (23 to 32 meters) of super bulky green yarn.
- 6 mm (US J/10) crochet hook.
- Stitch marker.
- Yarn needle with a large eye.
- Sharp scissors.
- Rust-resistant pins or sewing clips for arranging the tree.
- Small gold star embellishment.
- Approximately 8 to 10 inches (20 to 25 cm) of coordinating yarn or decorative cord for a hanging loop.
- Optional matching sewing thread for attaching the star.
Crochet Abbreviations
- ch: Chain
- sc: Single crochet
- sl st: Slip stitch
- st: Stitch
- sts: Stitches
- rnd: Round
- rep: Repeat
- FO: Fasten off
- RS: Right side
All instructions use US crochet terminology. The UK equivalent of US single crochet is double crochet.
Special Stitch and Technique
Four-stitch crochet tube: This small tube is made by crocheting four single crochet stitches around a tiny center opening and continuing in continuous rounds. Each round contains exactly four stitches. The stitch marker identifies the beginning of every round.
Continuous rounds: Work around the tube without joining at the end of each round. Do not make a slip stitch to close the round or a chain to begin the next one.
Tree shaping: The completed cord is positioned in seven horizontal tiers, with each lower tier extending farther outward than the previous one. Short diagonal connections link the tiers.
Before You Begin
- Keep the four-stitch tube relatively firm but flexible.
- Place a stitch marker in the first stitch of every round.
- Move the marker upward as each round is completed.
- Do not join the rounds.
- Keep the yarn tension consistent throughout the cord.
- Count the rounds carefully because the tier arrangement uses specific cord sections.
Turning chains: No turning chains are needed because the cord is worked continuously in rounds. Slip stitches are not used to join the rounds and do not count as stitches.
Part 1: Crochet the Green Spiral Cord
Use forest-green yarn and the recommended crochet hook. The cord is made in continuous rounds, creating a narrow tubular strand.
- Foundation: Ch 2.
- Round 1: Work 4 sc into the second ch from the hook. Place a stitch marker in the first sc. (4 sts)
- Rounds 2 to 10: Work 1 sc in each of the 4 sts around. Move the marker to the first stitch of each new round. (4 sts per round)
- Rounds 11 to 20: Continue working 1 sc in each stitch around. Keep the tube compact and check that it remains flexible. (4 sts per round)
- Rounds 21 to 50: Continue with 1 sc in each of the 4 stitches around. (4 sts per round)
- Rounds 51 to 100: Repeat the same four-stitch round, maintaining even tension. (4 sts per round)
- Rounds 101 to 150: Continue working 1 sc in each stitch around until round 150 is complete. (4 sts per round)
You should now have one long crocheted tube measuring approximately 33 inches (84 cm) when worked at the suggested round gauge.
Fastening off: After round 150, work a sl st into the next stitch only if needed to smooth the finishing edge. This slip stitch is not an additional round. Cut the yarn, leaving a tail of approximately 10 inches (25 cm). Pull the yarn through the final loop and tighten gently.
Thread the tail through the yarn needle. Close the small opening at the end with a few neat stitches if necessary. Keep the cord flexible and avoid pulling the tail so tightly that the end becomes bulky.
Pro Tip: Measure the cord as you work. The suggested gauge is approximately 4.5 rounds per inch, but yarn thickness and tension can change the finished length. The most important detail is maintaining the planned overall cord length and consistent thickness.
Part 2: Arrange the Seven Christmas Tree Tiers
Lay the finished cord on a flat surface. Arrange it into a compact tree shape, beginning with the shortest upper tier and gradually increasing the width toward the bottom.
For the following layout, use the round counts below as approximate sections of the finished cord. The small connecting sections create the diagonal movement between tiers.
| Section | Cord Rounds | Approximate Width |
|---|---|---|
| Tier 1 | 6 rounds | 1.3 inches (3.3 cm) |
| Tier 2 | 10 rounds | 2.2 inches (5.6 cm) |
| Tier 3 | 14 rounds | 3.1 inches (7.9 cm) |
| Tier 4 | 18 rounds | 4 inches (10.2 cm) |
| Tier 5 | 22 rounds | 4.9 inches (12.4 cm) |
| Tier 6 | 26 rounds | 5.8 inches (14.7 cm) |
| Tier 7 | 30 rounds | 6.7 inches (17 cm) |
Use the following placement instructions:
- Position the first short section near the top center of the tree.
- Curve the cord gently from left to right to create the first small branch tier.
- Use the next section to form a wider tier, traveling from right to left.
- Arrange the third section from left to right, extending the ends slightly farther outward.
- Continue alternating directions as the remaining sections become wider.
- Place the longest section at the bottom to create the broad base.
- Use the short transitions between sections to connect the tiers with gentle diagonal curves.
Pin each tier temporarily while arranging the tree. The cord should form a balanced triangular outline with small spaces between the branches.
Part 3: Secure the Tree Shape
Once the cord is positioned correctly, use the matching yarn tail or a separate length of green yarn to secure the branches.
- Thread a yarn needle with approximately 24 inches (61 cm) of green yarn.
- Starting at the back of the tree, sew through the touching sections of cord.
- Make small, discreet stitches at the center of each tier.
- Secure the diagonal connections between neighboring tiers.
- Check that the tree remains flat and that the branches are evenly spaced.
- Make additional small securing stitches wherever a curved section tends to lift.
- Fasten off securely on the back of the decoration.
Do not sew through the entire visible front surface. Keep the securing stitches hidden between the cord sections whenever possible.
