

/23291923286/STITCHDELIGHT_NOVO/STITCHDELIGHT_NOVO_CONTENT01
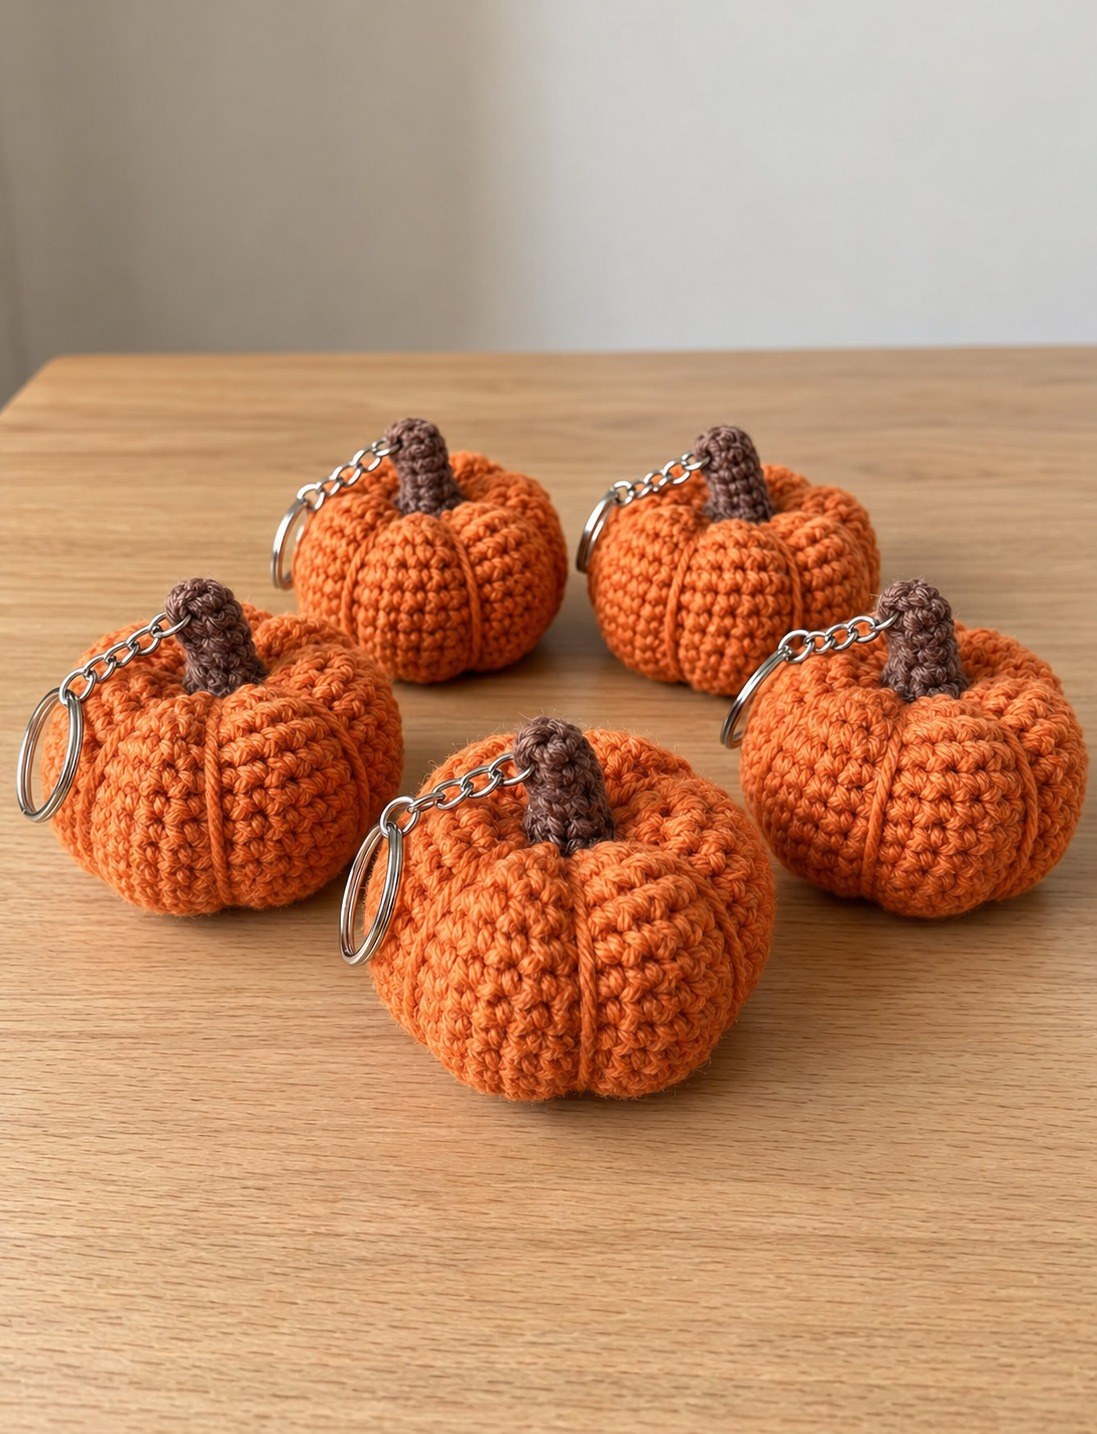
The Crochet Pumpkin Keychain Amigurumi Pattern is a delightful handmade project that combines the charm of autumn decorations with the creativity of crochet. These adorable miniature pumpkins are perfect for decorating handbags, personalizing backpacks, adding a seasonal touch to keys, or creating thoughtful handmade gifts. With their rounded shapes, beautifully defined ridges, and little brown stems, these crochet pumpkins capture the cozy atmosphere of fall in a small and practical accessory. Whether you are preparing for Halloween, celebrating Thanksgiving, or simply enjoying seasonal crafts, this crochet pumpkin keychain offers a wonderful opportunity to create something unique. The pattern uses basic crochet stitches, making it approachable for beginners who want to explore the world of amigurumi crochet. Even experienced crocheters will appreciate how quickly these tiny pumpkins come together and how easily they can be customized with different colors and yarn textures.
One of the most appealing features of this Crochet Pumpkin Keychain Amigurumi Pattern is its compact size and attractive three-dimensional appearance. Unlike flat crochet appliqués, these miniature pumpkins are carefully stuffed and shaped to create a realistic pumpkin silhouette. The decorative grooves are formed by wrapping yarn around the finished body, giving each pumpkin the recognizable sections found on real pumpkins. A small crocheted brown stem completes the design, while a metal keychain ring transforms the decorative piece into a functional accessory. This combination of simple construction and thoughtful finishing details makes the project particularly satisfying. You can create several pumpkins using only small amounts of yarn, making it an excellent choice for using leftover materials from previous crochet projects. The finished pieces can also become lovely seasonal decorations for craft displays, gift packages, or handmade accessory collections.
Advertising
Creating your own mini crochet pumpkin amigurumi is also a relaxing way to practice essential crochet techniques while developing confidence with three-dimensional patterns. Throughout this tutorial, you will learn how to work in continuous rounds, increase and decrease stitches, add stuffing, create decorative pumpkin ridges, crochet a small stem, and securely attach keychain hardware. The instructions use US crochet terminology, with clear stitch abbreviations and round-by-round explanations to help beginners follow the process. Although the finished pumpkin looks detailed, its construction relies primarily on single crochet stitches and basic shaping techniques. You can complete the project in a traditional orange shade or experiment with cream, sage green, mustard yellow, and other autumn-inspired colors. By the end of this tutorial, you will have the knowledge needed to make a charming handmade crochet pumpkin keychain that is both decorative and practical.

Materials and Essential Crochet Techniques for a Pumpkin Keychain
THE BEST CROCHET PATTERNS
➔
1. Choosing the right yarn for your crochet pumpkin. The best starting point for this Crochet Pumpkin Keychain Amigurumi Pattern is a smooth cotton or cotton-blend yarn in a lightweight category. Cotton helps the pumpkin maintain its rounded shape while making individual stitches easier to see. For a pumpkin similar to the example, choose orange yarn for the body and dark brown yarn for the stem. A small amount of matching orange yarn will also be needed to create the decorative ridges. If you prefer a softer appearance, acrylic yarn can work well, although the final texture may be slightly different. Because this is a miniature project, small leftover yarn balls are usually sufficient. Consistent yarn thickness is especially important when creating several matching keychains.
2. Selecting your crochet hook and additional supplies. A 2.5 mm crochet hook is a suitable starting point for many lightweight cotton yarns, although you may need to adjust the size according to your yarn and tension. The stitches should be tight enough to prevent stuffing from showing through the fabric. You will also need polyester fiberfill, a yarn needle, scissors, a stitch marker, and a metal keychain ring with a short chain. A locking stitch marker is particularly helpful because the pumpkin body is worked in continuous spiral rounds rather than joined rounds. Keep a measuring tape nearby if you want to make several pumpkins with consistent dimensions. The finished size will depend on your yarn weight, hook size, and personal tension.
3. Understanding the crochet abbreviations used in this pattern. Before beginning your easy crochet pumpkin pattern, become familiar with the following US crochet terms. MR means magic ring, ch means chain, sc means single crochet, inc means increase by working two single crochet stitches into the same stitch, dec means invisible decrease, sl st means slip stitch, st means stitch, and FO means fasten off. The abbreviation BLO means back loop only, although it is not required for the main pumpkin body. Instructions written between asterisks indicate a repeated sequence. For example, sc 2, inc means to work one single crochet in each of the next two stitches, followed by an increase. Understanding these abbreviations will make the written pattern much easier to follow.
4. Preparing to crochet in continuous rounds. The pumpkin body begins with a magic ring, which allows the center opening to be pulled tightly closed. This technique is widely used in amigurumi because it creates a neat starting point without leaving a visible hole. After making the magic ring, crochet the specified number of single crochet stitches into its center and gently pull the yarn tail to close the opening. Instead of joining each round with a slip stitch, continue crocheting directly into the next round. Place a stitch marker in the first stitch of every round so you can track your progress accurately. Maintaining even tension is important because uneven stitches can affect the finished pumpkin’s shape and appearance.
Advertising
5. Learning how increases and decreases create the pumpkin shape. The rounded body of this amigurumi pumpkin keychain is formed through a combination of increases, straight rounds, and decreases. Increases gradually expand the crochet fabric, creating the wider middle section of the pumpkin. Straight rounds maintain the circumference and add height, while decreases bring the stitches together to close the shape. For a polished finish, use invisible decreases by inserting your hook through the front loops of the next two stitches, pulling up a loop, and completing a single crochet. This technique helps minimize visible gaps. Carefully counting stitches after each round will prevent accidental changes in the pumpkin’s proportions.
6. Planning the finished size and appearance. With lightweight cotton yarn and a 2.5 mm hook, this mini pumpkin crochet pattern may produce a pumpkin approximately 5–6 cm wide, excluding the keychain hardware. Your finished dimensions may vary. The example features a bright orange body, a short brown stem, and several pronounced vertical ridges. For a similar appearance, aim for a slightly flattened spherical shape rather than a perfectly round ball. The stuffing should be firm enough to support the structure but not so tight that the stitches stretch apart. Once the basic construction is complete, the decorative ridges will transform the simple stuffed body into a recognizable miniature pumpkin.
Step-by-Step Crochet Pumpkin Keychain Amigurumi Pattern
1. Begin the pumpkin body with a magic ring. Using orange yarn and your selected crochet hook, start the Crochet Pumpkin Keychain Amigurumi Pattern by creating a magic ring. Work the following rounds in continuous spirals, placing a stitch marker at the beginning of each round. These first rounds create the bottom portion of the pumpkin and gradually increase its diameter.
- Round 1: 6 sc into MR. (6 sts)
- Round 2: Inc in each st around. (12 sts)
- Round 3: Sc 1, inc repeat 6 times. (18 sts)
- Round 4: Sc 2, inc repeat 6 times. (24 sts)
- Round 5: Sc 3, inc repeat 6 times. (30 sts)
- Round 6: Sc 4, inc repeat 6 times. (36 sts)
- Round 7: Sc 5, inc repeat 6 times. (42 sts)
At this stage, your crochet piece should resemble a small circular bowl. The gradual increases provide a smooth foundation for the pumpkin’s rounded body.
2. Crochet the middle section of the pumpkin. After completing the increase rounds, continue working without adding or removing stitches. This creates the central portion of the pumpkin and gives it enough height to develop its characteristic shape.
– Rounds 8–13: Sc in each st around. (42 sts per round)
Continue maintaining consistent tension throughout these rounds. The fabric should begin curving upward naturally, forming a small cup-like structure. Avoid pulling your stitches too tightly, as this can make the pumpkin difficult to stuff and shape later. If you are using cotton yarn, gently adjust the fabric with your fingers as you work. These straight rounds are essential for creating a compact but full-bodied crochet pumpkin amigurumi.
3. Shape the upper portion with decreases. Once the middle section is complete, begin reducing the stitch count to form the top of the pumpkin. Work carefully and use invisible decreases whenever possible to keep the surface neat.
- Round 14: Sc 5, dec repeat 6 times. (36 sts)
- Round 15: Sc 4, dec repeat 6 times. (30 sts)
- Round 16: Sc 3, dec repeat 6 times. (24 sts)
- Round 17: Sc 2, dec repeat 6 times. (18 sts)
Pause after Round 17 and begin adding polyester fiberfill. Distribute the stuffing evenly, paying attention to the outer edges so the pumpkin maintains a balanced appearance. Avoid overstuffing because the body still needs enough flexibility for the decorative shaping process.
4. Finish stuffing and close the pumpkin body. Continue working the final decrease rounds while adjusting the stuffing as necessary. A properly filled pumpkin should feel softly firm, with no large empty areas inside.
- Round 18: Sc 1, dec repeat 6 times. (12 sts)
- Round 19: Dec around. (6 sts)
Fasten off, leaving a long orange yarn tail approximately 60–80 cm long for shaping the pumpkin. Thread the tail through a yarn needle and pass it through the front loops of the remaining six stitches. Pull gently to close the opening. Do not cut the tail yet because it will be used to create the pumpkin’s decorative sections. At this stage, the piece will look like a small stuffed ball, which is exactly what you need before shaping it into a pumpkin.
5. Create the characteristic pumpkin ridges. The vertical grooves are one of the most important details in this Crochet Pumpkin Keychain Amigurumi Pattern. Using the long orange yarn tail, insert your yarn needle through the center of the pumpkin from top to bottom. Bring the yarn around the outside of the body and pass the needle through the center again. Pull gently to create a visible indentation along the surface. Repeat this process around the pumpkin, dividing it into approximately six evenly spaced sections. Each wrap should follow a vertical path from the top center to the bottom center. Adjust the tension until the grooves are defined without excessively compressing the stuffing. Secure the yarn inside the pumpkin after the final section is complete.
6. Crochet the brown pumpkin stem. Switch to brown yarn to create the small stem that sits on top of the pumpkin. The stem is worked as a narrow tube using single crochet stitches.
- Round 1: 6 sc into MR. (6 sts)
- Rounds 2–5: Sc in each st around. (6 sts per round)
- Round 6: Inc in each st around. (12 sts)
Fasten off, leaving a long tail for sewing. The final increase round creates a slightly wider base that can sit neatly against the pumpkin. You do not need to stuff the stem heavily; a small amount of fiberfill or the remaining yarn tails can help maintain its shape. Position the stem over the top center of the pumpkin and sew the widened base securely to the body using a yarn needle. Make sure the stitches are hidden as much as possible for a clean, professional finish.
How to Assemble, Shape, and Customize Your Crochet Pumpkin Keychain
1. Position the stem for a balanced appearance. Once the pumpkin body and stem are complete, examine the overall shape before attaching the metal hardware. The stem should sit directly above the center where the decorative ridges meet. If the pumpkin appears uneven, gently massage the stuffing through the crocheted fabric and adjust the grooves with your fingers. This small finishing step can make a noticeable difference in the appearance of your handmade pumpkin keychain. The stem should stand upright or lean very slightly to one side for a natural look. Sew around the entire base of the stem so it remains stable during regular use. Secure the yarn tail with several hidden stitches before weaving it into the pumpkin body.
2. Attach the metal keychain ring securely. To transform your miniature pumpkin into a functional crochet keychain, use a metal split ring and a short connecting chain. Position the chain beside the base of the brown stem, where it will be supported by the surrounding crochet fabric. Thread a strong sewing needle with durable matching thread or doubled cotton yarn and sew the final chain link securely through several stitches at the stem base and upper pumpkin body. Make multiple passes to distribute the tension rather than attaching the hardware through a single crochet stitch. Tie a secure knot and hide the thread ends inside the pumpkin. Gently test the attachment by pulling on the ring. A reinforced connection is especially important if the keychain will be carried daily.
3. Adjust the pumpkin shape for a more realistic finish. A well-shaped crochet pumpkin amigurumi should have a slightly flattened top and bottom with rounded sections around its circumference. If your pumpkin looks too spherical, carefully press the top and bottom inward while holding the sides. You can also use a separate length of orange yarn to add a subtle center indentation by passing it through the body vertically and securing it discreetly. Avoid pulling too tightly, as excessive tension can distort the stitches or create deep gaps between sections. The goal is to produce a soft, natural pumpkin silhouette. Taking a few minutes to refine the shape will help your finished accessory resemble the textured pumpkins shown in the reference image.
4. Experiment with different autumn color combinations. Although orange is the traditional choice for this Crochet Pumpkin Keychain Amigurumi Pattern, many other colors can create beautiful results. Cream-colored pumpkins offer a soft farmhouse-inspired appearance, while sage green creates a modern autumn aesthetic. Mustard yellow, terracotta, dusty pink, and warm beige are also attractive options. You can keep the brown stem consistent across all variations or use dark green yarn for a slightly different botanical effect. For a coordinated handmade collection, choose three or four complementary shades and crochet several pumpkins in the same size. These color variations are especially charming when displayed together on a craft table or attached to matching handbags.
